background image

User Guide

EchoStar Digital Terrestrial Receiver

 Terrestrial User Interface

ECHOSTAR HELP DESK

After you have consulted the 
troubleshooting guide which is part 
of this user guide, you can call the 
EchoStar Digital Terrestrial UK Help 
Desk on 0870 080 2310.

Calls are charged at UK national rates.

Summary of Contents for T-105

Page 1: ...er Terrestrial User Interface ECHOSTAR HELP DESK After you have consulted the troubleshooting guide which is part of this user guide you can call the EchoStar Digital Terrestrial UK Help Desk on 0870 080 2310 Calls are charged at UK national rates ...

Page 2: ...ed Smartcard which are approved by the service provider of the encrypted program you want to receive Only this will enable the receiver to work properly Anomalies can occur when an unapproved CI module and or Smartcard is used EchoStar can not and will not accept any responsibility for the performance of such CI modules and or smartcards If you use an unapproved CI module and or Smartcard EchoStar...

Page 3: ...you start any maintenance or installation procedures Do not use alcohol or ammonia based liquids to clean the receiver If required clean with a soft lint free cloth slightly made damp with a mild soap solution Consult an authorized service technician if the receiver does not operate normally when the instructions in this user guide are strictly followed Do not to attempt to open the receiver as yo...

Page 4: ...t to increase the amount of reusable materials and to minimise the amount of materials to be disposed of Please inform yourself on local regulations on disposal of your equipment ENVIRONMENTAL REMARK Dispose the packaging in an environmental safe manner Please inform yourself on local regulations with respect to the disposal of reusable materials ENVIRONMENTAL REMARK Dispose used batteries in an e...

Page 5: ...N 3 5 AERIAL MYTHS 4 6 CLEANING 4 GETTING STARTED 1 UNPACKING 1 1 2 INSTALL YOUR RECEIVER 1 1 3 MENU STRUCTURE 1 2 DESCRIPTION AND OPERATION 1 ELECTRONIC PROGRAM GUIDE GUIDE 2 1 2 TIMERS 2 2 3 INSTALLATION MAINTENANCE 2 3 4 THE MAIN MENU STRUCTURE 2 4 TROUBLESHOOTING 1 GENERAL 3 1 2 REMOTE CONTROL UNIT RCU RELATED 3 1 3 GUIDE RELATED 3 1 4 SMARTCARD RELATED 3 1 5 TV AND RADIO RELATED 3 2 6 TIMER R...

Page 6: ... 2004 EchoStar International Corporation All rights reserved Page VI EchoStar International Corporation ...

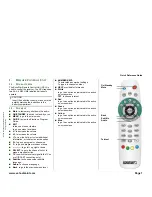
Page 7: ...am or channel down to go left up right or down SELECT to go to the channel list or to make a menu selection TV to switch the receiver signal to the TV on or off SCART connection only Subtitle to choose another subtitle language Audio to choose a language Back to go to the previous menu level CAUTION Insert the batteries correctly make sure the polarity matches the instruction in the battery compar...

Page 8: ...ge indicator shows that there is sufficient signal received The red indicator shows that the receiver is in standby The green indicator shows that the receiver is set to on ANT IN IEC to connect a terrestrial aerial analogue and digital broadcasts TV OUT IEC to connect a VCR or TV analogue only RS 232 sub D for the connection to the serial communication port of a PC Black S PDIF RCA to connect to ...

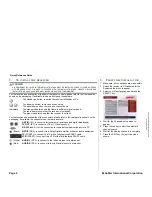
Page 9: ...he channel information bar to show the channel number and name The service information bar to show that additional services are available These icons show only if the service is available the icon to show that the channel is encrypted Scrambled the icon to show that more Subtitle languages are available the icon to show that teletext is available the icons to show that additional audio selections ...

Page 10: ...der delivers enough signal level and quality to your area if the indoor or outdoor aerial is healthy aerial is clean in good condition and correctly aimed if the connection between the aerial and TV set is healthy good quality cable 75 ohm no sharp bends or kinks metal connectors You can in certain situations improve the digital TV and Radio reception if you use an outdoor aerial which is not obst...

Page 11: ...HE PLASTIC PACKAGING FROM CHILDREN THE PLASTIC PACKAGING MAY CLING TO NOSE AND MOUTH AND PREVENT BREATHING 2 INSTALL YOUR RECEIVER 2 1 PROGRAM THE RECEIVER This section assumes that the aerial installation is completed and operational and your receiver is connected to your TV 1 Make sure all connections are made safely 2 Switch the receiver to ON and wait for the System setup menu to appear 3 Sele...

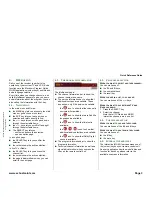
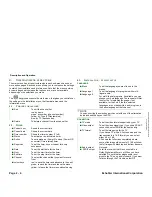
Page 12: ...annel To define the channel that shows at power up Software upgrade To start the Software upgrade procedure System info To show the receiver and company information Mediaguard To show the Mediaguard related information Factory reset To delete all personal settings and replace them with the factory defaults Antenna setup To select a passive Off or active aerial On Channel setup To scan for channels...

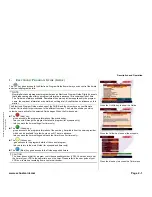
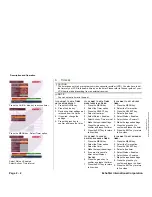
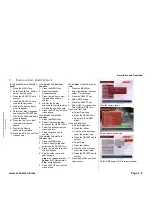
Page 13: ... available for a few hours up until 7 days in advance lets you save the timer settings and leave the timer menu for timer only The Yellow key gives access to the program details of the current program lets you return to the main Guide for synopsis and timer only The Blue key gives access to the Guide supported timers NOTE Most digital channels broadcast program data as an Electronic Program Guide ...

Page 14: ...key 4 Select a free timer 5 Select Status Enabled 6 Select Action Time interval 7 Make the required settings 8 Press the green key to confirm and leave the timer 9 Press the EXIT key to return to live video IF YOU WANT TO LOOK UP DELETE OR CHANGE A TIMER 1 Press the MENU key 2 Select the Timer option 3 Select the timer 4 Make the required settings 5 If you want to cancel a timer select Status Disa...

Page 15: ... Select Channel organizer and press the SELECT key 3 Select the channel that you want to delete 4 Press the green key to confirm IF YOU WANT TO SORT THE CHANNEL LIST 1 Press the MENU key 2 Select Channel organizer and press the SELECT key 3 Press the red key to reveal the sort options 4 Use the colour keys sort red by name green by channel number yellow by FTA scrambled blue by transponder 5 Press...

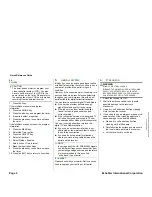
Page 16: ...the channel that you want to record from colour keys red to save the timer and advance to the next green to save the timer and leave the menu yellow to leave the timer menu without saving 4 3 INSTALLATION SYSTEM SETUP LANGUAGE CONNECTION Menu To set the language you want to use in the menus Language 1 To set the language for programs with multi lingual audio For multi lingual programs if available...

Page 17: ...fined channel To define the channel that shows at power up SOFTWARE UPGRADE SYSTEM INFO MEDIAGUARD FACTORY RESET Upgrade red to start the OTA software upgrade procedure If a new software version is found the receiver starts to download the new software version in temporary memory When the download is complete the new software version is written to the receiver memory where it deletes the previous ...

Page 18: ...ilable in the selected frequency red to start the search for channels TV Radio To show the number of found channels Menu To lock unlock the menu for unauthorized users Change PIN To let you change the PIN code for the receiver not for the smartcard PIN code Old New Verify To type in the factory default 0000 or your personal PIN code System info To show the smartcard reader information Maturity lev...

Page 19: ...U extender Batteries are almost empty Insert new batteries 3 GUIDE RELATED 4 SMARTCARD RELATED Problem Possible cause What to do 1 The Guide is empty The selected program supports no Guide There is no solution for this the data is supplied by the service provider and beyond our control The local time is not correct Press the menu key Select Installation System setup Time setting to set the correct...

Page 20: ... once The volume is set to minimum On the RCU press the V key 4 There is no Dolby Digital AC 3 sound to my other equipment The equipment is connected to the receiver with a RCA or SCART cable only Connect the S PDIF connector of the receiver to the Dolby Digital input of the Dolby Digital amplifier The Dolby Digital option is not set to On Press the menu key Select Installation System setup connec...

Page 21: ...TED Problem Possible cause What to do 1 My television does not receive any signal from the receiver You did not use a correct SCART cable Use only a full featured SCART cable that is correctly shielded 2 My television gets analogue signals only from the receiver You have connected the receiver TV OUT Analog connection to the TV with a UHF cable Connect the receiver TV connection with a fully featu...

Page 22: ...Troubleshooting Page 3 4 EchoStar International Corporation 2004 EchoStar International Corporation All rights reserved ...

Page 23: ... QAM64 means 64 state Quadrature Amplitude Modulation CVBS Composite video is a combination of the three basic elements of a video picture colour brightness and synchronization into a single cable with two wires in it as used in SCART and RCA Video connections Digital Terrestrial TV Digital Terrestrial Television or DTT is basically a digital TV signal received through a conventional indoor or out...

Page 24: ...CART cable A SCART cable is also known as Peritel cable and is commonly used in Europe to connect the audio and video equipment A fully furnished SCART cable has 21 wires which is at both sides finished with a 21 pin connector SVHS SVHS means Super VHS and is superior to a CVBS signal but less then a RGB signal Normally it is a single cable consisting of four wires because the black white luminanc...

Page 25: ...press the EXIT key to confirm 8 Select Channels setup and press the SELECT key 9 Press the red key to start the automatic channel search 10 Wait for the Search channels to complete 11 Press the EXIT key until live video shows 12 Press the SELECT key to access the channel list If there are no channels found Make sure the aerial is aimed in the correct direction 1 Troubleshoot you aerial and cabling...

Page 26: ...n Volume Control Audio Mute Weight 1 900g Size 36cm x 23cm x 4 5cm WxDxH Low Power Consumption 10W 7W in Stand by Parental Control Channel Lock MHEG5 MPEG2 and DVB T Compliant AMBIENT CONDITIONS Storage temperature between 40 and 50 degrees Celsius no condensation allowed Operation temperature between 5 and 45 degrees Celsius no condensation allowed TUNER DEMODULATOR CONNECTIONS Receiving Frequenc...

Page 27: ...Notes Appendix 1 www echostar int com Page A1 3 2004 EchoStar International Corporation All rights reserved ...

Page 28: ...Appendix 1 Notes Page A1 4 EchoStar International Corporation 2004 EchoStar International Corporation All rights reserved ...

Reviews: