

eDrawer 4048 Hardware Quick Guide
6.
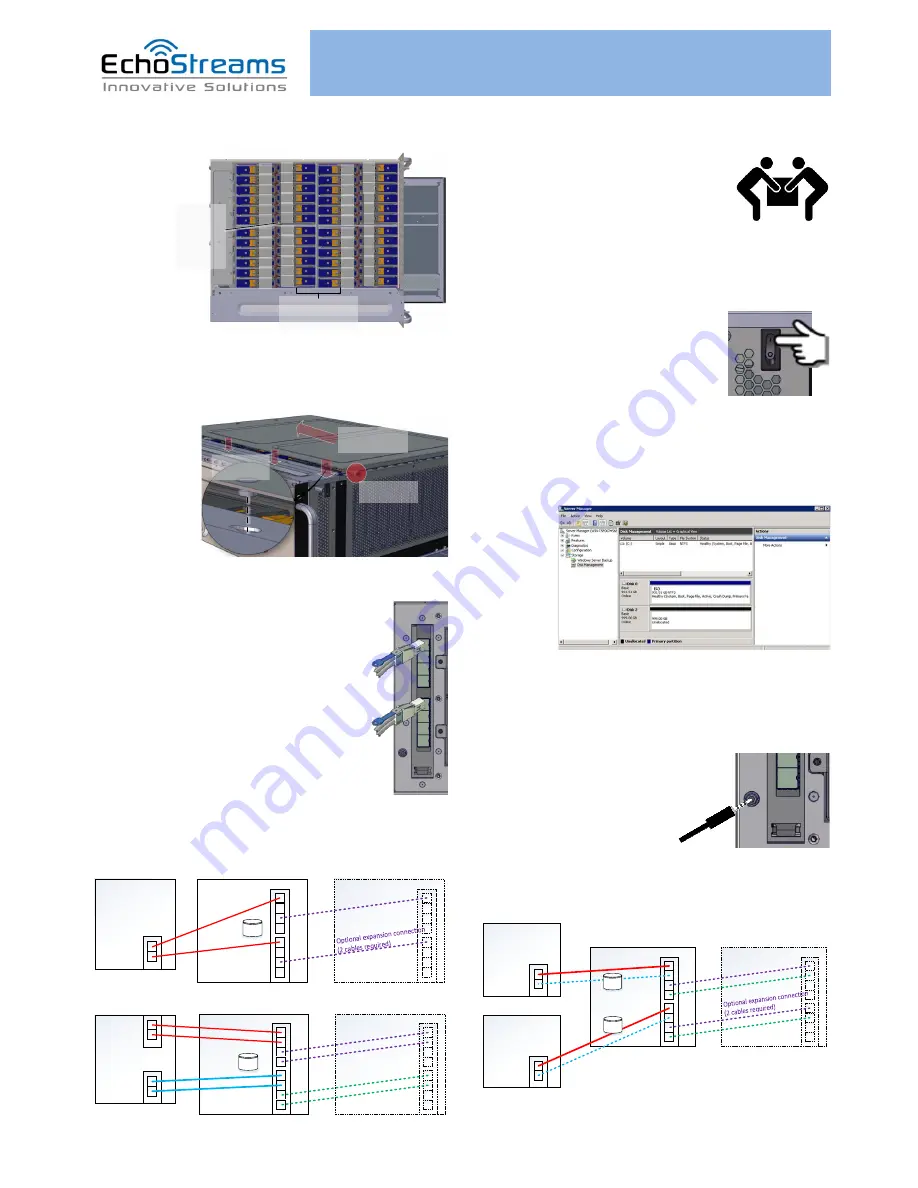
Drive Mapping
of the system is as follows:
1
2
3
4
5
6
7
8
9
10
11
12
13
14
15
16
17
18
19
20
21
22
23
24
25
26
27
28
29
30
31
32
33
34
35
36
37
38
39
40
41
42
43
44
45
46
47
48
HD
D
1~
12
HD
D
13
~24
HD
D
25
~36
HD
D
37
~48
Look for any
Red LED
from the
trays to
locate failed
drives
Note the orientation
of the drive trays
changes every row
7.
Close the Top Cover
and the front door. Please
position the top cover at the described location before sliding
it close.
1. Align guide
pin to the hole
2. Slide the cover
backwards
3. Secure the
thumbscrews
Caution:
Slide top cover on lightly so HDDs won’t be shocked
8.
Connect mini-SAS HD cable
(SFF-8644)
to the desired mini-SAS HD ports.
For a host to be able to see all 48 drives, a
minimum of two mini-SAS HD cables is
required. Connect those two cables to
Expander-A’s Primary Host Port and to Expander-
B’s Primary Host Port (see picture).
Connect the cables on the host side
accordingly.
See the next step for optional connections using
the other mini-SAS HD ports.
9.
Review your hardware setup.
It should be a
variation of the diagrams below:
10.
Place the unit to the rack.
Please refer to Rail Kit
Installation Guide on how to mount the
enclosure.
Caution:
At least two people are required to
lift a fully populated chassis
11.
Plug in the Power Cords
to the AC receptacles on
the back of the unit.
12.
Press the Power Switch
on
the front of the unit and wait about 30
seconds until the unit is ready.
Once it’s ready, power up your host unit.
13.
Access the disks on the Host
.
This example
assumes Windows OS is used for the host. Go to “Disk
Management” to see the disks. If the host is using SAS RAID
adapter, use the RAID Management Software to manage the
disks.
14.
Access the Serial Console
(when necessary) by
connecting a serial audio cable to the debug console port and
use a terminal console with baud rate 38400, 8, N, 1, N.
Once there, type “help –a” for the list of commands.
EXP
GRP-1
Host
Exp
1
2
1
2
Host
Exp
1
2
1
2
EXP
GRP-2
Debug
Console
Exp
1
2
Debug
Console
Your eDrawer 4048 Enclosure
Host
eDrawer 4048 Expansion
Unit (optional)
Required
Required
SAS card
Option 1: Default configuration with optional expansion
x48
Your eDrawer 4048 Enclosure
Host
eDrawer 4048 Expansion
Unit (optional)
SAS card
Second
SAS card
Option 2: Optimized Bandwidth configuration with optional expansion
x48
Your eDrawer 4048 Enclosure
Host
Second Host
eDrawer 4048 Expansion
Unit (optional)
SAS card
Second cables are required when
Secondary connection to the host is
present
Option 3: Shared storage configuration (24 drives for each host)
with optional Optimized Bandwidth configuration and expansion
x24
x24
Optional for
bandwidth increase
SAS card
Pri
Sec
Pri
Sec
Pri
Sec
Pri
Sec
If you have any technical questions, please contact your authorized dealer before contacting us.
For more information please visit our website at
www.echostreams.com


