background image

Installation and Startup of Combi Gateway

40

Version 1.6   04. November 2016

6.7

Checklist for the putting into service

Page 1/3

Store: _____________________________

Location _____________________________

Postcode

_______________________________

Street _____________________________

Telephone

_______________________________

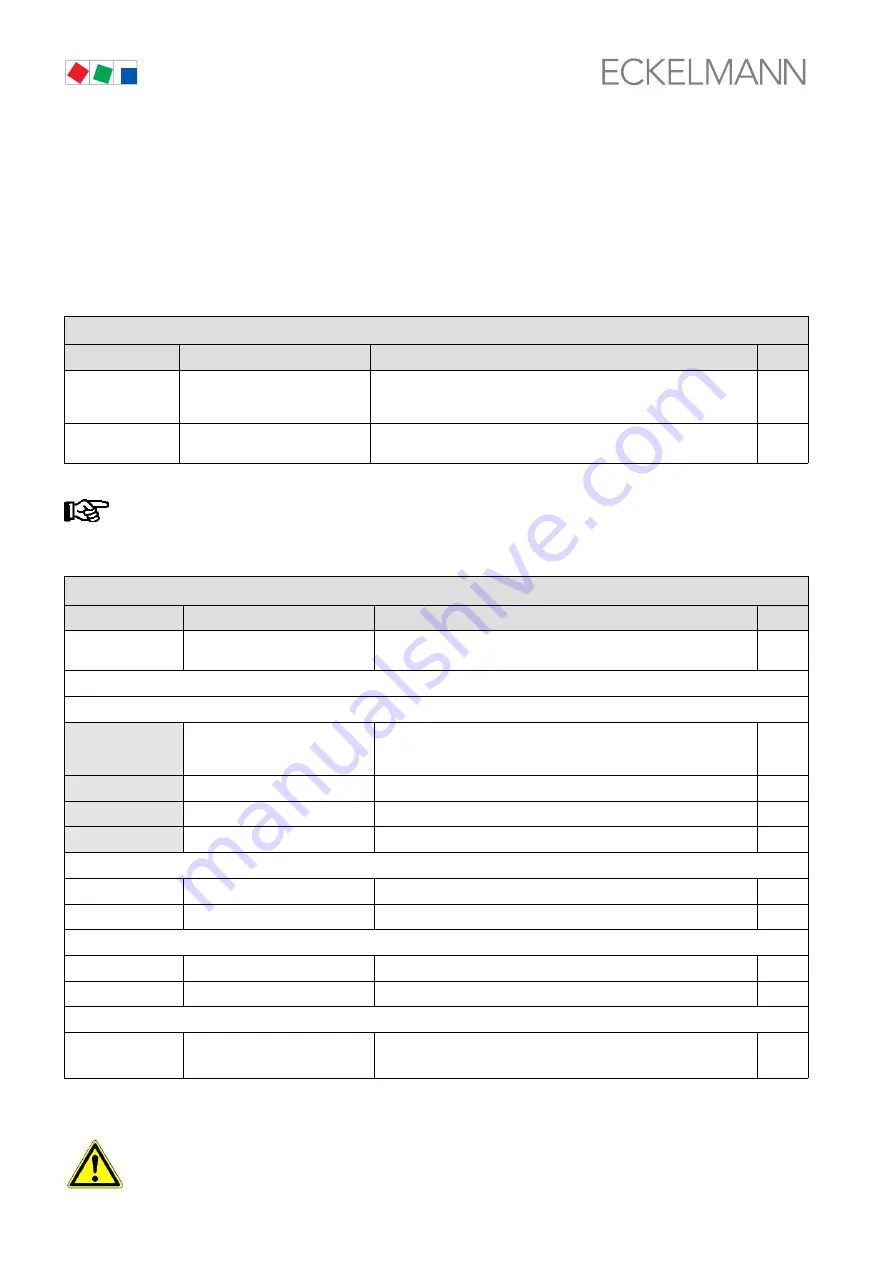
1. E*LDS System - CAN bus connections

Module

Measure / test

Note / settings

Status

CAN-Bus at
store computer

CAN bus termination (terminating 
resistor 100 Ohm) checked?

For information about the CAN bus, see the operating manual 
”Basics and general safety and connection instructions”, see
https://edp.eckelmann.de/edp/lds/_0sErd44C8T

CAN-Bus at 
Combi Gateway

Correct CAN bus-termination, 
see chapter 6.2?

Check DIP switch CAN Term 1 resp. CAN Term 2

The following three pages must be completely filled in to backup all settings of the Combi Gateway.
All required parameters (here the factory settings) must be checked on the web-based configuration
interface (see chapter 6.6) and documented here.

2. Combi Gateway

Module

Measure / test

Note / settings

Status

Status LEDs

Status LEDs checked?

7-segment display cycles ->
connection to the store computer is present

Global Settings

Net work

Hostname 

1)

Hostname configured? 
(called „Compter name“  
in the field mask)

Combi-Gateway

IP address  

1)

Configured?

192.168.161.66

Subnet mask 

1)

Configured?

255.255.255.0

Default gateway 

1)

Configured?

192.168.161.1

COM Port Server

TCP port

Configured?

1041

Baud rate

Configured?

38400

Language and time

Language

Configured?

Deutsch (German)

Time zone

Configured?

UTC+01:00 - Europe/Berlin

Security

Access details

Modification of the access details

User name:: 

webadmin

Password: FanTubo3

New: _____________________

1)

 For the configuration file required settings, see chapter 6.5.1.1.

Unauthorized access protection! 

The new password should be kept securely against access by

unauthorised persons!

Summary of Contents for Combi

Page 1: ...Version 1 6 04 November 2016 Operating instruction Combi Gateway Version V1 57 ...

Page 2: ...n such as data sheets more detailed documentation and FAQs are available for you on line in E EDP Eckelmann Electronic Documentation Platform at www eckelmann de elds You reach all relevant documents for this component directly using the QR code Information on safety and connection instructions are described in detail in chapter 1 Industrial safety notes All rights to any use whatever utilisation ...

Page 3: ...sign of Combi Gateway 7 2 1 Introduction 7 2 2 Combi Gateway design 8 3 Application Combi Gateway 9 3 1 Application of the E LDS Combi Gateway 9 3 2 New features compared to previous versions 10 3 2 1 Version dependent functions and access data 11 4 Function of Combi Gateway 13 4 1 Physical Interfaces 13 4 1 1 Power supply 13 4 1 2 CAN bus interface 13 4 1 3 LAN interface 13 4 1 4 USB interface 13...

Page 4: ... 5 Network connection LAN 25 6 5 1 Network settings using a configuration file recommended 26 6 5 1 1 Structure of the configuration file 27 6 5 1 2 IP configuration 28 6 5 2 Correction of an incorrect configuration 28 6 6 Web based configuration interface 29 6 6 1 Global settings 31 6 6 1 1 Network settings 31 6 6 1 2 Language and time 32 6 6 1 3 System 33 6 6 2 LAN Gateway 35 6 6 3 XML Gateway 3...

Page 5: ... CAN bus 44 7 1 3 RJ45 interface CAN2 High speed connection to the CAN bus 45 7 1 4 RJ45 interface RS232 45 7 1 5 RJ45 interface LAN Ethernet 46 7 1 6 USB interface 46 8 Decommissioning and disposal 47 8 1 Decommissioning Demounting 47 8 2 Disposal 47 9 Specifications of Combi Gateway 49 9 1 Electrical data 49 9 2 Mechanical data 50 9 3 Information on open source software 50 10 Order No s and acce...

Page 6: ...iv Version 1 6 04 November 2016 Notice ...

Page 7: ...ety instructions or hazard warnings are composed of four elements 1 The pictogram warning sign symbol at the edge of the page 2 A short concise description of the danger 3 A description of the possible consequences 4 A catalogue with prevention measures For example Warning hazardous electrical voltage Danger of electric shock BEFORE and AFTER connection it must checked that the 230 V AC relay outp...

Page 8: ...attention symbol can result in personal injury in extreme cases serious injuries or death and or material damage S Voltage symbol warns of hazardous electrical voltage This work safety symbol warns of danger from a hazardous electrical voltage with potential consequences such as serious injury or death S ESD symbol warns of electrostatic sensitive components and assemblies This symbol indicates el...

Page 9: ...t to power S When using uncoded plug connectors it is possible to connect them so that there is a danger to life and limb If this cannot be ruled out coded plug connectors must be used S Specified ambient conditions e g humidity and temperature limits must be observed and complied with in order to avoid malfunctioning see Section Specifications S Check correct wiring of the connections before swit...

Page 10: ...uirements requirements on staff Special skills are required for project planning programming assembly commissioning and maintenance work This work may be performed by qualified and specially trained staff The staff involved in installation commissioning and maintenance must have received the special training needed for them to work on the unit and on the automation system The project planning and ...

Page 11: ...tric power Disconnect power at all connections of the entire installation on which work is to be carried out Warning hazardous electrical voltage Beware of possible external power supplies BEFORE and AFTER connection it must be checked that the controller is off load All device connections plugs are only to be plugged in unplugged and or wired when off load 2 Secure against reconnection of power T...

Page 12: ...ective packaging provided Avoid materials that may produce electrostatic discharge for example Plastic containers and table tops Synthetic fiber clothing Plastic soled shoes Plastic file covers Styrofoam packaging Computer monitors etc Preferably wear the following Cotton work clothes ESD shoes with conductive soles or leather soles Use the following Conductive flooring ESD workstations equipped w...

Page 13: ...manager as well as for remote monitoring and configuration The Combi Gateway has been specially developed for E LDS systems where a CI 3000 or CI 3100 System Centre is available Any use is not intended for E LDS systems with a CI 4xx0 System Centre Furthermore selection of common parameters and functions of components of the E LDS system is provided via the XML and web based interface The connecti...

Page 14: ... CAN bus CAN1 COMBICON Communication in E LDS system with 50 kbit default CI 3000 CI 3100 CAN2 RJ45 Interface for fast CAN bus connection of the store computer CI 3000 CI 3100 with 250 kbit see chapter 6 2 1 x Seriell RS232 RJ45 COM Port Server for connection to a GLT 3010 via network and CoDeSys 1 x LAN ETHERNET LAN LAN connection 1 x USB A firmware update can be carried out via the USB interface...

Page 15: ...dule XML Gateway S Software module Modbus TCP S Software Module Master Slave Explanatory notes for the setup and configuration of the software modules XML Gateway and Modbus TCP Master Modbus TCP Slave are given in detail in the chapters 6 6 3 6 6 4 and 6 6 5 More detailed descriptions of the tasks and functions of these software modules are available in separate documents S COM Port Server for co...

Page 16: ...uters CI 3000 CI 3100 Network settings using a configuration file LAN Gateway V1 3 Initial Version The LAN Gateway software module is used to connect an E LDS system to a network LAN for the purpose of local operation on site e g for the market ma nager as well as for remote monitoring and configuration This TCP IP based form of communication represens an alternative to communication via serial in...

Page 17: ...when updating Version Version dependent functions Access data User name Password V1 57 A firmware update to V1 57 is recommended to increase the system stability webadmin FanTubo3 V1 56 A firmware update to V1 56 is recommended to increase the system stability webadmin FanTubo3 V1 55 A firmware update to V1 55 is recommended to increase the system stability webadmin FanTubo3 V1 51 NOTE A firmware ...

Page 18: ...Application Combi Gateway 12 Version 1 6 04 November 2016 Notice ...

Page 19: ...ormation 4 1 2 CAN bus interface The Combi Gateway has two CAN bus interfaces for connection to the E LDS system S CAN bus interface 1 COMBICON conectors on top of the device Standard connection to the E LDS system with CI 3000 CI 3100 see chapter 6 2 1 S CAN bus interface 2 RJ45 Fast CAN bus connection to the store computer with CI 3000 CI 3100 see chapter 6 2 2 4 1 3 LAN interface Using this int...

Page 20: ...ten Dokumentation S COM Port Server See chapter 4 2 1 4 2 1 COM Port Server The COM Port Server software module is used for the connection of a GLT 3010 via network and CoDeSys and is integrated in the Combi Gateway as standard A remote connection to a GLT 3010 was previously only possible using the GLT modem switching function With the increasing disappearance of modem connections and the establi...

Page 21: ...n on site e g for the market manager as well as for remote monitoring and configuration This TCP IP based form of communication represents an alternative to transmission via serial interface modem or CAN bus PC adapter and it so helps the development towards a network based communication solution It is possible to access the E LDS system via a PC in the same network local LAN using the LDSWin PC s...

Page 22: ...Win uses the port 5000 and as done in LDSWin as follows 192 168 161 66 5000 for details see chapter 5 3 1 The port configured in LDSWIN applies for all systems managed by LDSWIN Therefore configura tion must be standardised here Ports other than port 5000 should only be used in justified cases If a connection is made via a firewall the configured TCP IP port must be opened for the TCP IP ser vice ...

Page 23: ... repair maintenance work so that the remote alarm function is suppressed for a limited period Refer to the operating manual of the store controller for the details for this The control centre should also be informed Background If the Combi Gateway is disconnected from the power supply or connection lines are disconnected the store computer would generate an alarm for each component connected to th...

Page 24: ...to recording gaps in the instances retrieved The Combi Gateway can be integrated in the LDS system via the CAN bus as follows S Standard connection The data exchange with the store computer CI 3000 CI 3100 is performed at approx See chapter 6 2 1 for detail S High speed fast connection The data exchange with the store computer CI 3000 CI 3100 is performed at approx 250 kbit See chapter 6 2 2 for d...

Page 25: ... CAN1 interface on the top right on the device If the Combi Gateway is installed at the end of the CAN bus segment the terminating resistor of the CAN1 interface must be set to ON using the DIP switch CAN Term1 see chapter 6 2 3 Step 2 Settings on the store computer store computer with firmware V5 0 Not required store computer with firmware V5 0 The parameter CAN Bus fast menu 6 1 1 must be set to...

Page 26: ...nd of the CAN bus segment the terminating resistor of the CAN1 interface must be set to ON using the DIP switch CAN Term1 see chapter 6 2 3 for details Step 2 Settings on the store computer the store computer must be equipped with the firmware V5 0 or higher the parameter CAN Bus fast menu 6 1 1 must be set to Yes Step 3 The Combi Gateway is connected to the CAN bus terminals of the store computer...

Page 27: ...4 6 5 7 8 ZNG 114 530 E1 2 1 3 4 CAN1 0 V 24 V DC 6 5 7 8 CAN GND CAN High CAN Low SHLD GN WS BR WS BR GN CAN bus ATTENTION Check CAN bus wiring E LDS standard wiring 2 1 CAN Term ON OFF Only if the Combi Gateway is installed at the end of the CAN bus segment the terminating resistor of the CAN1 interface must be set to ON using the DIP switch CAN Term1 S CAN bus connection directly at the store c...

Page 28: ...ion to the store computer NOT possible RS232 yellow green For future functions For future functions Ethernet yellow green ON Data transfer ON Connected to LAN Blaue Front Weiße Front LED1 WDOG green For future functions LED2 LED1 red Flashing Data transfer on CAN1 interface COMBICON OFF NO data transfer on CAN1 interface COMBICON LED3 LED2 yellow ON CAN1 Communication to store computer possible OF...

Page 29: ... file is outside the valid value range see chapter 6 5 1 1 suc Success The configuration file has been successfully read and used cycling 3 Infomation on the IP configuration IP xxx xxx xxx xxx Display of the IP address The IP address is displayed with the four xxx numbers separated by a point 4 Standard operating mode cycling The Combi Gateway is in standard operating mode Display of error messag...

Page 30: ...E LDS components 6 4 2 Error codes In case of an error a two digit error code will be displayed E 0 2 Indicates that the store computer is running an incompatible firmware The supplier must be contacted to obtain compatible firmware for the Combi Gateway or the description how a firmware update is per formed for a store computer E 0 6 FLASH defect Cause A file required internally cannot be read Re...

Page 31: ...ort 5000 for communication This port must be opened if a con nection is made via a firewall The XML and HTML interfaces communicate via the TCP port 80 HTTP This port must be opened for TCP IP and HTTP services if a connection is made via a fire wall Failure of components A double or incorrect assignment of IP address and or subnet mask can lead to the failure of compo nents within a network Conse...

Page 32: ...ed The Combi Gateway provides the possibility of conveniently loading a configuration file using a USB stick In this way all the settings required for the network are configured automatically With this technique it is possible to modify the network settings of the gateway if the network can no longer be reached due to incorrect configuration of the gateway Requirements USB stick The ELDS_Combi_Gat...

Page 33: ... 161 66 PAY ATTENTION TO TYPING ERRORS FILE CODING ASCII text Copyright 2015 Eckelmann AG ALL RIGHTS RESERVED Netzwerk Konfiguration Ethernet Schnittstelle RJ45 NETWORK CONFIGURATION ETHERNET INTERFACE RJ45 network_eth0 IP Adresse anzupassen TO BE EDITED ipAddress 192 168 161 66 Subnetzmaske anzupassen TO BE EDITED subnetMask 255 255 255 0 Standard Gateway anzupassen TO BE EDITED standardGateway 1...

Page 34: ... ELDS_Combi_Gateway_Configuration ini Further details for the manual configuration of the settings on the notebook of the commissioning engineer are explained in chapter 6 6 Checking the IP configuration Remove the patch cable from the Combi Gateway during operation wait 5 seconds and plug back in the IP address will now be shown in the 7 segment display for information on the display see chapter ...

Page 35: ...ay so that the configuration interface can be reached using the web browser for detailed infos see https edp eckelmann de edp lds _2YqrLxxxXw The Combi Gateway is preconfigured with the following network settings at the factory Hostname computer name in the mask Combi Gateway IP Address 192 168 161 66 Subnet Mask 255 255 255 0 Gateway 192 168 161 1 If the network settings of the Combi Gateway have...

Page 36: ...ther detail below of the respective software module is reached by clicking on the tab in the tab bar The input options are available S Default input fields if these are greyed out these values cannot be changed S Drop down menus for selection of possible parameters S Checkboxes for activating the required option S Upload button for uploading a file S The changed parameters are saved by pressing th...

Page 37: ...values by resetting the Combi Gateway to the factory settings see chapter 6 6 1 3 As a result it is possible that the network settings of the configuration PC and those of the Combi Gateway are no longer compatible with each other This results in the web based configuration interface no longer being ac cessible NOTE It is important that the new IP configuration entered is documented on the device ...

Page 38: ...on interface is automatically changed to the language selected as system lan guage in the store computer provided this is supported by the Combi Gateway Time Different time zones of the Earth with the UTC information are available for the options for setting the time zone UTC is coordinated world time which is a standard Starting from the Greenwich Meridian the other times in the different time zo...

Page 39: ...can be restarted using the System restart button A system restart is required in some cases e g for saving changes in the configuration There is an appropriate note in the help texts for this A restart is initiated by pressing the OK button Factory settings When the Load button is pressed the current configuration files are deleted and the Combi Gateway is reset to the factory settings All configu...

Page 40: ...ust copied into the root directory of a USB stick for this 2 If the previous network settings should be automatically adopted in the Combi Gateway after the firmware update the adapted configuration file for the network settings ELDS_Combi_Gateway_Configuration ini see chapter 6 5 1 must also be copied to the root directory of the USB stick Both files are available from the manufacturer see https ...

Page 41: ...assword is no longer available for you 6 6 2 LAN Gateway The LAN Gateway software module is integrated in the Combi Gateway as standard Under the tab LAN Gateway the TCP port the CAN bus address participant information priority and parame ters can be configured using the configuration interface Parameters such as TCP port standard port is 5000 CAN bus address and CAN bus participant information mu...

Page 42: ... bus participant information can be configured using the con figuration interface under the XML Gateway tab More detailed descriptions of the tasks and functions of this software module are available in the separate XML Gateway API documentation A manual system restart is required to apply the changes of the configuration see chapter 6 6 1 3 ...

Page 43: ...The activation of the Modbus TCP Master process is controlled by the Active checkbox If the process is deactivated this has the consequence that the external data points are no longer mapped in the E LDS system and the functions of the Modbus TCP Master cannot be used More detailed descriptions of the tasks and functions of this software module are available in the separate Modbus TCP Master Gatew...

Page 44: ...en the Modbus TCP Master and the Modbus TCP Slave is performed using a net work connection An alarm is triggered if any failure at this level occurs A manual system restart is required to apply the changes of the configuration see chapter 6 6 1 3 6 6 5 Modbus TCP Slave Gateway The Modbus TCP Slave Gateway software module is not enabled until activation with a valid activation code see chapter 6 6 ...

Page 45: ...eeded for this see chapter 7 1 4 6 6 6 2 Required software on the user PC An additional program not included in the scope of delivery is needed on the PC to connect to a GLT 3010 using CoDeSys via the COM Port Server function This program emulates a local COM port on the PC and connects this to the Combi Gateway via the network Basically any program that transfers serial data in the RAW mode can b...

Page 46: ...ettings of the Combi Gateway All required parameters here the factory settings must be checked on the web based configuration interface see chapter 6 6 and documented here 2 Combi Gateway Module Measure test Note settings Status Status LEDs Status LEDs checked 7 segment display cycles connection to the store computer is present Global Settings Net work Hostname 1 Hostname configured called Compter...

Page 47: ...r Gateway 2 Master Gateway 3 Master Gateway 4 Aktive Modbus TCP Master aktiviated Polling intervall s Configured 15 15 15 15 Reconnection intervall s Configured 30 30 30 30 Configuration file 2 already exists Configured File name ______________ ______________ ______________ ______________ IP address Configured 192 168 161 51 192 168 161 51 192 168 161 51 192 168 161 51 TCP Port Configured 502 502 ...

Page 48: ... Status CAN Bus at store computer Setting for high speed low speed connection Standard low speed see menu 6 1 1 Name Participant information Name in store computer configured Combi Gateway see menu 7 3 Priority Configured 0 see menu 7 3 PRAXIS TIP All three pages of the checklist for putting into service must be 1 filled in check and document settings 2 printed out then available in paper form 3 f...

Page 49: ...al diagramm of the Combi Gateway Combi Gateway connection diagram with terminal configuration Following connection of the power supply the LEDs flashes see chapter 6 3 Status LEDs A detailed description of the connection and terminal configuration of the Combi gateway is contained on the following pages ...

Page 50: ... connection to CAN bus Warning hazardous electrical voltage If mains voltage is connected to the CAN bus terminals this will result in the destruction of all components connected to the CAN bus Incorrect shielding of the CAN bus results in electromagnetic interference fields It must be strictly ensured during installation that the cables with shielding are correctly connected The following cable t...

Page 51: ...8 TUV 6 MNO 4 GHI 5 JKL 3 DEF 2 ABC 1 0 ALARM RESET CI 3000 CABLE FOR FAST CAN BUS CONNECTION KABHICAN2M 4 3 2 1 100 Ohm 0 25 W GND CAN LOW CAN HIGH 2 grün 3 braun 4 weiss GREEN BROWN WHITE CAN bus 250 kbit max 100 m GN BN WH SHIELD 7 2 1 The Combi Gateway is connected to the CAN bus terminals of the store computer using the connection cable order number KABHICAN2M at the RJ45 connector CAN2 inter...

Page 52: ...ection at least of category 5 CAT5e CAT6 or CAT7 The MAC address of the ethernet controller is factory assigned see label on the assembly Use a cross over cable if a point to point connection is made between Combi Gateway and other devices 7 1 6 USB interface Use high quality shielded cables for the USB connection The maximum length of these cables is 5 m ...

Page 53: ...s a component exclusively for further processing As a consequence of this fact ECKELMANN AG does not undertake any measures for the taking back or mu nicipal recycling of this product as it is not supplied directly to the free market Never dispose of this product with other household waste Please inform yourself of the local regula tions for the separate disposal of electrical and electronic produ...

Page 54: ...Decommissioning and disposal 48 Version 1 6 04 November 2016 Notice ...

Page 55: ... USB interface USB 2 0 type A Monitoring function Watchdog Environmental conditions Temperature range Transport 20 C 60 C Operation 0 C 50 C Storage at low temperatures enhances the battery lifetime Temperature change Transport max 20 K h Operation max 10 K h Relative humidity non condensing Transport 8 80 Operation 20 80 Atmospheric pressure Transport 660 hPa 1060 hPa Operation 860 hPa 1060 hPa W...

Page 56: ...licenses old licenses gpl 2 0 translations html and http www gnu org licenses old licenses lgpl 2 1 translations html All Rights reserved Every person who purchases a copy of this software and the accompanying documentation files the Software is hereby permitted to use the software free of charge and without restriction This authorisation also applies without restrictions to the making of copies c...

Page 57: ... 0 7 m 2 0 m 5 0 m KABLIND001 KABLIND002 KABLIND003 KABLIND007 RJ45 cable adapter on CAN bus The CAN bus Y cable is also required for fast CAN bus coupling between Combi Gateway and store computer CI 3000 CI 3100 KABHICAN2M Cable set for connection to a GLT 3010 Cable set for connection to a GLT 3010 KABCOMSRV1 Connector set for CAN bus Connector set with terminating resistor 100 Ohm for CAN bus K...

Page 58: ...Order No s and accessories 52 Version 1 6 04 November 2016 Notice ...

Reviews: