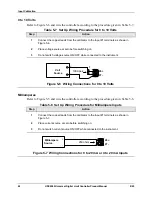
Input Calibration
64
UDC2500 Universal Digital Limit ControllerProduct Manual
8/05
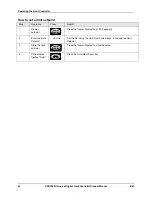
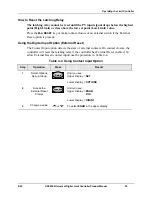
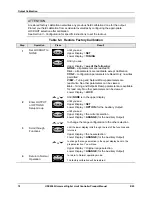
Step
Operation
Press
Result
Lower Display
=
IN1SPN
•
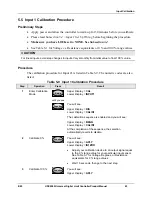
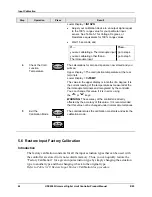
Adjust your calibration device to an output signal equal
to the 100 % range value for your particular input
sensor. See Table 5-1 for Voltage, Degrees, or
Resistance equivalents for 100 % range values.
If …
Then …
you are calibrating a Thermocouple input go to step 4
you are calibrating other than a
go to step 5
Thermocouple input
4
Check the Cold
Junction
Temperature
Function
Function
Function
The calculations for zero and span are now stored and you
will see:
Upper Display
= The cold junction temperature at the rear
terminals
Lower Display
=
The value in the upper display is in tenths of a degree. It is
the current reading of the temperature as measured at the
thermocouple terminals and recognized by the controller.
You can change this value, if it is in error, using
the
or
keys.
WARNING:
The accuracy of the controller is directly
affected by the accuracy of this value. It is recommended
that this value not be changed under normal circumstances.
5
Exit the
Calibration Mode
Function
Function
Function
then
The controller stores the calibration constants and exits the
calibration mode.
Lower
Display
Lower
Display
Lower
Display
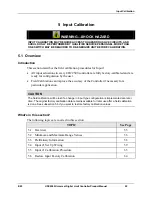
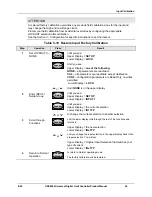
5.6 Restore Input Factory Calibration
Introduction
The factory calibration constants for all the input actuation types that can be used with
the controller are stored in its non-volatile memory. Thus, you can quickly restore the
“Factory Calibration” for a given input actuation type by simply changing the actuation
type to another type and then changing it back to the original type.
Refer to Table 5-10 Restore Input Factory
Calibration
for procedure.
Summary of Contents for UDC2500 Limit
Page 2: ...ii UDC2500 Universal Digital Limit ControllerProduct Manual 8 05...
Page 10: ......
Page 76: ...Input Calibration 66 UDC2500 Universal Digital Limit ControllerProduct Manual 8 05...
Page 126: ......
Page 127: ......
Page 128: ......


