Notizen/Notes
Page 1: ......
Page 2: ...tomer We thank you for choosing the V Titan 64 and wish you a lot of pleasure with your new grinder Please read the instruction manual carefully before using your new grinder If you have any further q...
Page 3: ...r Ber cksichtigen Sie diese Hinweise um Verletzungen zu vermeiden Achtung Wichtiger Hinweis zur korrekten Bedienung der M hle Caution Important notices on safety for the user Pay attention to these no...
Page 4: ...chl ge Probleml sungen 16 8 Konformit t 17 9 Entsorgung der Maschine 18 10 Wartung 18 11 Empfohlenes Zubeh r 18 CONTENT ENGLISH Used symbols 2 1 INCLUDED WITH DELIVERY 19 2 GENERAL ADVICE 19 2 1 Gener...
Page 5: ...sigkeit darf weder auf den Netzstecker der Maschine noch auf die Steckbuchse gelangen Kaffeem hle nur von handlungsf higen Erwachsenen bedienen lassen M hle ist nicht daf r bestimmt durch Personen ein...
Page 6: ...l 2 Verschlussschieber f r Bohnenbeh lter 3 Sicherungsverschraubung 4 Kaffee Auswurftrichter mit Deckel 5 Filtertr gerauflage 6 Display Timer 7 Mahlgradverstellrad 8 Mahlgradskala 9 Bezugstaster Mahlu...
Page 7: ...bnahme Ihrer V TITAN 64 Setzen Sie den Bohnenbeh lter auf und verschrauben Sie ihn mit der mitgelieferten Sicherungsschraube BEACHTEN SIE Wenn Sie den Bohnenbeh lter wieder aufsetzen m ssen die Bohrun...
Page 8: ...nur in kleinen Schritten vor z B jeweils eine halbe Umdrehung am Verstellrad 5 PROGRAMMIERUNG UND MAHLEN 5 1 Fixierung des Filtertr gers und H henverstellung W hrend des Mahlvorgangs k nnen Sie den F...
Page 9: ...itan 64 erm glicht Ihnen verschiedene Arten der Bedienung bei der Mahlung je nach Ihrem Bedarf Standardmodus s Kap 5 3 1 Dieser Modus erm glicht Ihnen das komfortable Abrufen der gew nschten Portion d...
Page 10: ...ortion erreicht stoppt die Vermahlung automatisch Double Shot Dr cken Sie Der Strich springt auf die rechte Seite des Displays Tippen Sie mit dem Siebtr ger f r zwei Portionen 1x kurz auf den Bezugsta...
Page 11: ...gleichzeitig bis t1 auf dem Display erscheint Best tigen Sie mit um in das Untermen von t1 zu kommen Hier k nnen Sie nun durch z giges Dr cken der Taste die Vermahlungszeit in Zehntelsekunden um den...
Page 12: ...Siebtr ger an den Taster Erfahrungsgem liegt die Vermahlungszeit f r einen doppelten Espresso bei ca 5 2 6 2 Sekunden Dies ist abh ngig von der Einstellung des Mahlgrades und des Kaffees Manuelle Mah...
Page 13: ...ngs reagiert die M hle bei Gedr ckthalten des Tasters etwas zeitverz gert 5 4 Anzeige Bezugsmengenz hler ber den Bezugsmengenz hler k nnen Sie sich die gesamten gemahlenen Portionsmengen anzeigen lass...
Page 14: ...Mahlgradskala F llen Sie ein P ckchen M hlenreiniger in den Bohnenbeh lter Mahlen Sie das Granulat durch und fangen es z B mit dem Deckel des Bohnenbeh lters auf Sch tten Sie es zur ck in den Bohnenbe...
Page 15: ...enbeh lter wieder aufsetzen m ssen die Bohrungen bereinander gebracht werden damit Sie den Bohnenbeh lter beim Eindrehen der Sicherheitsschraube nicht besch digen 6 3 Reinigung der Mahlscheiben Aufgru...
Page 16: ...verwenden Vergewissern Sie sich vor dem Zusammenbau dass alle Bauteile sehr sauber sind Es d rfen keine Kaffeer ckst nde in den Gewinden vorhanden sein Sie lassen sich sonst nicht mehr richtig zusamme...
Page 17: ...grad gr ber einstellen Der Auswurf oder der Auswurftrichter sind mit Kaffeemehl verstopft sodass der Kaffee den Motor blockiert Auswurf reinigen Mahlgrad gr ber einstellen Fremdk rper in der Mahlkamme...
Page 18: ...e Vertr glichkeit EMC 2014 30 EU Richtlinie ber die Beschr nkung der Verwendung bestimmter gef hrlicher Stoffe in Elektro und Elektronikger ten ROHS 2011 65 EU Richtlinie 2012 19 EU ber Elektro und El...
Page 19: ...heiben blicherweise nachdem 1100 1200kg Kaffee gemahlen wurden wenden Sie sich bitte ebenfalls an eine von uns anerkannte Kundendienststelle 11 EMPFOHLENES ZUBEH R F r ein perfektes Kaffee Ergebnis be...
Page 20: ...on the socket The grinder should only be used by experienced adult persons The grinder is not intended for use by persons including children with reduced physical sensory or mental capabilities or la...
Page 21: ...7 Adjustment for grinding level 8 Grind level indicator 9 Grinding button 10 On Off switch 11 Coffee collection tray also available 500 g bean hopper Image display 3 2 Technical data Grinding Mechanis...
Page 22: ...plate on the underside of the grinder Always attach the bean hopper by fastening the safety screw Plug the grinder into a grounded socket only and do not leave it unattended when on Do not roll or ben...
Page 23: ...Turn the grinder on The bean hopper should be filled with coffee beans Open the lock slide by pulling it outward 2 Perform a trial grind by shortly activating the grinding button 3 In case the grind i...
Page 24: ...nd simultaneously until t1 appears on the display Press in order to reach the submenu of t1 Here you can adjust the grind time to a tenth of a second by quickly pressing or Wait a short while after ad...
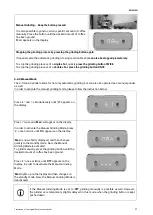
Page 25: ...grind Manual Mode see chapter 5 3 3 You can also use the V Titan 64 as a manual grinder by activating the Manual Mode Man On just press the grinding button until the desired amount of coffee has been...
Page 26: ...rly by briefly tapping the grinding button The display will show the remaining time of the preset time that was not required TIP Programming the portions after determining the remaining time By determ...
Page 27: ...results in the new grinding time for t2 for two portions of 06 3 seconds 5 3 2 Barista Mode The Barista Mode allows to swap between different doses quickly and easily just by simply pressing the grind...
Page 28: ...grinder as well In order to activate the manual grinding mode please follow the instruction below Press and simultaneously until t1 appears on the display Press twice and Man will appear on the displa...
Page 29: ...rder to keep the grinding mechanism functioning properly and to receive even results Furthermore you will prevent old coffee residues in the grinding mechanism from affecting aroma and taste 6 1 Clean...
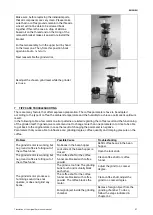
Page 30: ...it back onto the grinder and refill it with coffee beans Readjust the grind setting Grind a single portion of beans and throw them out Your grinder is operational again 6 2 Cleaning of the housing an...
Page 31: ...this is the case Close the bean hopper with the lid and grind the remaining beans still in the hopper Unplug the grinder and unscrew the safety screw of the bean hopper Remove the bean hopper Please...
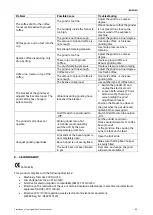
Page 32: ...not to change more than one parameter at a time to be able to get back to the original state in case the result of changing the parameter is negative Parameters that you are able to influence are grin...
Page 33: ...ose The grind setting has changed autonomously Vibrations during grinding have loosened the bracket 1 Switch the grinder off and unplug the electrical cord 2 Loosen both screws 2 5mm Allen wrench that...
Page 34: ...2002 A1 A2 EN 55014 1 2017 EN 55014 2 2015 EN 62233 2008 IEC 60335 1 ed5 A1 A2 IEC 60335 2 64 2002 A1 A2 9 DISPOSAL WEEE Reg No DE69510123 This product complies with EU Directive 2012 19 EU and is re...
Page 35: ...Notizen Notes...
Page 36: ......
Page 37: ......
Page 38: ......