background image


6 Report Management 




Notice: 

The  schedules  in  attendance  setting  reports  have  priority  over  those  set  on  the  device  in  attendance 

calculation. 


Some devices have the function  of report management, this menu item allows you to  upload and download attendance 

setting report or download attendance report. 


Note:  

The   attendance   machine   downloads   information   onto   the   USB   disk   when   a   USB   disk   is   inserted 

simultaneously. 


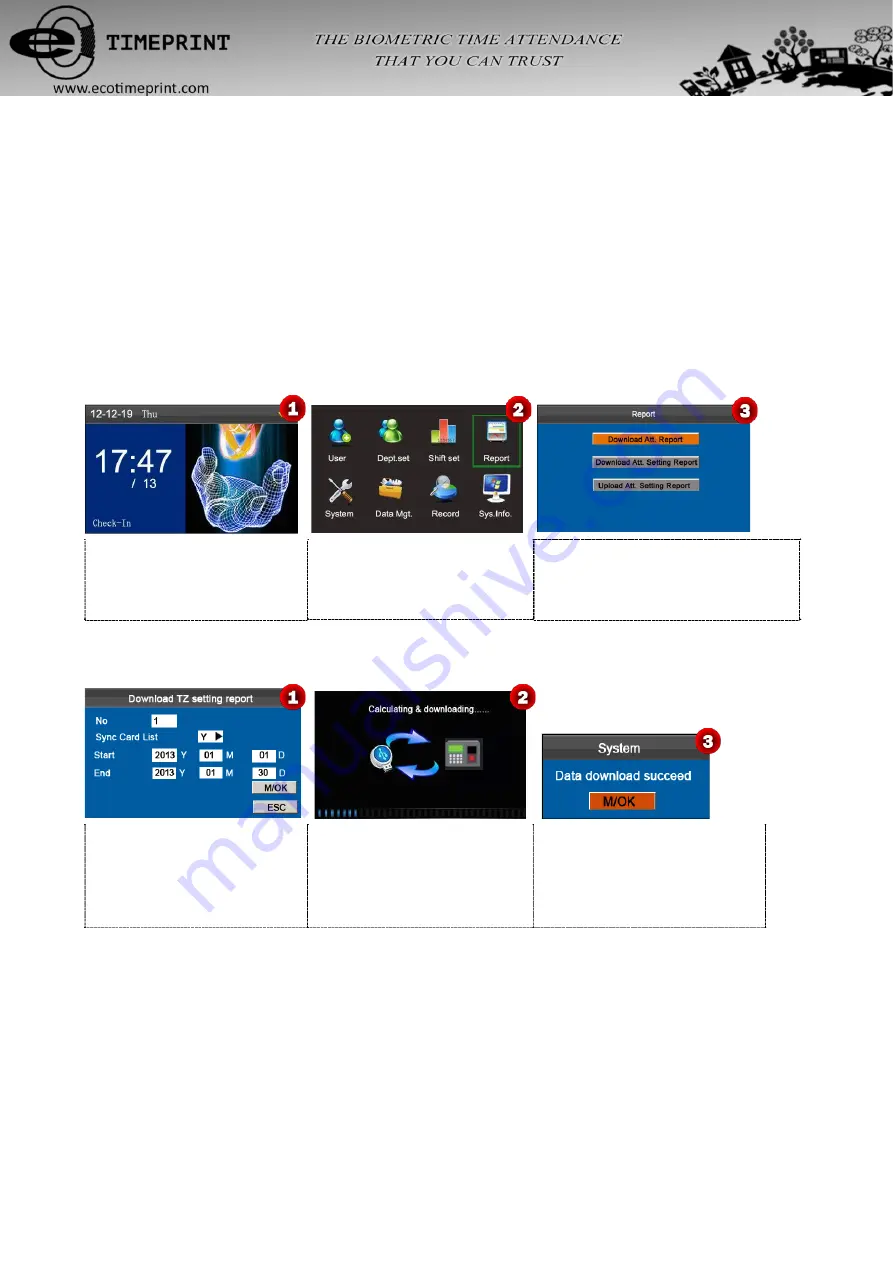
Press and hold [

M/OK

] key on the 

initial interface to enter the 

Main 

Menu 

interface. 

Press 

◄/► key to select 

Report 

menu and press [

M/OK

] to enter 

the 

Report 

interface. 

Press 

▼ key to select 

Download Att. 

Report 

and press [

M/OK

] key to enter the 

Download TZ setting report 

interface. 


6.1 Download Att. Report


Enter the 

Start 

and 

End 

dates, 

select if sync download Card List, 

then press [

M/OK

] key to 

calculating & downloading. 

Calculating and downloading...... 

Data download succeed! Press 


[

M/OK

] key to close the prompt box, 

and then take out the USB disk. 


Note: 

On the 

“Download TZ setting report” 

interface, the card list in 

Sync  Card  List 

refer to the report that can 

substitute  for  clock-based  cards  and  can  be  sent  to  each  employee  for  confirmation.  Select 

downloads  the  card  list 

synchronously, or select 

does not download the card list. 


The 

Standard  Report.xls

” 

shall  be  stored  in  the  USB  disk.  The  schedule  information,  statistical  report  of attendance, 

attendance Record Report, Exception Statistic Report and card report  (select 

in 

Sync  Card  List

) can be viewed on a 

PC. The following reports show the preceding information: 


To make reports more understandable, a report containing two-day attendance records of four employees is provided as 


19 

Summary of Contents for ECO TA500

Page 1: ...About this manual About This Manual This document describes the GUIs and menu operations of the ECO TA500 I ECO TA500 User Manual Version 1 0 Date FEBRUARY 2017...

Page 2: ...I About this manual Not all the devices have the function with The real product prevails The photograph in this manual may be different from that of the real product The real product prevails...

Page 3: ...ll a Password 8 3 1 4 Enroll an Card 8 3 1 5 Verification Type 9 3 1 6 Select Department 9 3 1 7 Select Privilege Settings 9 3 2 User Management 10 3 2 1 Search a User 11 3 2 2 Query a Record 11 3 2 3...

Page 4: ...Message 28 7 5 4 View an SMS Message 28 7 6 Daylight Saving Time DST Setting 29 7 7 Bell Settings 30 7 8 Work code 31 7 8 1 Add a Work Code 32 7 8 2 Edit a Work Code 32 7 8 3 Delete a Work Code 32 7 8...

Page 5: ...Record employees attendance Check that the device time is precise and start attendance Step 7 Download and review reports For details see 6 1 Download Att Report ECO TA500 machines support connecting...

Page 6: ...minal compares current fingerprint collected through the fingerprint collector with that in relation to the user ID entered through keyboard Adopt this mode only when it is difficult to recognize the...

Page 7: ...tion If needs please contact business representative or pre sales engineer you can use this function after obtaining license and activating ECO TA500 devices have an embedded ID or Mifare card module...

Page 8: ...1 4 Terminal Interface BUT Connecting Exit Button NO Normal Open NC Normal Close 4...

Page 9: ...item allows you to set attendance rules and required shifts and to arrange schedules for employees The device supports a maximum of 24 Shifts This menu item allows you to download statistical reports...

Page 10: ...nformation of the device This menu item allows you connect this device with PC to access attendance data you need set IP Address Subnetmask Gatway DHCP and the communication password first This menu i...

Page 11: ...Purview Press and hold the M OK key on the initial interface to enter the Main Menu interface Press key to select Add User menu and press M OK to enter the Add User interface directly Enter a User ID...

Page 12: ...erprint collector for three consecutive times correctly until enrollment succeeds Note If the enrollment fails the system will display a prompt message and return to the Enroll Fingerprint interface I...

Page 13: ...N FP FP PW FP RF PW RF FP PW RF PIN FP PW FP RF PIN 3 1 5 Select Department Some devices have this function you can select department that the new added user belongs to Press key to select Dept Press...

Page 14: ...ress M OK to save user information 3 2 User Management Generally the user information stored on the device needs to be modified in the wake of the personnel changes in a company To facilitate modifica...

Page 15: ...row by row Press to view the attendance record page by page Press M OK to view the details of the employee s record Notes displayed at the bottom of the screen explain all letter meanings Verify Veri...

Page 16: ...ployee from the device The fingerprint or password of this employee is no longer required This employee has resigned Note Deleting a user will not result in the deletion of the user s attendance recor...

Page 17: ...ey 3 on the Dept set interface to enter the Add Dept interface Enter the department name by using the T9 input method Press to select Shift Name and press M OK key to save No The attendance machine au...

Page 18: ...4 3 Delete a Department Press to select department to be deleted and press numeric key 0 pop up the Prompt Box Press M OK key to delete the department or press ESC key to cancel and quit 14...

Page 19: ...fication in the middle of a month may even disarrange the schedules Schedule Type Department based scheduling and individual based scheduling are supported If a company uses one timetable only one dep...

Page 20: ...ould be set based on the actual condition of a company If no shift is set the system makes attendance calculations based on default shifts set in attendance rules Press and hold M OK key on the initia...

Page 21: ...elect Shift Name and then press M OK to save When saving successful the interface showed as above figure 3 2 Edit Schedule Press to select a shift then press M OK to enter the Edit Schedule interface...

Page 22: ...4 Delete a shift Press to select a shift to be deleted then press numeric key 0 pop up the Prompt Box Press M OK key to delete the shift or press ESC to cancel 18...

Page 23: ...Start and End dates select if sync download Card List then press M OK key to calculating downloading Calculating and downloading Data download succeed Press M OK key to close the prompt box and then...

Page 24: ...nd Overtime hour in the Statistical Report of Attendance is HH MM For example 17 50 indicates that the on duty time is 17 hours and 50 minutes Attendance Record Report The report lists the daily atten...

Page 25: ...e shifts that have been set on the attendance machine shall be displayed For more details see 5 2 Shift Setting You can modify the 24 shifts and add shifts After modification the shifts shall prevail...

Page 26: ...ll employees use the Shift 1 by default from Monday to Friday 6 3 Upload Att Setting Report Press key to select Upload Att Setting Report then press M OK to uploading table Uploading table Data upload...

Page 27: ...7 System Setting 7 1 System Setting Set system parameters to meet user requirements to the greatest extent in terms of functions and display Set system parameters 23...

Page 28: ...cord will not be stored Value scope 0 60 0 Save all the records passing the verification Log Alert When the available space is insufficient to store the specified number of attendance records the devi...

Page 29: ...er the Main Menu interface then press key to select System menu and press M OK to enter the System interface shown as following figure Enter the desired value by using the keypad Press M OK to save No...

Page 30: ...ssword is 0 that is no password Once a password is set you need to enter this password before connecting the PC software with the device otherwise the connection is unsuccessful 1 to 6 digits password...

Page 31: ...cancel the setting and return to the previous interface 7 5 SMS Setting The menu item allows you to add edit view and delete SMS messages On the initial interface press and hold M OK key to enter the...

Page 32: ...s M OK to mark to choose the user then press ESC to return and then select M OK option and press M OK key to save the settings When adding successful the interface is shown as figure 6 7 5 2 Edit an S...

Page 33: ...e official local time forward to save energy The uniform time adopted during the implementation of this system is known as the DST Typically clocks are adjusted forward one hour in the summer to make...

Page 34: ...k shifts and they usually manually ring their bells or use electric bells To lower costs and facilitate management we integrate the time bell function into the attendance device You can set the alarm...

Page 35: ...ployees An employee may have different work type in different time period Different work types have different pays Therefore in order to distinguish different attendance states when user is dealing wi...

Page 36: ...Work Code Press to choose the desired Work Code from the list and then press M OK to display the WorkCode Edit interface The No cannot be modified You can modify the Work Code Name only After modific...

Page 37: ...s M OK to enter the System interface shown as following figures 1 Insert a USB flash drive into the USB port of the terminal 2 Press M OK key to update firmware when updated successfully the device wi...

Page 38: ...M OK to save or press ESC to cancel and return to the previous interface Access Settings On the System interface press key to select Access and press M OK key to enter the Access interface as figure 6...

Page 39: ...howed as above figure 3 8 1 Download Upload Download Attlog Download attendance data Download all the attendance data from the ECO TA500 device to the USB host Download User Download user data Get all...

Page 40: ...M OK to enter the Dn Upload interface 2 Press key to select Download Attlog then press M OK key to download Downloading Data download succeed 8 2 Delete Clear Delete Attlog Delete all the attendance r...

Page 41: ...tendance log as an example to describe how to delete user attendance log Press key to select Data Mgt menu and press M OK to enter the Data Mgt interface Press key to select Delete Attlog then press M...

Page 42: ...figure 1 Press finger input ID Punch Card enter the Start and End time and then press M OK to view records Records show as figure 2 Press M OK to view the details of the attendance records The attend...

Page 43: ...shows the Device Information Free Space The number of enrolled users administrators and passwords is displayed on the Free Space interface The total fingerprint storage capacity and occupied capacity...

Page 44: ...ish Symbol or Pinyin mode Enter numeric 2 and press numeric 3 to get letter A Enter letters Angel in the same manner Appendix 2 Quick Query of Attendance Records This function allows ordinary users to...

Page 45: ...by page Press M OK to view the details of the attendance records Mode 2 Query directly and quickly without saving the attendance records Press numeric key 0 on the initial interface to display the Rec...

Page 46: ...for entering the query conditions 1 Press the enrolled finger The user ID and Name corresponding to the fingerprint will be automatically displayed 2 Enter the desired employee ID directly 3 Sweep th...

Reviews: