background image


@2021 EcoAir  

-

 C480 V1                                                                  

Page 4

                                               All rights reserved 

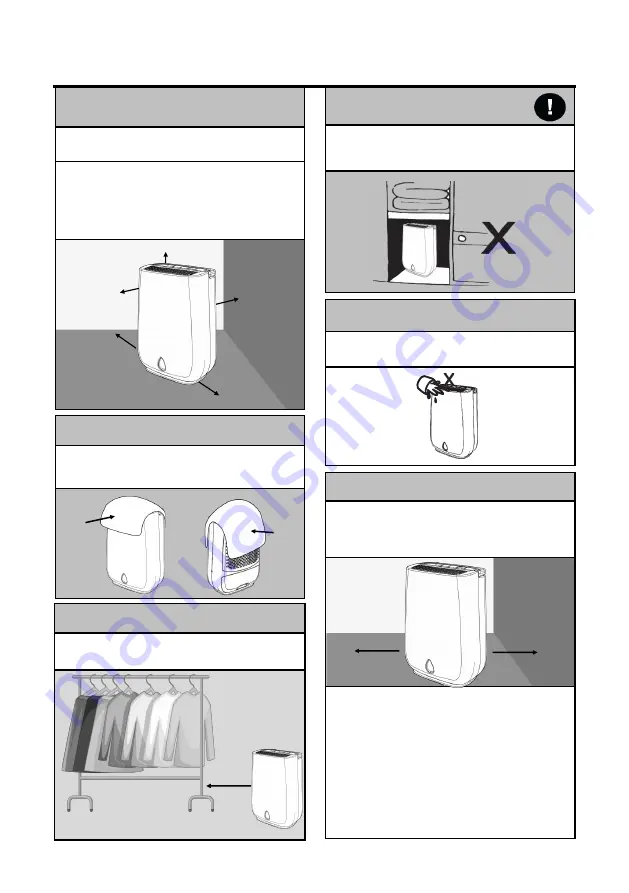
DO NOT PLACE OBJECTS ON OR OVER THE 


APPLIANCE


Ensure the air inlet (A5) and air outlet (A1) are not 


obstructed. Obstruction will cause overheating and 


malfunction.


PLACE ON EVEN LEVEL FLOOR


• 

Always operate appliance on an even level floor to 
avoid leakage 


• 

If appliance is on carpet, ensure the appliance is stable 
and level


IMPORTANT


• 

Do not move the appliance or remove the water tank 
when the dehumidifier is running. It may cause


damage, electric shock, water leak or spills. 


• 

After turning the dehumidifier off,  the fan will continue 
to run for 2 minutes. This is to help to cool and protect 
the internal components. During these 2 minutes, do 
not remove the power plug from the power socket, wait 
for the fan to stop.


• 

Never use in dusty areas, building sites or an industrial 
environment where tiny particles can clog up the filter 
or internal components. 


DO NOT SPLASH 


• 

Do not wash the appliance or immerse in water


• 

Do not allow water to drip on to the  appliance 


IMPORTANT SAFEGUARDS


WHERE TO POSITION YOUR DEHUMIDIFIER?


Ensure the unit is a safe distance away from a wall or 
furniture and away from direct sunlight.


TIP: 

Position  the  dehumidifier  in  the  dampest  room  or 

somewhere  central  like  a  landing  or  a  hallway.  As  long  as 
the internal doors are open the excess moisture from all of 
the  rooms  in  the  house  will  migrate  naturally  towards  the 
dehumidifier and be processed.


ROOM SIZE 


• 

Never use in small confined areas, such as broom 
cupboard. If using in a confined room it must be a 
minimum room size of 26 sq meter for this model.


Min 40 cm


Min 40 cm


Min 40 cm


Min 40 cm


Min 40 cm


A4


A9


DRYING YOUR LAUNDRY


Never place wet laundry over the appliance. Dry the laun-
dry on a rack with a minimum distance of 40 cm. 


     Min 40 cm


X


X


A5


A1


Summary of Contents for DD-100017

Page 1: ... 2021 EcoAir DD3 Classic MK2 DD 100017 DESICCANT DEHUMIDIFIER USER MANUAL Please read instructions before use Keep for future reference Visit ecoair org to register your product or terms and conditions ...

Page 2: ...ents and artwork by drying it out too much High humidity High humidity indoors causes damp and condensation The damp left by condensation can damage plaster wall paper furniture vehicles timber windows doors and clothes It can be harmful to our health when bacteria thrives causing mould and fungus Maintaining safe levels of humidity It is important to maintain a consistent humidity range to preser...

Page 3: ...BS Plug Wiring 2 The Appliance and Accessories 3 Important Safeguards 4 Installation 5 Setup Continuous Drainage 6 Control Panel 7 Operation 8 9 Emptying the Water Tank 10 Cleaning Maintenance and Storing the appliance 11 Troubleshooting 12 INDEX ...

Page 4: ...nance or when not in use The appliance must not be placed or used where the atmosphere may contain combustible gasses oil or sulphur or solvent or near heat sources such as heaters or in server rooms or excessive dust Do not place or rest any objects on the appliance and do not cover while in use Always observe the minimum room size for storing and operating the appliance Allow a minimum of 40 cm ...

Page 5: ...ust be connected to the terminal which is marked with the letter N or coloured BLACK 2 The BROWN wire is LIVE and must be connected to the terminal which is marked with the letter L or coloured RED 3 The GREEN YELLOW is EARTH and must be connected to the terminal which is marked with the letter E or or coloured GREEN or GREEN YELLOW 4 Always ensure that the cord grip is positioned and fastened cor...

Page 6: ...DESCRIPTION Key Description Key Description A1 Air Outlet B1 Continuous Drainage Hose A2 Control Panel B2 User Manual A3 Water Level Indicator A4 Handle A5 Air Inlet A6 Antibacterial Nano Silver Filter A7 Water Tank A8 Continuous Drainage Outlet A9 Tank Plug A4 Front Back A5 A6 A7 A2 A1 A3 B1 A8 A9 ...

Page 7: ...ilding sites or an industrial environment where tiny particles can clog up the filter or internal components DO NOT SPLASH Do not wash the appliance or immerse in water Do not allow water to drip on to the appliance IMPORTANT SAFEGUARDS WHERE TO POSITION YOUR DEHUMIDIFIER Ensure the unit is a safe distance away from a wall or furniture and away from direct sunlight TIP Position the dehumidifier in...

Page 8: ...difier is level to avoid any water leaks Turn on the dehumidifier to start dehumidification ZEOLITE When you first use the dehumidifier and periodically thereafter you may notice a smell coming from the dehumidifier This is caused by the Zeolite desiccant material and is NOT a sign that the dehumidifier is faulty nor is it harmful to humans or pets The Zeolite absorbs odours from items such as cig...

Page 9: ...sition 5 The Continuous Drainage Hose B1 must lead to an appropriate drain at a downward slope with no sharp bends NOTE Ensure the tank and the hose are securely fitted in position before turning the dehumidifier on Never leave the end of continuous drainage hose outside when the temperature is below 1 C to avoid leakage When the outdoor temperature is at freezing point the water will not flow fre...

Page 10: ...0 and 50 illuminates mean 45 3 Dry Mode Select AUTO or ECONOMY or High settings 4 Select Laundry Mode to run the appliance continuously and when drying laundry 5 Timer Key Select 2 4 8 or 12 hours timer on 6 Check Indicator Indicator lights up when the unit needs attention 7 Water Tank Full Indicator Indicator lights up when the water tank is full or incorrectly installed 8 Humidity Display The di...

Page 11: ...n Econo my mode and in a quiet setting to approximately 40 60 RH 5 intervals Use this mode in your daily normal household once the ideal humidity level has been reached Highly recommended for night use Hi Select High mode to quickly control high levels of humidity The unit brings the humidity down to approximately 40 45 RH 5 intervals to control problem areas quickly Laundry Mode Select the laundr...

Page 12: ...hts reserved OPERATION TIMER Press the TIMER Key to select your desired running time Press the TIMER button to set the timer as it counts down the remaining time is displayed via the LED s 12H CHECK LIGHTS Full Indicator Check Indicator ...

Page 13: ... out gently by gripping the water tank from bottom cutaway and pull out carefully 5 Pour the water away by tilting the water tank see step 4 picture to the right side Clean the water tank if needed 6 Reinsert the water tank to the correct position as soon as possible to prevent water dripping from the dehu midifier 7 Check therubberplugisfirmlyinplace Insertthewatertankbacktothecorrectposition NOT...

Page 14: ...cloth 3 Dry thoroughly with a towel after cleaning 4 For cleaning tank see Emptying the Water Tank section Caution Do not wash the unit or immerse in water Do not let water drip into the air inlet or outlet When cleaning the water tank take caution to avoid damaging the float STEP 2 REPLACING YOUR FILTER It is recommended that the outer filter is replaced every 6 months for optimal performance and...

Page 15: ...r on uneven surface or water tank fitted incorrectly Ensure the dehumidifier is on a flat even sur face use a spirit level to check remove tank and replace correctly Filter clogged Clean or replace filter Damaged water tank Remove the water tank fill with water and place on a hard even surface to test for leakage The continuous drainage is clogged or loose Check the continuous drainage hose and it...

Reviews: