background image


© 2020

-

03 EcoAir                                                                                    8                                                                         All rights reserved


STEP 2 

-

 REPLACING YOUR ANTIBACTERIAL 

NANO SILVER FILTER 


It  is  recommended  that  the  outer  filter  is 


replaced 

every 

months 

for 

optimal 


performance  and  hygiene  standards.  To 


purchase a replacement filter please visit:


www.ecoair.org


MAINTENANCE


STEP 1 

-

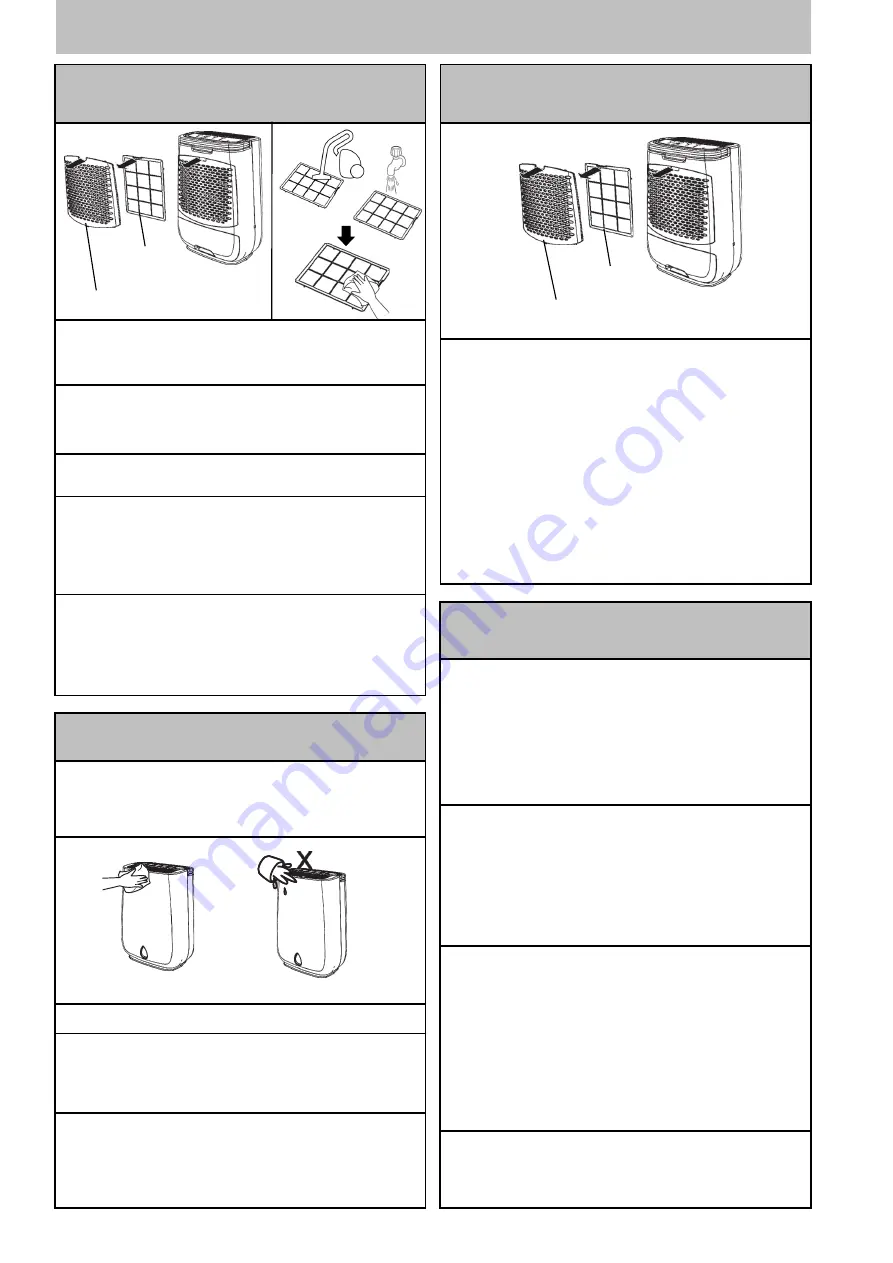
 CLEANING YOUR ANTIBACTERIAL 

NANO SILVER FILTER 


 

Turn  OFF  the  dehumidifier  and  remove  the 
filter from the unit.


 

Clean the filter lightly with a brush or vacuum 
cleaner or warm mild soapy water.  Allow the 
filter to air dry fully.


 

Replace the filter back into position.   


 

If  the  filter  is  covered  with  dust,  the  airflow 
and the performance of the dehumidifier will 
be  affected.    Check  the  filter  periodically  to 
ensure all dust is removed. 


Tip: 

Clean your filter every 2 weeks to keep your 

air  clean  and  prolong  the  life  of  your


dehumidifier.    The  frequency  will  depend  on


the conditions of operation.


STEP 5

-

 STORING YOUR DEHUMIDIFIER 


 

Turn OFF the dehumidifier, wait for the fan to 
stop  and  unplug  the  dehumidifier  from  the 
power socket. 


 

Leave  the  dehumidifier  to  drain  for


approximately  one  day.    Clean  and  dry  the


water tank.


 

Clean  the  filter  and  the  dehumidifier.  Cover 
the  dehumidifier  to  prevent  it  from


gathering  dust.    Store  it  upright  in  a  cool  dry 
place. 


 

Do not expose to direct sunlight.


STEP 3

-

 CLEANING YOUR DEHUMIDIFIER 


 

Turn the dehumidifier OFF, wait for the fan to 
stop  and  unplug  the  dehumidifier  from  the 
socket. 


2.


Clean the surface with a soft damp cloth.


3.


Dry thoroughly with a dry towel after cleaning. 


4.


Empty the water tank.  Allow the water tank to 

drip dry or dry with a cloth. 


5.


Please  take  care  when  cleaning  or  drying 

around the float area.


Caution: 


• 

Do  not  wash  the  dehumidifier  or  immerse  in 

water.


• 

Do  not  let  water  drip  into  the  air  inlet  or


outlet. 


Grill Cover


Antibacterial 


Nano Silver Filter


Grill Cover


Antibacterial 


Nano Silver Filter


or


Summary of Contents for DD3 Classic MK2

Page 1: ...1 UK EU DD3 Classic MK2 Desiccant Dehumidifier Domestic Dehumidifier ...

Page 2: ...ispose of this appliance as domestic household waste For disposal a Contact your local council b The manufacturer will take back the old appliance for disposal when you replace it with a new product c Old products contain valuable resources which should be recycled as scrap metal Wild disposal of waste in forests and landscapes endangers your health when hazardous substances leak into the ground w...

Page 3: ...eater are controlled by a mode setting function Select AUTO the fan speed and heater will run automatically While selecting ECONOMY or High setting will make the machine run with a low or high fan speed and heat setting Select Laundry Mode to run the appliance continuously 4 Timer Key Select 2 or 4 or 8 or 12 hours timer 5 Check Indicator Indicator lights up when the unit needs attention 6 Water T...

Page 4: ...om cupboard boiler room unventilated rooms etc Close proximity to a heat source such as heater tumble dryer cooker Dusty or building sites or an industrial environment where particles can clog up the filter or internal components This will cause the dehu midifier to malfunction voiding your guarantee Min 40 cm Min 40 cm Min 40 cm STEP 4 HUMIDITY SETTING Press the humidity setting button to set the...

Page 5: ...lect High mode to quickly control high levels of humidity The unit brings the humidity down to ap proximately 40 45 RH 5 intervals to control problem areas quickly Select the laundry mode for continuous dehumidification and the display will show Co at the same time While selecting the laundry mode the Humidity Setting is disa bled Note The display will go back to the ambi ent humidity level in 3 s...

Page 6: ...Clean the water tank if needed Reinsert the water tank to the correct position as soon as possible to prevent water drip ping from the dehumidifier Check therubberplugis firmly inplace Insert thewatertank back to the correct position NOTE Clean the water tank with clean water if needed Do not use detergent solvents abra sives or hot water to avoid damaging the water tank or float Do not remove or ...

Page 7: ...h no sharp bends NOTE Ensure the tank and the hose are securely fitted in position before turning the dehu midifier on Before removing the water tank ensure that the hose is disconnected When using the continuous drainage option place the dehumidifier on a level surface and make sure the hose is clear of any obstructions and is directed downwards Avoid placing the dehumidifier on an uneven surface...

Page 8: ...fier The frequency will depend on the conditions of operation STEP 5 STORING YOUR DEHUMIDIFIER Turn OFF the dehumidifier wait for the fan to stop and unplug the dehumidifier from the power socket Leave the dehumidifier to drain for approximately one day Clean and dry the water tank Clean the filter and the dehumidifier Cover the dehumidifier to prevent it from gathering dust Store it upright in a ...

Page 9: ... back into position Water Leaking Dehumidifier on uneven surface or water tank fitted incorrectly Ensure the dehumidifier is on a flat even surface use a spirit level to check remove tank and replace correctly Filter clogged Clean or replace filter Damaged water tank Remove the water tank fill with water and place on a hard even surface to test for leakage The continuous drainage is clogged or loo...

Page 10: ...den furniture musical instruments and artwork by drying it out too much HIGH HUMIDITY High humidity indoors causes damp and condensation The damp left by condensation can damage plaster wall paper furniture vehicles timber windows doors and clothes It can be harmful to our health when bacteria thrives causing mould and fungus MAINTAINING SAFE LEVELS OF HUMIDITY It is important to maintain a consis...

Page 11: ...ated a If repairs or other interventions are performed by persons not authorised by us b If our appliances are fitted with non original spare parts extras or accessories c If our appliance has been altered and damaged by owner or third parties d In the event of abuse whether physical or verbal abuse towards any member of staff 8 Warranty provision will be free of charge and we will decide whether ...

Page 12: ...must be connected to the terminal which is marked with the letter N or coloured BLACK 2 The BROWN wire is LIVE and must be connected to the terminal which is marked with the letter L or coloured RED 3 The GREEN YELLOW is EARTH and must be connected to the terminal which is marked with the letter E or or coloured GREEN or GREEN YELLOW 4 Always ensure that the cord grip is positioned and fastened co...

Page 13: ...ance or when not in use The appliance must not be placed or used where the atmosphere may contain combustible gasses oil or sulphur or solvent or near heat sources such as heaters or in server rooms or excessive dust Do not place or rest any objects on the appliance and do not cover while in use Always observe the minimum room size for storing and operating the appliance Allow a minimum of 40 cm c...

Reviews: