


417101438_EMPII_E60.docx
- 94 -
Rev. 11-02.14
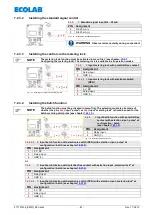
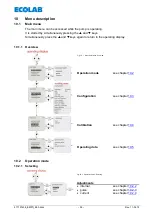
8.2.3.1
Installing the batch pulse
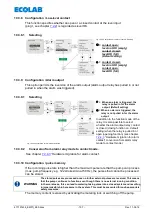
NOTE
The batch function must be activated in menu first. The selection must also be made of
whether the pins
2
+
4
(input “pulse”) or
3
+
4
(input “metering lock”) should be used for the
batch metering start pulse (see chapter
“Configuration / batch”)
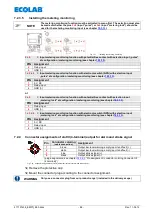
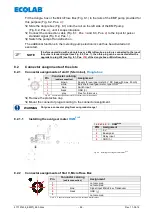
Fig. 8.9
Installing the batch impulse
2
+
4
= Input batch metering with potential-free contact with selection input „pulse“ at
configuration / batch (see chapter
PIN Assignment
2
Relay input
4
GND
(┴)
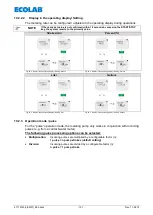
1
+
2
+
4
= Input batch metering with electronic switch (NPN) with selection input „pulse“ at
configuration / batch (see chapter
PIN Assignment
1
5 V, DC
2
Relay input
4
GND
(┴)
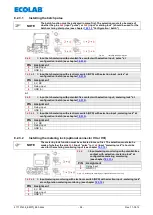
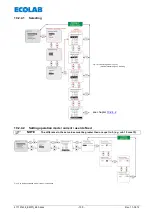
or
3
+
4
= Input batch metering with potential-free contact with selection input „metering lock“ at
configuration / batch (see chapter
PIN Assignment
3
Relay input
4
GND
(┴)
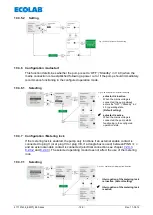
1
+
3
+
4
= Input batch metering with electronic switch (NPN) with selection input „metering lock“ at
configuration / batch (see chapter
PIN Assignment
1
5 V, DC
3
Relay input
4
GND
(┴)
8.2.3.2
Installing the metering lock (optional connector VII or VIII)
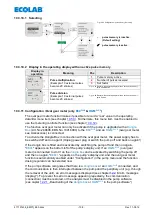
NOTE
The metering lock function must be activated in menu first. The selection must also be
made of whether the pins
2
+
4
(input “pulse”) or
3
+
4
(input “metering lock”) should be
used for the metering monitoring input (see chapter
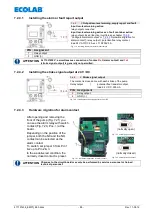
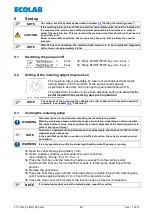
3
+
4
= Input metering monitoring with potential-free
contact, with selection „metering lock“ at
configuration metering monitoring
(see chapter
PIN
Assignment
3
Relay input
4
GND
(┴)
Fig. 8.10 Installing the metering lock (optional connector VII or VIII)
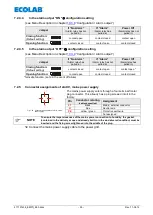
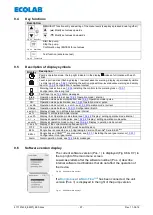
1
+
3
+
4
= Input metering monitoring with electronic switch (NPN) with selection input „metering lock“
at configuration metering monitoring (see chapter
PIN Assignment
1
5 V, DC
3
Relay input
4
GND
(┴)


