11
Installation Instructions
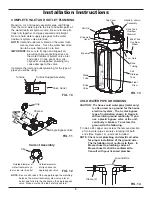
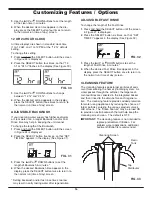
FIG. 15
...depressurize the
plumbing, then push By -
pass Valve body toward
water treatment system
If removing
clips...
7
. After you hear the valve motor stop running (valve
in “Brine” position), press, but do not hold, the
RECHARGE button. The valve will advance to the
“Backwash” position.
8
. Once the unit is in backwash, place bypass valve(s)
in SERVICE, EXACTLY as follows:
a
. Single Bypass Valve: Slowly, slide pull the valve
stem outward toward service, pausing several times
to allow the system to pressurize gradually.
b
. 3-Valve Bypass: Fully close the bypass valve and
open the outlet valve. Slowly open the inlet valve,
pausing several times to allow the system to pres-
surize gradually.
9
. Let the water treatment system complete the back-
wash and fast rinse cycles (takes about 20 min-
utes). When the regeneration ends, the system’s
valve returns to the service position.
SANITIZE THE WATER SOFTENER /
SANITIZE AFTER SERVICE
Care is taken at the factory to keep your unit clean and
sanitary. Materials used to make the unit will not infect
or contaminate your water supply, and will not cause
bacteria to form or grow. However, during shipping,
storage, installation and operation, bacteria could get
into the unit. For this reason, sanitizing as follows is
suggested* when installing.
1
. Slide open the salt lid, remove the brinewell cover
and pour about 90 ml (6 tablespoons) of household
bleach into the softener brinewell. Replace the
brinewell cover.
2
Make sure the bypass valve(s) is in the “service”
(open) position.
3 Start a recharge:
Press the RECHARGE button and
hold for 3 seconds, until “Recharge Now” begins to
flash in the display. This recharge draws the sanitiz-
ing bleach into and through the water softener. Any
air remaining in the unit is purged to the drain.
4
. After the recharge has completed, fully open a cold
water faucet, downstream from the softener, and
allow 190 liters of water to pass through the system.
This should take at least 20 minutes. Close the
faucet.
*
Recommended by the Water Quality Association. On some
water supplies, the unit may need periodic disinfecting.
RESTART THE WATER HEATER
1
. Turn on the electricity or fuel supply to the water
heater and relight the pilot, if applicable.
NOTE:
The water heater is filled with hard water and,
as hot water is used, it refills with treated
water. In a few days, the hot water will be fully
treated. To have fully treated hot water imme-
diately, wait until the initial recharge (previous
step) is over. Then, drain the water heater (fol-
lowing instructions for water heater) until water
runs cold.
TEST FOR LEAKS
To check for leaks, complete the following steps:
1
. Fully open two nearby cold water faucets down-
stream from the water treatment system.
2
. Observe steady water flow from both open faucets.
3
After about three minutes, open a hot water faucet
for about one minute, or until all air is expelled, then
close.
4
. Close both cold water faucets.
5
. Check your plumbing work for leaks, and fix right
away if any are found. Be sure to observe previous
caution notes.
NOTE:
If this procedure is performed on a new sys-
tem, water coming from the taps may initially
be discolored. This normally occurs the first
time water runs through the resin bed. The
discolored water is not harmful, and the discol-
oration will not last more than a few minutes.
Questions? Call Toll Free 1-800-693-1138
or visit
www.ecopure.com
When you call, please be prepared to provide the model and serial number,
found on the rating decal, typically located on the rim below the salt lid hinges.


