background image


EcoWave Installation Guide 

Telkonet, Inc.


Configuration 

10200 W. Innovation Dr., Ste. 300 

Revision 9 

Milwaukee, WI 53226 

Page 11 


(800) 380-9640 


www.telkonet.com 


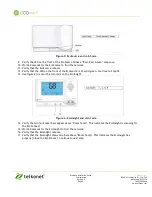
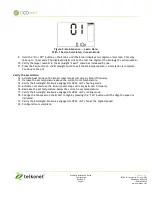
Figure 9: Maintenance 

 Learn Menu  

With 1 Device Associated, In Learn Mode 


9.


Hold the “On / Off” button on the EcoAir until the EcoAir displays two digits on its screen. This may 
take up to 10 seconds. The displayed digits will be the last two digits of the EcoInsight’s serial number. 

10.


Verify the larger number in the EcoInsight “Learn” menu has increased by one.   

11.


Press the Fan button on the EcoInsight twice to exit the Maintenance Menu.  Association is complete. 
Continue to Step 12. 


Verify the Association 

12.


Activate heat mode on the EcoAir (exact steps will vary by EcoAir firmware). 

13.


Increase the set temperature above the current room temperature. 

14.


Verify the EcoInsight/EcoSource engages its HVAC unit’s heating mode. 

15.


Activate cool mode on the EcoAir (exact steps will vary by EcoAir firmware). 

16.


Decrease the set temperature below the current room temperature. 

17.


Verify the EcoInsight/EcoSource engages its HVAC unit’s cooling mode. 

18.


Change the fan speed on the EcoAir to high by pressing the “Fan” button until the High fan speed is 
indicated. 

19.


Verify the EcoInsight/EcoSource engages its HVAC unit’s fan at the highest speed. 

20.


Configuration is complete. 


Summary of Contents for PST6000

Page 1: ...EcoWave Installation Guide PST6000 and PST6550...

Page 2: ...pment 2 Hardware 2 Regulatory Compliance 2 FCC Notice 2 Wiring the EcoInsight EcoSource 3 Wireless Installation of the EcoAir 6 Configuration 7 Join the EcoInsight EcoSource to the EcoConnect 7 Requir...

Page 3: ...structions may cause harmful interference to radio communications However there is no guarantee that interference will not occur in a particular installation If the equipment does cause harmful interf...

Page 4: ...code 5 Disconnect the existing thermostat if any 6 Use the voltmeter to verify the power is off It may not be possible to switch off transformer supply voltage on low voltage units Use caution when in...

Page 5: ...r 12 277VAC power from HVAC used to power the thermostat 2 C Common AC Common 3 AUX Auxiliary User defined 4 W1 Heat Strip Heat call or strip heat call depends on programming 5 Switched Power 1 W1 Y1...

Page 6: ...ight EcoSource Backplate Wired to HVAC Unit 21 Hook the EcoInsight EcoSource to the hinges on the right hand side of the backplate 22 Gently swing the EcoInsight EcoSource closed onto the backplate un...

Page 7: ...tationary e g sleeping in bed Position the EcoAir within 2 to 12 feet of their expected location If the occupants will move occasionally e g working at desk Position the EcoAir within 15 feet of their...

Page 8: ...paperclip or pen Join Process 1 Verify the EcoCommander or EcoCommander Pro is powered 2 Verify the EcoConnect is powered 3 Verify the EcoConnect is connected to the EcoCommander or EcoCommander Pro 4...

Page 9: ...boots 12 Verify that the LED on the front of the EcoSource is lit solid green Continue to Step 18 13 Use figure 6 to enter the join code on the EcoInsight Figure 6 EcoInsight and Join Code 14 Verify t...

Page 10: ...ront of the EcoConnect should change from blinking green to solid green This means the EcoConnect will no longer accept join requests from ZigBee devices 19 If configuring a multi bind system where mu...

Page 11: ...4 Hold the On Off button on the EcoAir until the EcoAir displays two digits on its screen This may take up to 10 seconds The displayed digits will be the last two digits of the EcoSource s serial num...

Page 12: ...to exit the Maintenance Menu Association is complete Continue to Step 12 Verify the Association 12 Activate heat mode on the EcoAir exact steps will vary by EcoAir firmware 13 Increase the set temper...

Page 13: ...blink red 10 Hold the On Off button on the EcoAir until the EcoAir displays two digits on its screen This may take up to 10 seconds The displayed digits will be the last two digits of the EcoSource s...

Page 14: ...e The text On should appear next to the smaller number See Figure 9 34 Hold the On Off button on the EcoAir until the EcoAir displays two digits on its screen This may take up to 10 seconds The displa...

Page 15: ...preface the PAN value with 0x such as 0x201 Backspace was used while typing the zb command Re enter the zb command without using backspace The ShortAdd shows the default value of 0xFFFF The EcoInsight...

Reviews: