background image


SIGNATURE 5


    ecosystoves.co.uk


+ 44 1256 830099


trade@ecosystoves.co.uk 


13


LIGHTING MY STOVE 

Prior to lighting the fire for the first time, ensure that 


Installation and building work is complete. 


The chimney is suitable and sound and has been swept and free from obstruction. 


Adequate ventilation and provision for combustion air has been made. 


The stove installation has been carried out in accordance with Building Regulations and any applicable local regulations as 
well as these installation instructions. 


Chimney draw has been checked and within specification. (The stove has been tested at nominal output with a flue draught of 
12 Pa) INITIAL CURING AND TEMPERING FIRES. 

ESSENTIAL INSTRUCTIONS BEFORE USE 

It is essential to follow these ‘tempering

-

in’ instructions in order to avoid serious damage to your stove. The ca

stings of your stove 

require very gentle ‘normalising’ to release stresses in the metal formed during the casting process. The paint finish also r

equires an 

initial curing process to be followed and will release a smell when burning off: For the first few burns we suggest opening a window to 
get rid of the smell. 

You will need to have at least two controlled small wood fires, each fire lasting around 40 minutes 

 the second fire can be started when 

the stove is almost cooled down. After these fires you can increase the fuel load but still control the fire for another few burns as the 
paint may still be curing and in a fragile state. Starting a large fire too soon is likely to damage the stove in which case it will not be 
covered by the warranty. Note: the paint on any new stove is relatively soft. As such do not clean, wash or wipe the surface until the 
paint has fully cured. Never wipe the stove whilst warm. If the above advice is ignored, then there is a high risk of the paint being 

“shocked” by excessive h

eat and could peel. Furthermore, if the stove is over fired it will invalidate your guarantee. 

ENSURE THAT YOU HAVE READ AND UNDERSTOOD THESE INSTRUCTIONS BEFORE LIGHTING THE FIRE, AND THAT YOU ARE CONFIDENT 
THE STOVE HAS BEEN INSTALLED CORRECTLY. 

ALWAYS WEAR A PROTECTIVE GLOVE WHEN REFUELLING YOUR STOVE. 

IGNITION 

(FOLLOW INITITAL TEMPERING INSTRUCTIONS ABOVE FIRST TO AVOID DAMAGE) 


Construct a pile of kindling in the middle of the bed using approx 500g of kindling wood. 


Ensure all vents are open 


Light with a single firelighter. 


Leave the door ajar slightly as that begins to catch.  


After a few minutes’ ad your first log or two and then continue to leave the door ajar


When the burn becomes established you can close the door. 


You can then begin closing the vents down, starting with the top vent, leaving a small gap if the Defra stop is not in place. 


Once the load burns down to embers you can re-load the fire. If the stove is nice and warm with plenty of embers you may not 
have to have the door ajar. 


TIPS 

Getting heat into the chamber is very important. A hot chamber will increase the stoves efficiency and make refueling the fire very 
easy. If the temperature in the stove is too low, the glass will begin to go black and excess smoke will be produced. Often the key to a 
hot firebox is the burning of quality dry fuel.  

Summary of Contents for Ottawa 5 ECO

Page 1: ...y Unit 24 Folly Farm Ramsdell Tadley Hampshire RG26 5RJ United Kingdom CONTACT Telephone 44 1256 830099 Email trade ecosystoves co uk Last updated 04 03 2020 Version 1 2 Ottawa 5 ECO Wide OTTAWA DELUXE WIDE Technical Information covering Hampton Vista 500 ...

Page 2: ...Y DRAW 9 CHIMNEY LINING Error Bookmark not defined AIR CONTROL 10 FUEL OVERLOADING 10 SMOKE FREE ZONES 11 REGULATIONS 11 THE CLEAN AIR ACT 1993 AND SMOKE CONTROL AREAS 11 FUEL 12 LIGHTING MY STOVE 13 ESSENTIAL INSTRUCTIONS BEFORE USE 13 IGNITION 13 FIRST USE TROUBLESHOOTING 14 CLEANING AND MAINTENANCE 15 Baffle Plate Removal 15 Replacing the Fire Rope 15 Changing glass 15 GUARANTEE 16 BROKEN FIRE ...

Page 3: ...n and easy maintenance To top it off we offer a 5 year guarantee on this range SAFETY THIS STOVE IS FOR WOOD BURNING ONLY This appliance is suitable for wood burning only to use any fuel other than wood will invalidate the guarantee IN THE EVENT OF A CHIMNEY FIRE EVACUATE THE PROPERTY AND CALL THE EMERGENCY SERVICES INSTALLATION AND USE Safety is the most important consideration when using and ins...

Page 4: ... Efficiency 83 4 DIN Plus Dust at 13 O2 7 Nmg m3 Mean NOX at 13 O2 100 Nmg m3 Mean CnHm at 13 O2 48 Nmg m3 Mean CO emissions 0 10 Hearth Temperature 52c Flue gas mass flow g s 3 7 g s Mean Flue Gas Temp 239 C Distance to Combustibles at the Rear 500MM Distance to Combustibles at the Side 400mm ClearSkies Approved Yes Adjustable Feet Yes TECHNICAL INFORMATION ...

Page 5: ...stant glass 4 Top steel slider plate 5 Right side fire brick 6 Cast iron Air wash casing 7 Baffle plate brick 8 Top baffle steel 9 Stoves top 10 Top plate 11 External body 12 Casing which includes secondary air holes 13 Left side brick 14 Tertiary air bar 15 Tertiary air stop 16 Back fire brick 17 Base firebrick 18 Log guard Left side brick 21 Door catch 2 of 2 ...

Page 6: ...SIGNATURE 5 ecosystoves co uk 44 1256 830099 trade ecosystoves co uk 5 DRAWING FOR OTTAWA 5 WIDE DRAWING FOR OTTAWA DELUXE WIDE ...

Page 7: ...op with the bolts going down into the stove Reaching through the rear flue place a washer and then nut on each thread and screw from above whilst holding the nut with the 10mm spanner When the collar is on you can then fix the blanking plate that came off the top onto the rear Place the bolts through the rear blanking plate and line each one up with the pre drilled hole on the stove Reaching throu...

Page 8: ... for a 12mm free standing non constructional hearths see diagram below marked b This is allowed because each model s base does not exceed 100 C The hearth must be made from a non combustible material strong enough to stand the weight of the fire Further diagrams relating to constructional hearths are attached below ...

Page 9: ...SIGNATURE 5 ecosystoves co uk 44 1256 830099 trade ecosystoves co uk 8 ...

Page 10: ...forcing it out of the fire and into the room The most common cause for a chimney not performing well is the fact it is cold Cold air sinks the smoke down whereas a warmer chimney draws the smoke up and out This issue is most common on twin walled chimney systems and exposed brick chimneys on the gable end of a house Getting heat up the chimney as quickly as possible will help to ensure this negati...

Page 11: ...losing it down If you close the vent down too early before the fire is established it could go out and or increase smoke output When the stove is burning hot and is well established you can turn the fire right down If done at the right time and with the right fuel it will die right back and gently burn away for a long time If the Defra stops are in place the fire will not close down as much The ke...

Page 12: ... in Scotland appliances are exempted by publication on a list by Scottish Ministers under section 50 of the Regulatory Reform Scotland Act 2014 In Northern Ireland appliances are exempted by publication on a list by the Department of Agriculture Environment and Rural Affairs under Section 16 of the Environmental Better regulation Act Northern Ireland 2016 In Wales appliances are exempted by regula...

Page 13: ...er which will indicate the moisture levels in your fuel Liquid fuels must NEVER be used WARNING Wet timber should not be used as this will create excess tar deposits in the chimney and stove and could increase the risk of chimney fire Timber which is not of a suitable moisture content will also create more smoke and harmful emissions and will damage the stove and flue system If you are buying wood...

Page 14: ... too soon is likely to damage the stove in which case it will not be covered by the warranty Note the paint on any new stove is relatively soft As such do not clean wash or wipe the surface until the paint has fully cured Never wipe the stove whilst warm If the above advice is ignored then there is a high risk of the paint being shocked by excessive heat and could peel Furthermore if the stove is ...

Page 15: ...s can go black in the first few burns This happens because the stove is not running hot When the stove gets up to temperature this should begin to burn off If it does not the glass may need cleaning with a stove glass cleaner or a damp cloth that has been dipped in the ash Under certain abnormal weather conditions for example down draughts it may be difficult to get sufficient draw through the app...

Page 16: ...e vermiculite side fire bricks 2 Remove the vermiculite baffle brick 3 When removed you will come to separate folded steel plate This is held in place with 2 x 10mm nuts Remove these nuts to release the baffle Replacing the Fire Rope If your fire rope has become frayed and is no longer making a good contact it will need replacing To change the rope we suggest removing the door and laying it flat T...

Page 17: ...and the handle simply needs adjusting to make the door lock a little tighter If the glass is not split and is only crazed then it does not need replacing to keep in line with the guarantee terms Please keep a record of all services as this will be required if a claim is ever put forward As a company we will only ever be responsible for the product itself and would not cover installation de install...

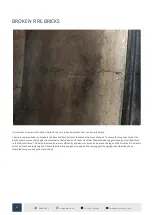
Page 18: ...se To ensure the longevity of your fire bricks please ensure that you gently place fuel in the fire and do not over stack fuel We would also suggest leaving a small bed of ash in the fire at all times This helps the wood burn more efficiently and also acts a cushion between the log and the brick itself If a brick is split it will not need replacing and this could potentially happen at any point We...

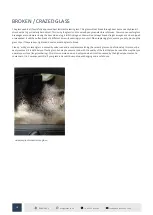
Page 19: ...ll then often break at a different time with seemingly no contact When replacing glass ensure you only pinch up the glass clips If they are over tightened it could cause the glass to break Cloudy milky or crazed glass is caused by unburned acidic condensates etching the ceramic glass and unfortunately this cannot be easily removed It is definitely not faulty glass but may have more to do with the ...

Page 20: ...SIGNATURE 5 ecosystoves co uk 44 1256 830099 trade ecosystoves co uk 19 ENERGY EFFICIENCY ...

Reviews: