Serinus 44 User Manual 3.0
Page 100
5.6
Multipoint Precision Check
A multipoint precision check is used to determine the linear response of the instrument across its
operating range. The instrument is supplied with span gas at multiple known concentrations,
typically a zero point and at least four up-scale points, spread across the operating range of the
instrument. The observed concentrations are compared to expected values and the linearity of the
instrument assessed against local applicable standards.
Note:
The instrument is inherently linear and the instrument gain should
not
be adjusted at each
individual point. Non-linearity indicates a problem with the instrument (refer to Section 7). Ensure
that the instrument has been running for at least one hour before any calibration is performed to
ensure the instrument’s stability.
Several methods for producing multiple known concentrations are available to use, such as
connecting multiple certified gas cylinders at different concentrations. However, Ecotech strongly
recommends the use of a dilution calibrator and a certified cylinder of NO at an appropriate
concentration (typically a cylinder of 40 to 100 ppm NO, balance in Nitrogen).
1.
Connect your calibration system to the
Calibration Port
of the instrument (Ecotech recommends
the Serinus Cal 2000, refer to Figure 45).
2.
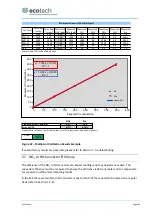
Generate and record the displayed span concentrations for (at least) five stepped points (of
known concentrations) evenly spaced across the instruments measurement range (see the
example below).
3.
Then using a program such as MS Excel, create an X Y scatter plot of expected concentration
versus the recorded instrument response and use linear regression to calculate the line of best fit
and the correlation factor (R
2
) – refer to the users local applicable standards.
Example for an instrument measurement range of 500 ppb:
a.
For the 1st concentration, set the gas dilution calibrator to supply
400 ppb
NOx
gas to the
instrument.
b.
Allow the instrument to sample the calibration gas until a prolonged stable response is
achieved (the amount of time this takes is impacted by the calibration setup). Record the
instrument response.
c.
Repeat the above steps using concentrations of
300ppb
,
200ppb
,
100ppb
and a
Zero
point.
d.
Graph the results and use linear regression to determine a pass or fail as per your applicable
local standards.
𝑦 = 𝑚𝑥 + 𝑐
Note:
To highlight hysteresis errors, it is advisable to run the multipoint check in both
descending
and
ascending
order - refer to applicable local standards.
Summary of Contents for Serinus 44
Page 1: ...Serinus 44 Ammonia Oxides of Nitrogen Analyser User Manual Version 3 0 www ecotech com...
Page 2: ...Serinus 44 User Manual 3 0 Page 2 This page is intentionally blank...
Page 30: ...Serinus 44 User Manual 3 0 Page 30 This page is intentionally blank...
Page 64: ...Serinus 44 User Manual 3 0 Page 64 This page is intentionally blank...
Page 112: ...Serinus 44 User Manual 3 0 Page 112 This page is intentionally blank...
Page 128: ...Serinus 44 User Manual 3 0 Page 128 This page is intentionally blank...
Page 137: ...Troubleshooting Page 137 7 6 USB Memory Stick Failure Figure 71 USB Memory Stick Failure...
Page 140: ...Serinus 44 User Manual 3 0 Page 140 This page is intentionally blank...
Page 146: ...Serinus 44 User Manual 3 0 Page 146 This page is intentionally blank...
Page 150: ...Serinus 44 User Manual 3 0 Page 150 9 5 Plumbing Schematic D020018...
Page 151: ...Parts List and Schematics Page 151 9 6 Block Wiring Schematic D020104...
Page 152: ...Serinus 44 User Manual 3 0 Page 152 9 7 Ozone Generator Assembly H011107...
Page 153: ...Parts List and Schematics Page 153 9 8 Optical Bench Assembly H011200...
Page 154: ...Serinus 44 User Manual 3 0 Page 154 9 9 Manifold Block Assembly H011302...
Page 155: ...Parts List and Schematics Page 155 9 10 Calibration Manifold Assembly H010013 01...
Page 156: ...Serinus 44 User Manual 3 0 Page 156 9 11 Valve Assembly H010042...
Page 173: ...Parts List and Schematics Page 173 This page is intentionally blank...


