background image

18

ECOWATER

S

Y

S

T

E

M

S

Service Information

REFILLING WITH SALT

Remove the brine tank cover and check the salt stor-
age level frequently. If the unit uses all the salt before
you refill it, you will get hard water. Until you have
established a refilling routine, check the salt every 2
or 3 weeks. ALWAYS refill if less than 1/2 full.

Be

sure the brinewell cover is on.

RECOMMENDED SALT:

Cube, pellet, coarse solar,

etc., water conditioner salt is recommended. This
type of salt is from high purity evaporated crystals,
sometimes formed, or compressed, into briquets. It
has less than 1% insoluble (will not dissolve in water)
impurities.

Clean, high grade

rock salts are accept-

able, but may require frequent brine tank cleaning to
remove the ‘‘sludge’’ residue (insolubles).

NOTE:

If

using potassium chloride (KCl) instead of standard
sodium chloride (NaCl) water softener salt, hard-
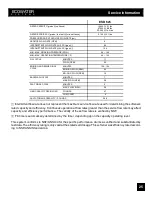
ness setting must be increased by 25%.

SALT NOT RECOMMENDED:

Rock salt, high in im-

purities, block, granulated, table, ice melting, ice
cream making salts, etc., are not recommended.

SALT WITH IRON REMOVING ADDITIVES:

Some

salts have an additive to help a water conditioner
handle iron in a water supply. Although this additive
may help keep the resin bed clean, it may also re-
lease corrosive fumes that will weaken and shorten
the life of some EcoWater System Unit parts.

BREAKING A SALT BRIDGE

Sometimes, a hard crust or salt bridge forms in the
brine tank. It is usually caused by high humidity or
the wrong kind of salt. When the salt bridges, an
empty space forms between the water and the salt.
Then, salt will not dissolve in the water to make
brine. Without brine, the resin bed does not regener-
ate and you will have hard water.

If the storage tank is full of salt, it is hard to tell if you
have a salt bridge. Salt is loose on top, but the bridge
is under it. Take a broom handle, or like tool, and
push it straight down into the salt. If a hard object is
felt, it’s most likely a salt bridge.

Carefully

push into

the bridge in several places to break it.

NOTE:

In humid areas, it is best to keep the salt stor-

age level lower, and to refill more often.

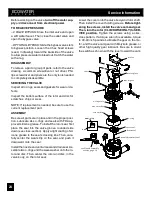
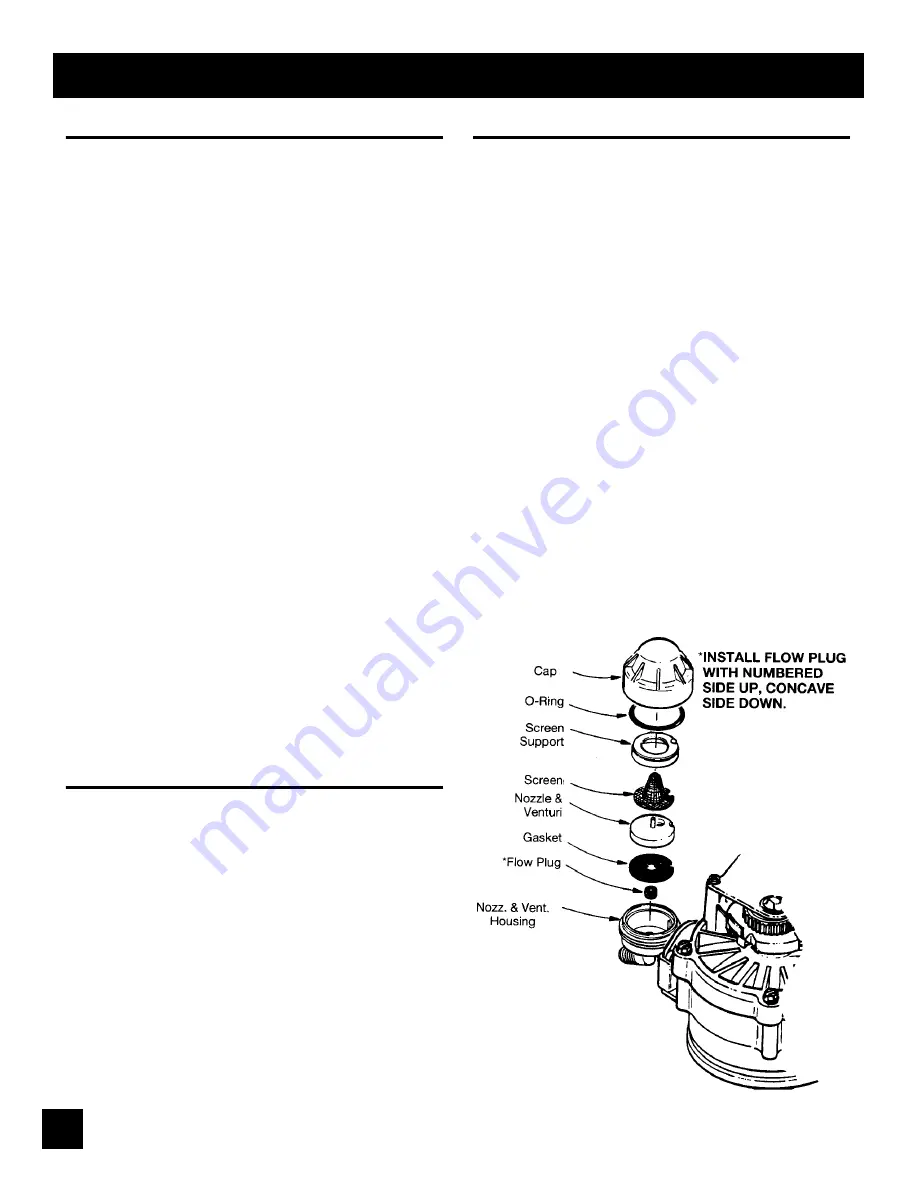
CLEANING THE NOZZLE AND VENTURI

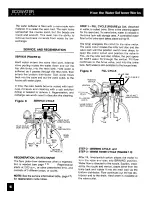
A clean nozzle and venturi (FIG. 13) is a must for the
EcoWater System Unit to work right. This small unit
creates the suction to move brine from the brine
tank, into the resin tank. If it should become plugged
with sand, silt, dirt, etc., the EcoWater System Unit
will not work, and you will get hard water.

To get to the nozzle and venturi, remove the EcoWa-
ter System Unit top cover.

Be sure the unit is in ser-

vice cycle

(no water pressure at nozzle and ventu-

ri). Then, holding the nozzle and venturi housing
with one hand, turn off the cap.

Do not lose the o--

ring seal.

Lift out the screen support and screen.

Then, remove the nozzle and venturi. Wash the
parts in warm, soapy water and rinse in fresh water.
If needed, use a small brush to remove iron or dirt.
Be careful not to scratch, misshape, etc., surfaces of
the nozzle and venturi. Also, check and clean the
gasket and flow plug(s) if dirty.

Carefully replace all parts in the correct order. Lubri-
cate the o--ring seal with silicone grease and locate
in position. Install and tighten the cap,

by hand only.

Do not overtighten

and break the cap or housing.

Figure 13

Summary of Contents for ESD 525

Page 1: ...d on recycled paper EcoWater Canada LTD 5240 Bradco Blvd Mississauga Ontario L4W 1G7 Systems tested and certified by NSF Inter national against NSF ANSI Standard 44 for water softener performance Systems tested and certified by the Water Quality Association against NSF ANSI Standard 44 for water softener performance and against CSA B483 1 ...

Page 2: ...FOR FUTURE REFERENCE ENTER THE FOLLOWING INFORMATION MODEL NO DATE CODE WATER HARDNESS GPG WATER HARDNESS SETTING see page 15 SERIAL NO INSTALLATION DATE IRON CONTENT PPM on rating decal on shipping carton EcoWater Canada LTD 5240 Bradco Blvd Mississauga Ontario L4W 1G7 1 800 752 3273 ...

Page 3: ...nd feder al codes Use care when handling the EcoWater softener Do not turn upside down drop or set on sharp pro trusions Do not locate the EcoWater softener where freezing temperatures occur Do not attempt to treatwater over 120 F Freezing or hot water damage voids the warranty Avoid installing in direct sunlight Excessive sun heat may cause distortion or other damage to non metallic parts The Eco...

Page 4: ... greatly across the country It generally contains from 3 to 100 gpg Hard water affects living in general Hardness miner als combine with soap to make a soap curd The curd greatly reduces the cleaning action of soap Precipitated hardness minerals form a crust on cooking utensils appliances and plumbing fixtures Even the tastes of foods are affected A water soft ener removes the hardness minerals to...

Page 5: ...hragms etc in water handling equipment A chemical analysis is needed to measure the de gree of acidity in water This is called the pH of water Water testing below 6 9 pH is acidic The lower the pH reading the greater the acidity A neutralizerfilter or a chemical feed pump are usually recommended to treat acid water 4 SEDIMENT is fine foreign material particles sus pended in water This material is ...

Page 6: ...NED WATER Figure 2 INLET OUTLET PLUMBING OPTIONS ALWAYS INSTALL either an EcoWater bypass valve 7129871 or a 3 valve bypass system By pass valves allow you to turn off water to the soft ener for repairs if needed but still have water in house pipes Use 1 or 3 4 minimum pipe and fittings Use sweat copper or threaded pipe or PVC plastic pipe Sweat soldering is required to adapt to the fittings 1 mal...

Page 7: ... water in the home install the Eco Water conditioner close to the water supply inlet and before all other plumbing connections ex cept outside water pipes Outside faucets should remain on hard water to avoid wasting condi tioned water and salt see drawing on page 6 A nearby drain is needed to carry away regenera tion discharge water A floor drain is preferred with a laundry tub standpipe etc as ot...

Page 8: ...8 ECOWATER S Y S T E M S Installation Figure 5 ...

Page 9: ...9 ECOWATER S Y S T E M S Installation 2 7 out in drain fitting hose clamp ...

Page 10: ... wire clamp 2 B A 2 Use the included ground clamp kit to jump across the inlet and outlet copper tubes Figure 6 18 Bypass valve s should always remain in softwater service position Position in bypass only if needed for softener repair ground clamp ...

Page 11: ...11 ECOWATER S Y S T E M S Installation PROGRAM THE TIMER page 12 AFTER PROGRAMMING COMPLETE INSTALLA TION STEPS 16 AND 17 BELOW 26 17 ...

Page 12: ...reset SOUND BEEPER A beeper sounds while pressing keypads for timer set up One beep signals a change in the face plate display Repeated beeps means the timer will not accept a change from the keypad you have pressed telling you to use another keypad For example in setting the hardness step 2 the beeper sounds repeatedly when the display reaches 1 using the DOWN keypad or the highest hardness setti...

Page 13: ...reased by 25 3 SET RECHARGE REGENERATION TIME Press the SELECT keypad once to display 2 00 AM flashing and RECHARGE TIME At the 2 00 AM RE CHARGE TIME setting the softener begins regenera tion at 2 00 AM This is a good time in most house holds because water is not being used If a different RECHARGE TIME setting would be bet ter for your household do the following Press the UP DOWN keypads to set t...

Page 14: ...RECHARGE keypad RECHARGE TONIGHT flashes in the dis play and the softener begins regeneration at the next preset recharge time If you decide to cancel the regeneration before it has started press and re lease the RECHARGE keypad once more to turn off the flashing RECHARGE TONIGHT PROGRAM MEMORY If electrical power to the softener goes off the time display is blank but the face plate timer keeps th...

Page 15: ...s from the water meter it converts them to gallons of water passing through the water softener It multiplies this water usage information times the water hardness preprogrammed into tim er to continually calculate the soft water capacity re quired The computer adjusts daily to water using habits seeking to supply soft water for the longest time using the least and most efficient amount of salt and...

Page 16: ...16 ECOWATER S Y S T E M S How the Water Softener Works 8 Figure 8 13 25 10 Figure 9 9 VALVE CAM ROTOR DISC ...

Page 17: ...17 ECOWATER S Y S T E M S How the Water Softener Works Figure 10 11 12 FLOW PLUG Figure 11 Figure 12 ...

Page 18: ... between the water and the salt Then salt will not dissolve in the water to make brine Without brine the resin bed does not regener ate and you will have hard water If the storage tank is full of salt it is hard to tell if you have a salt bridge Salt is loose on top but the bridge is under it Take a broom handle or like tool and push it straight down into the salt If a hard object is felt it s mos...

Page 19: ...tart the unit 3 Valve Bypass OUTLET VALVE INLET VALVE BYPASS VALVE water flow to conditioner from conditioner for SERVICE Open the inlet and outlet valves Close the bypass valve for BYPASS Close the inlet and outlet valves Open the bypass valve EcoWater Bypass Valve CAUTION ALWAYS relieve water pressure in the EcoWater System Unit as follows before removing parts from the valve or resin tank DE PR...

Page 20: ...e with the hardness setting Also test a conditioned water sam ple to verify if a problem exists Press SELECT twice more to return the present time display If you do not find a problem after making the initial checks do MANUAL INITIATED ELECTRONIC DIAGNOSTICS and the MANUAL ADVANCE RE GENERATION CHECK AUTOMATIC ELECTRONIC DIAGNOSTICS The faceplate computer has a self diagnostic func tion for the el...

Page 21: ...ugh the meter open a nearby CONDITIONED WATER faucet 000 to 199 continual repeats display for each gal lon of water passing through the meter If you don t get a reading in the display with a faucet open pull the sensor housing from the valve outlet port Pass a small magnet back and forth in front of the sensor You should get a reading If you do get a reading disconnect the outlet plumbing and chec...

Page 22: ...correct model code number press the UP or DOWN keypad Press SELECT and reset the timer NOTE If the face plate is left in a diagnostic display or a flashing display when setting times or hardness present time automatically returns if a keypad is not pressed within 4 minutes FACE PLATE REPLACEMENT Be sure the valve is in service position observe valve cycle indicator when replacing the face plate If...

Page 23: ...e draw from the brine tank by shining a flashlight into the brine well and observing a noticeable drop in the liquid lev el NOTE Be sure a salt bridge is not preventing water with salt contact a If the softener does not draw brine nozzle and or venturi dirty or defective nozzle and venturi not seated properly on gasket restricted drain check drain fitting and hose defective nozzle and venturi seal...

Page 24: ...ubricate ALL o rings and seals with FDA ap proved silicone grease To install the rotor seal first place the seal into the valve groove rounded side down see cross section Apply a light coating of sil icone grease to the seal s crossing ribs Then care fully center the wear strip on the seal and push it downward onto the seal Install the nozzle and venturi seal and drain seal As semble two o rings a...

Page 25: ... FAST RINSE CYCLE MINUTES 3 MAX FLOW GPM 2 0 HiGH CAPACITY RESIN LOAD POUNDS 47 CUBIC FEET 9 SALT STORAGE CAPACITY POUNDS 200 Intermittent flow rate does not represent the maximum service flow rate used for determining the softeners rated capacity and efficiency Continuous operation at flow rates greater than the service flow rate may affect capacity and efficiency performance The validity of thes...

Page 26: ...26 ECOWATER S Y S T E M S Repair Parts 11 12 6 7 25 26 27 28 29 30 31 8 9 10 18 13 14 23 22 20 17 16 15 32 1 2 3 5 Valve Assembly see page 28 24 21 4 19 33 ...

Page 27: ... 35 14 0502272 Resin 1 cu ft stand mesh 15 1103200 Hose Adaptor 16 9003500 Grommet 0900431 Hose Clamp not shown 17 7218604 Brine Tank 18 7287386 Rim KEY NO PART NO DESCRIPTION 19 7214244 Vapor Barrier 20 7273997 Salt Hole Cover 21 7219587 Screw 22 7109871 Brinewell 23 7155115 Brinewell Cover 24 7219595 Washer 25 7221754 Float Stem and Guide Assembly 26 7170288 O ring 15 16 x 1 3 16 27 7116713 Clip...

Page 28: ...WATER S Y S T E M S Repair Parts 50 1 2 4 3 5 6 7 8 9 10 11 12 13 14 15 16 17 21 20 19 18 23 43 28 27 32 30 29 31 33 34 35 36 37 39 40 41 42 45 46 47 48 24 cross section view seal wear strip 25 26 49 22 44 38 ...

Page 29: ...Rotor Seal 24 7170204 O Ring 3 8 x 9 16 25 7092642 Plug Drain Seal 26 7129889 Spring 27 2204101 Turbine Support and Shaft 28 7117858 Turbine 29 7082053 Valve Body KEY NO PART NO DESCRIPTION 30 7081764 Seal Nozzle Venturi 31 7170319 O Ring 1 4 x 3 8 2 req 32 7081201 Retainer Nozzle Venturi 33 7081104 Nozzle Venturi Housing 34 1202600 Nut Ferrule 35 7095030 Cone Screen 36 1148800 Flow Plug 3 gpm 37 ...

Page 30: ...E HUNDRED AND 00 100th DOLLARS 500 00 as to any one installation and shall not exceed the sum of FIVE HUNDRED THOUSAND AND 00 100th DOLLARS 500 000 00 in the aggregate and 2 There shall be no liability hereunder as to any purchaser to whom there has not been issued at the time of installation and purchase completed registration card which is enclosed with a facsimile of this bond and who has not r...

Page 31: ...ee year warranty on the electronic FACEPLATE WIRING HARNESS DRIVE MOTOR TRANSFORMER POWER CORD SENSOR HOUSING and MICRO SWITCHES to a total of TEN YEARS from the date of original installation Should your local dealer not offer this warranty you may contact the factory for additional information General Provisions The above warranties are effective provided the water conditioner is operated at wate...

Reviews: