4
ECOWATER
S Y S T E M S
Before Starting Installation
PLAN HOW YOU WILL INSTALL THE FILTER
You must first decide how to run in and out pipes to
the filter. Look at the house main water pipe at the
point where you will connect the filter. Is the pipe sol-
dered copper, glued plastic, or threaded brass/galva-
nized? What is the pipe size?
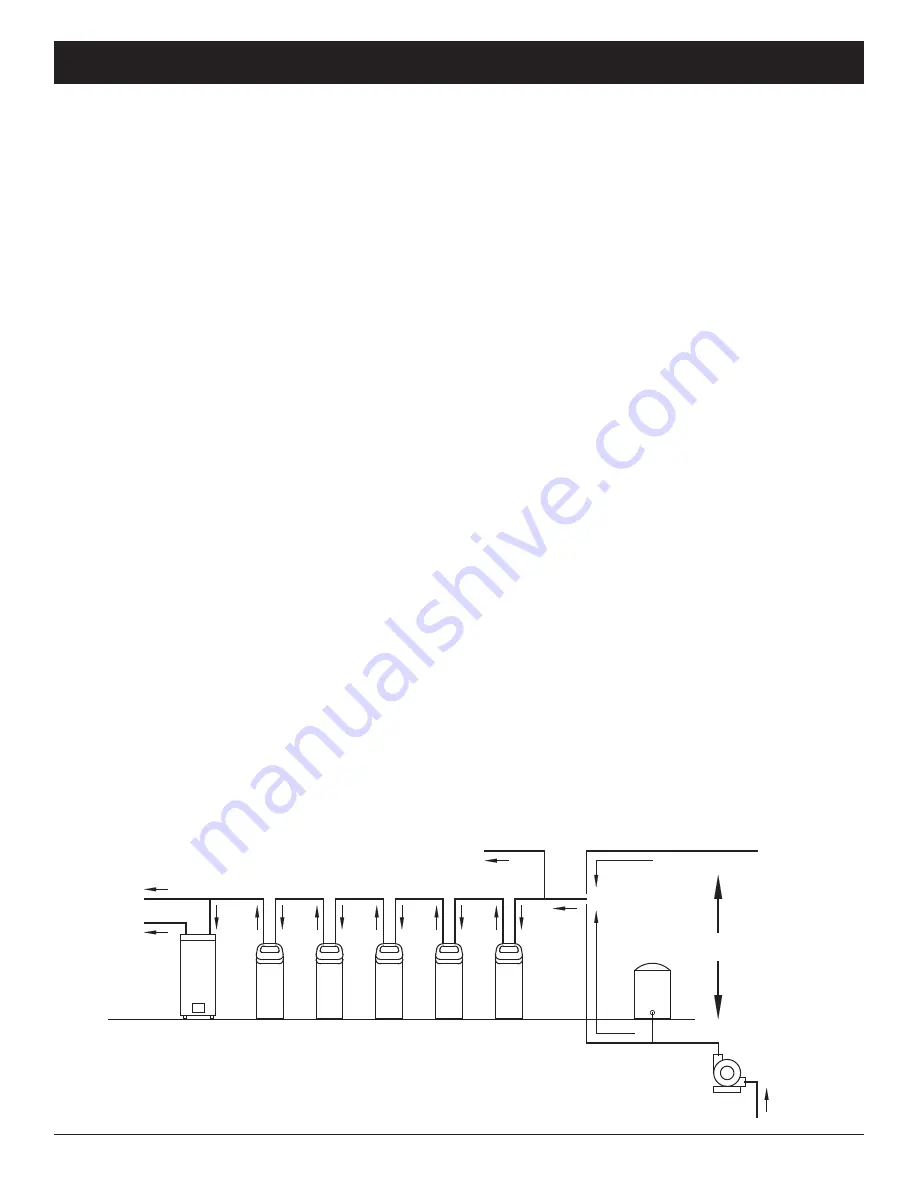
Now look at the typical installation illustration on page
6. Use it as a guide when planning your particular
installation. Be sure to direct incoming, unfiltered
water to the filter valve inlet fitting. The valve ports
are marked IN and OUT.
UNPACKING
EcoWater Systems Air Aspirated Iron Filters are
shipped from the factory in one master carton. The
carton also includes a bag of small parts needed to
assemble and install the unit, plus this manual.
NOTE: Filtering mineral is not included with mod-
els ETF2300EIV10 & EIV2300EIV12.
Thoroughly check the filter for possible shipping dam-
age and parts loss. Also inspect and note any dam-
age to the shipping carton. Notify the transportation
company if damage is present. EcoWater Systems is
not responsible for in-transit damages.
Remove and discard (RECYCLE) all packing materi-
als. We suggest you keep the small parts in the
bag(s) until you are ready to use them.
WHERE TO INSTALL THE FILTER
=
Place the filter as close as possible to the pressure
tank (well system) or water meter (city water).
=
Place the filter as close as possible to a floor
drain, or other acceptable drain point (laundry tub,
sump, standpipe, etc.).
CAUTION:
Drain water
exits the hose at a fast flow rate, and at water sys-
tem pressure. Be sure the hose is fastened in
some manner to prevent ”whipping” and splashing
to prevent water damage to surrounding area.
=
Connect the filter to the main water supply pipe
UPSTREAM OF the water heater. DO NOT RUN
HOT WATER THROUGH THE FILTER. The tem-
perature of water passing through the filter must
be less than 120°F.
=
Keep outside faucets on unfiltered water to con-
serve filtering capacity.
=
Do not install the filter in a place where it could
freeze. Damage caused by freezing is not cov-
ered by the warranty.
=
Put the filter in a place water damage is least likely
to occur if a leak develops. The manufacturer will
not repair or pay for water damage.
=
A 120V, 60 Hz electrical outlet, to plug the included
power supply into, is needed near the filter. Be
sure the electrical outlet and power supply are in an
inside location, to protect from wet weather.
=
If installing in an outside location, you must take the
steps necessary to assure the filter, installation
plumbing, wiring, etc., are as well protected from the
elements, contamination, vandalism, etc., as when
installed indoors.
=
Keep the filter out of direct sunlight. The sun's heat
may soften and distort plastic parts.
TOOLS, PIPE & FITTINGS,
OTHER MATERIALS YOU WILL NEED
=
Plastic inlet and outlet fittings included with the filter
allow water flow equivalent to 1 inch nominal pipe.
To maintain full valve flow, 1” pipes to and from the
filter fittings are recommended. Do not reduce the
pipes to less than 3/4” size.
=
Use copper, brass or PEX plastic pipe and fittings.
=
ALWAYS install the included bypass valve, or 3 shut-
off valves. Bypass valves let you turn off water to
the filter for repairs if needed, but still have water
available to the house pipes.
=
Drain hose 5/8” inside diameter minimum, with a
garden hose connection on one end, is needed for
the valve drain. See step 5 on page 8.
=
If a rigid valve drain is needed, to comply with plumb-
ing codes, you can buy the parts needed (see page
6) to connect a 5/8” minimum copper tubing drain.
OR
City Water Supply
Well Water Supply
Well
Pump
Pressure
Tank
Untreated Water to
Outside Faucets
Water
Heater
Water
Softener
Taste
& Odor
Filter
Iron
Filter
Sediment
Filter
Neutral -
izer
Filter
Cold Water
to House
Hot Water
to House
FIG. 2
NOTE: Not all devices shown would be needed on a typical water supply.
Illustration shows proper relative sequence for installation.


