26 | eddyfi.com
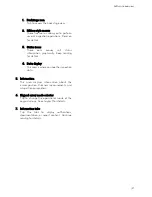
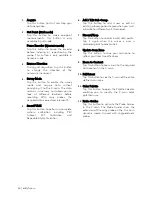
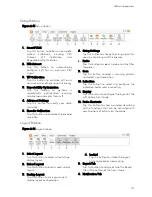
1.
Acquire
Tap this button to start and stop your
data acquisition.
2.
Get Point (Grid mode)
Tap this button to make one-point
measurements. This button is only
available in grid mode.
Pause Encoder (dynamic mode)
Tap this button to pause the encoder
before indexing or repositioning the
probe. This button is only available in
dynamic mode.
3.
Reverse Direction
During grid acquisition, tap this button
to change the direction of the
automatic increment.
4.
Survey Mode
Tap this button to enable the survey
mode and acquire data without
consigning it to the C-scan. The data
remains in memory and allows you to
look at different locations before
recording. With array probes, the
acquired data comes from element 3.
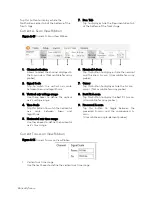
5.
SmartPULSE
Tap this button to perform a complete
system calibration including PEC
Autoset,
WT
Calibration,
and
Repeatability Optimization.
6.
Add / Edit Sub-Comp.
Tap this button to add a new or edit an
existing subcomponent region when you must
calibrate for different wall thicknesses.
7.
Discard/Keep
Tap this button to discard invalid data points.
Tap it again when the cursor is over a
discarded point to reactivate it.
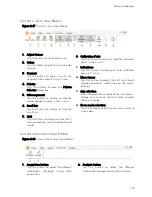
8.
Update Scan Zone
Tap this button to save your scan zone to
reflect your latest modifications.
9.
Zoom to Content
Tap this button to zoom in on to the acquired
data content in the C-scan.
10.
Full Extent
Tap this button to see the C-scan of the entire
defined scan zone.
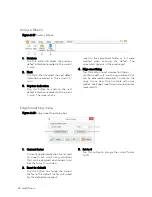
11.
Color Palette
Tap this button to open the Palette Selector
enabling you to modify the C-scan color
palette in use.
12.
Probe Guides
Tap this button to activate the Probe Guides
in the C-scan. The Probe Guides show the
extension of the array probe on the C-scan in
dynamic mode. Unused with single-element
probes
Summary of Contents for LYFT
Page 1: ...i EDDYFI LYFT Corrosion Assessment Redefined User s Manual...
Page 11: ...General Precautions and conventions xi General Precautions and conventions...
Page 17: ...Lyft System Overview 1 Chapter 1 Lyft System Overview...
Page 30: ...14 eddyfi com...
Page 31: ...Software overview 15 Chapter 2 Software overview...
Page 47: ...Workflow overview 31 Chapter 3 Workflow overview...
Page 48: ...32 eddyfi com TYPICAL Inspection Workflow Figure 3 1 Typical inspection workflow...
Page 68: ...52 eddyfi com...
Page 69: ...Lyft PRO software 53 Chapter 4 Lyft PRO software...
Page 73: ...Lyft PRO software 57...
Page 74: ...58 eddyfi com Chapter 5 Preferences...
Page 78: ...62 eddyfi com...
Page 79: ...Keypad and Keyboard Functions 63 Chapter 6 Keypad and Keyboard Functions...
Page 81: ...Maintenance and Troubleshooting 65 Chapter 7 Maintenance and Troubleshooting...
Page 90: ...74 eddyfi com...
Page 91: ...Specifications 75 Chapter 8 Specifications...
Page 94: ...78 eddyfi com...
Page 95: ...Connector reference 79 Appendix A Connector reference...
Page 99: ...Using the Optional Harness 83 Appendix B Using the Optional Harness...
Page 109: ...Setting Up the Extension Pole 93 Appendix C Setting Up the Extension Pole...
Page 113: ...Using the array probe straps 97 Appendix D Using the array probe straps...
Page 119: ...License management 103 Appendix E License management...
Page 121: ...License management 105 Today Two weeks later YourComputerID...

