WWW.EDELBROCK.CO
M
©2007 Edelbrock Corporation
Brochure #63-70216
Page 8 of 16
Catalog #70216
Rev. 5/07 - DC/mc
2.4 Nitrous Feed Line Mounting
1.
Determine the route your main nitrous feed line will follow. Ensure that the path does not route the nitrous feed line too
close to the exhaust system, suspension, electrical lines/components or tires.
2.
Attach nitrous supply line to bottle.
3.
Feed nitrous line along proposed route.
4.
Secure the nitrous supply line to the underside of the vehicle.
NOTE:
The stainless steel covering of the main nitrous feed line is very abrasive. Shield painted components or sensitive
system components like electrical, fuel lines, brake lines or suspension components to prevent them from contacting the
main feed line. Rubber hose can be slid over and retained as a chafe guard if necessary.
5.
Leave the nitrous line end under the hood loose pending installation of the nitrous solenoid.
2.5 Edelbrock E1 Nitrous Nozzle Installation
1.
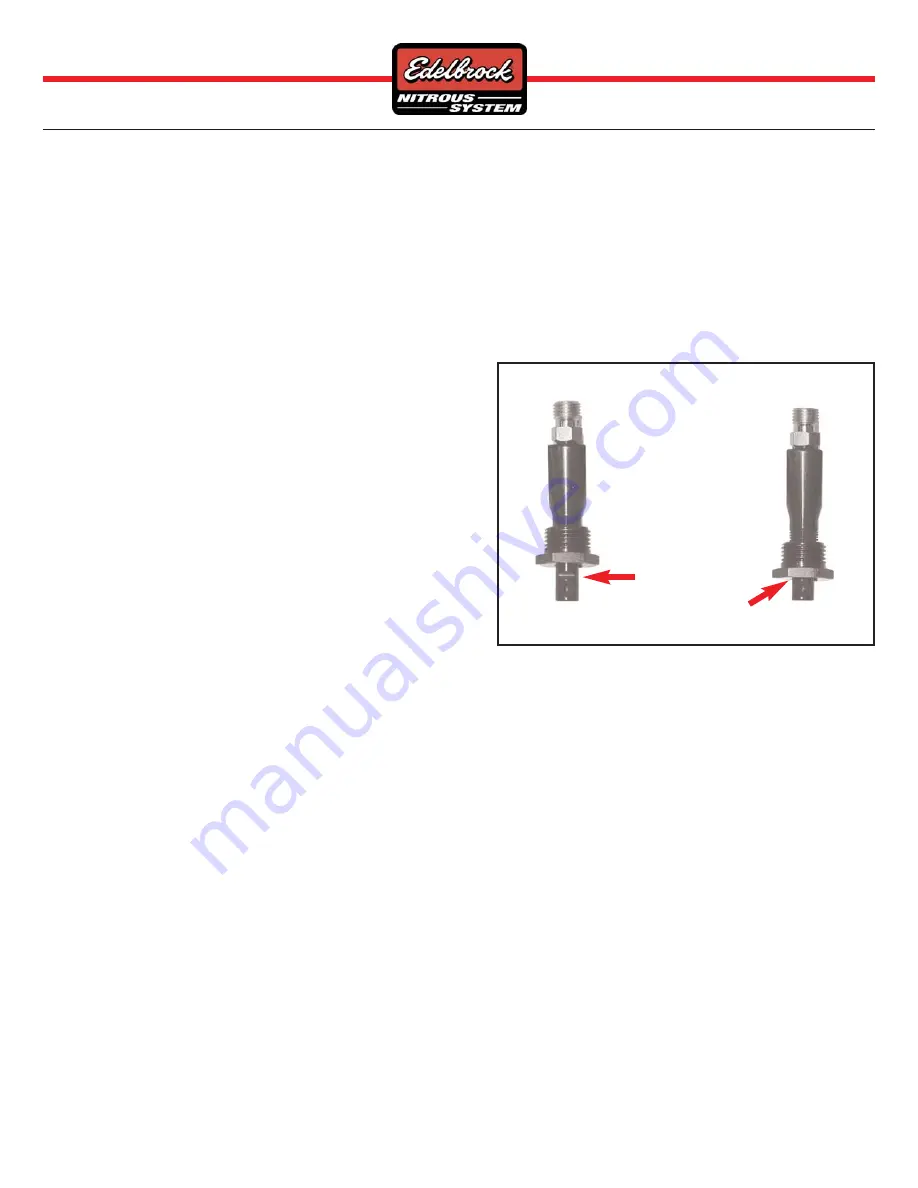
Thread the E1 nozzle into the mounting collar to be sure that
both the nitrous and fuel outlets are fully visible when
threaded in, such as shown in the picture to the right. If the
fuel outlet, which is most succeptable to being blocked is
blocked, serious engine damage will most likely occur. If the
nozzle does not seat deep enough into the collar you may
need to run a tap through the hole to clean out and deepen
the threads.
2.
Disconnect the intake air temperature sensor from the
intake boot and remove the intake boot (leading from the air
filter housing to the throttle body).
3.
Find a location on the intake boot that has ample clearance
to install the nozzle and a clean shot at spraying through the
throttle body into the engine. We mounted the nozzle in the bottom of the boot just before the throttle body. Also make sure
that you have clearance for the nozzle with the nitrous and fuel lines connected.
4.
Drill a hole in the intake boot where you will be installing the nozzle using a 9/16” drill bit.
5.
Install the nozzle mounting collar in the boot with the nut on the outside of the boot. Put a small amount of lock-tite on the
collar nut to ensure that the collar and nut do not come loose in the intake tract.
6.
Install the E1 nozzle into the nozzle collar using Teflon paste. Be sure that the nozzle outlet is clocked so that it sprays
through the throttle body and into the engine.
7.
Re-install the intake boot.
2.6 Solenoid Assembly and Installation
Nitrous Solenoid Assembly
1.
Hold the nitrous solenoid securely in a bench vise, being careful not to harm the solenoid or block the inlet or outlet ports
of the solenoid.
2.
Install the nitrous filter fitting (4AN x 1/8”NPT Blue Fitting) into the inlet port of the nitrous solenoid using Teflon Paste.
3.
Install the nitrous outlet fitting (3an x 1/8”NPT Blue Fitting) into the outlet port of the nitrous solenoid using Teflon Paste.
4.
Remove the solenoid from the vise and attach a solenoid bracket using the supplied solenoid screws.
5.
Find a location in the engine compartment to mount the solenoids, making sure that it is within reach of the feed line and
E1 nozzle.
6.
Connect the straight end of the 3AN x 15” 90° blue hose to the outlet port of the nitrous solenoid.
7.
Select the nitrous jet you will be using from the jet map on page 4 and place this in the “N” port of the E1 nozzle. Connect
the 90° end of the 3AN line to the nozzle with the jet installed.
8.
Connect the 4AN nitrous feed line to the inlet port of the nitrous solenoid.
Correct Nozzle Depth
into Collet
Incorrect Nozzle
Depth into Collet
Fuel Outlet Blocked
Fuel Outlet Fully
Exposed Correctly


