6.
”PHOTO TIME LAPSE MODE”
If you are a DSLR / mirrorless user, you could perform time lapse shots with the help of the Photo Time Lapse Mode. Attach the
trigger cable, select the mode and follow these steps. If Action Module is not on Photo Time Lapse Mode, turn off the device
and turn it on again to be able to choose Photo Time Lapse Mode.
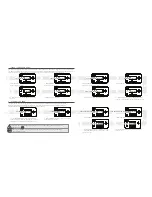
1.
Use
LEFT/RIGHT
buttons to move your camera
to the end point position. By choosing same end and
start points you could perform Steady Time-Lapse.
2.
Use
LEFT/RIGHT
buttons to move your camera
to the start point position.
GET ME TO MY END POINT!
8.
Push
UP/DOWN
buttons to choose
when to start. Now, or set a countdown.
6.
Set up your camera’s shutter speed according to
value on the screen in order to prevent slide overlaps.
9.
The system will start begin the countdown to your
time lapse.
10.1.
While in operation, pushing
LEFT/RIGHT
buttons
shows the information of percentage completed and
continues as.
4.
Push
UP/DOWN
buttons to set your frame
rate.
WHAT SHOULD BE OUR FINAL VIDEO FPS?
EASE IN OUT OPTION
TIMELAPSE STARTS IN
SHOW ME WHERE TO START!
10.2.
The duration of the final video so far.
% COMPLETE
10.3.
Elapsed time so far
FINAL VIDEO DURATION SO FAR
TIME ELAPSED
3.
Push
UP/DOWN
buttons to set duration of time
lapse.
HOW LONG ARE WE HERE FOR?
DON’T EXCEED SHUTTER SPEED OF
10.5.
Pause the process and it will memorize where
it paused.
10.4.
Remaining time to finish.
TIME REMAINING
PAUSE?
5.
Push
UP/DOWN
buttons to set your
final video duration.
WHAT SHUOLD BE OUR FINAL VIDEO DURATION?
7.
Push
LEFT/RIGHT
buttons to enable/disable ease
in/out option.
In this mode use left/right control buttons to move the camera.
To go back to previous question press OK and wait 3 secs.
Action Module can perfom time lapses up to 365 days. Be prepared the unit by either hot
swapping or using an AC-DC adapter.
WHEN SHALL WE GET STARTED?
Before operating your product, please watch the users manual videos from the link:
manuals.edelkrone.com


