background image

Materials to be avoided in microwave oven

Utensils                       Remarks
Aluminum tray

Food carton with

metal handle

Metal or metal-

trimmed utensils
Metal twist ties

Paper bags
Plastic foam

Wood

Metal shields the food from microwave energy. Metal trim may

cause arcing.

May cause a fire in the oven.
Plastic foam may melt or contaminate the liquid inside when exposed

to high temperature.
Wood will dry out when used in the microwave oven and may split

or crack.

May cause arcing. Transfer food into microwave-safe dish.

May cause arcing. Transfer food into microwave-safe dish.

May cause arcing and could cause a fire in the oven.

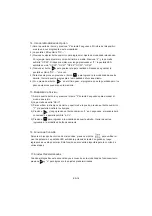
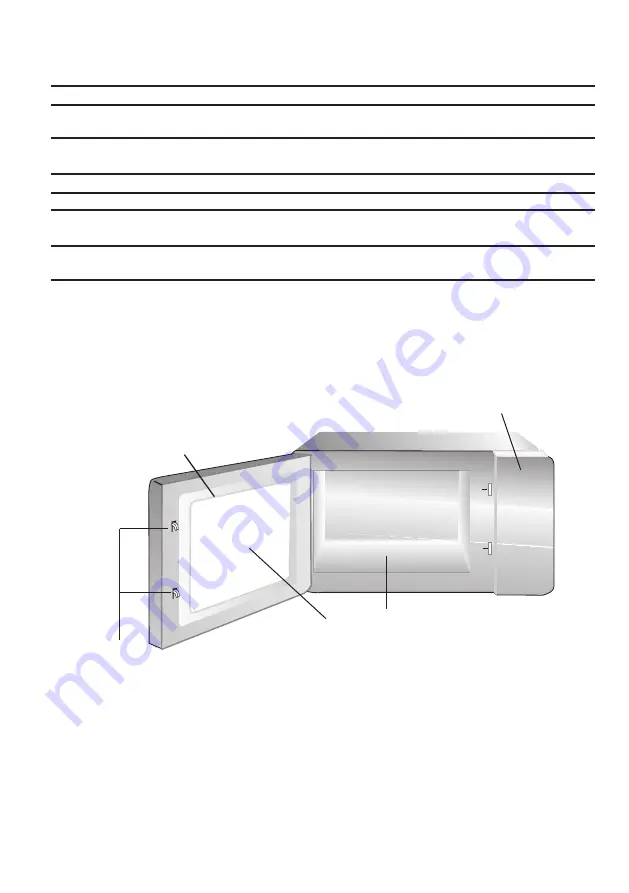
A) Control panel

B) Observation window

C) Door assembly

D) Safety interlock system

E) Ceramic board

SETTING UP YOUR OVEN

Names of Oven Parts and Accessories

Remove the oven and all materials from the carton and oven cavity.

Your oven comes with the following accessories:

Instruction Manual                1

C

A

B

D

E

Note: 1) Don't press the ceramic board forcibly.

         2)  Take and put the 

 gently during the operation

.

         3)  After using, don't touch the ceramic board by hand in order to avoid high temperature


utensils

 in order to avoid damage  the 

ceramic board

.

scald

 to

EN-7

Summary of Contents for EDMO-1000E

Page 1: ...1000E Horno Microondas MANUAL DE INSTRUCCIONES Lea atentamente estas instrucciones antes de utilizar el horno de microondas y guárdelas cuidadosamente Si sigue las instrucciones su horno le proporcionará un buen servicio durante muchos años ...

Page 2: ......

Page 3: ...ión perjudicial a la energía de microondas Es importante no forzar los cierres de seguridad b No coloque ningún objeto entre la parte frontal del horno y la puerta y evite que se acumule suciedad o restos de detergentes limpiadores en las superficies de sellado c ADVERTENCIA Si la puerta o juntas de la puerta están dañadas el horno no debe utilizarse hasta que haya sido reparado por una persona co...

Page 4: ...aparato con accesorio tipo Y 3 Advertencia Asegúrese de que el aparato esté apagado antes de reemplazar la lámpara para evitar la posibilidad de una descarga eléctrica 4 Aviso Es peligroso para cualquier persona que no sea una persona competente llevar a cabo cualquier servicio o repa ración que consista en la extracción de una cubierta que impida la exposición a la energía de microondas 5 Aviso L...

Page 5: ...n regularidad y los depósitos de alimentos deben ser eliminados 13 El aparato no debe limpiarse con un chorro de agua para los aparatos destinados a colocarse en el suelo y que no sean al menos IPX5 14 Si no mantiene el microondas en condiciones limpias podría dar lugar a un deterioro de la superficie que podría afectar negativamente a la vida del aparato y provocar una situación peligrosa 15 Sólo...

Page 6: ...cado si no entiende las instrucciones de conexión a tierra o si tiene alguna duda sobre si el aparato está correctamente conectado a tierra Si es necesario el uso de un cable de extensión utilice únicamente un cable de extension de 3 conductores que tenga 3 clavijas 1 Se incluye un cable de alimentación corto para reducir los riesgos de tropiezos o enredo con un cable más largo 2 Si se utiliza un ...

Page 7: ...rovocar que el plato se quiebre Siga las recomendaciones del fabricante No cierre las bolsas usando ataduras de metal Realice agujeros para permitir que escape el vapor Sólo utilícelos para periodos de cocción cortos No deje el horno sin vigilancia cuando cocine con estos utensilios Utilice sólo vajilla microondeable Siga las recomendaciones del fabricante No use platos agrietados o astillados Uti...

Page 8: ... evitarse Utensilios Observaciones Bandeja de aluminio Comida envuelta con manijas de metal Utensilios de metal o con decoraciones metálicas Ataduras de metal Bolsas de papel Porexpán Madera Podrían provocar incendio en el horno Podrían causar arcos eléctricos y provocar incendios en el horno Podría provocar un arco eléctrico Transfiera la comida a un plato microondeable El metal blinda la comida ...

Page 9: ...n la parte superior Nunca desmonte los pies del aparato ni bloquee la entrada de aire y la abertura de escape El lado debe estar abierto 1 Si bloquea las aberturas de ventilación del aparato podría dañarlo 2 Coloque el horno lo más lejos que pueda de radios y televisores El uso del horno microondas puede provocar interferencias en su radio televisión o equipos similares 3 Conecte su horno en un to...

Page 10: ...detergente o espray de líquido alcalino al panel de control y a las piezas plásticas pues podría dañarlas Use un paño seco no mojado para limpiar estas piezas 3 Limpie el interior del horno Antes de usarlo asegúrese de limpiar líquidos derramados salpicaduras de aceite y restos de comida tan pronto como sea posible Si el horno se usa cuando está sucio la suciedad se pegará en la superficie y podrí...

Page 11: ...Funciones y características del panel de control FUNCIONAMIENTO 1 Botones de potencia 2 Botón de tiempo de cocción 4 Botón detener 5 Botón de inicio 3 Botón X2 6 Botones numéricos 1 2 3 4 5 6 ES 10 ...

Page 12: ... de 3 segundos Bip continuo 5 bips rápidos repitiéndose Sonidos apagados Bajo Medio Alto Sonido de botones apagado Sonido de botones encendido 15 segundos 30 segundos 60 segundos 120 segundos Deshabilitar opción Sobre la marcha Habilitar opción Sobre la marcha Deshabilitar reinicio de puerta Habilitar reinicio de puerta 60 minutos máximos de cocción 10 minutos máximos de cocción Deshabilitar progr...

Page 13: ...zca algo distinto en las especificaciones del producto Botón Pantalla Tiempo Potencia 1 2 3 4 5 6 7 8 9 0 0 10 0 20 0 30 0 45 1 00 1 30 2 00 3 00 4 00 5 00 100 100 100 100 100 100 100 100 100 100 Factores de cocción 80 80 80 80 80 80 80 80 80 80 Apéndice B Tiempos de cocción predeterminados ES 12 ...

Page 14: ...alidad el horno estará listo para comenzar un ciclo manual o predeter minado de cocción 2 Durante la modalidad de funcionamiento la pantalla exhibirá 0 00 3 Desde esta modalidad el horno podrá cambiar a cualquiera de las otras modali dades Sólo el ventilador y la luz de horno funcionan 4 Modalidad de Puerta Abierta 1 Mientras el horno está con la puerta abierta estará en la modalidad de puerta abi...

Page 15: ... manual 2 Durante la modalidad de funcionamiento la pantalla exhibirá 00 00 3 Si presiona los botones Hold 0 Defrost 20 Medium 50 o Med Hi 70 para seleccionar el nivel de potencia el LED exhibirá la seleccionada Si se presiona el mismo botón dos veces la alimentación cambiará a PL10 Si no se elige ninguna potencia la opción PL10 será la predeterminada 4 Sólo el ventilador y la luz de horno funcion...

Page 16: ...il En la modalidad de funcionamiento presione los botones del teclado e ingrese a la programación predeterminada asociada con ese botón 2 La pantalla LED exhibirá el tiempo restante Si es una cocción de varias etapas el tiempo total restante aparecerá y no el tiempo de alguna etapa en particular 3 Cuando el programa de cocción haya finalizado el horno ingresará a la modalidad de término de ciclo d...

Page 17: ...informarle que el tiempo no está disponible y luego el LED volverá a exhibir ProG El tiempo ajustado antes no será cambiado 8 Cierre la puerta y el horno regresará a la modalidad de funcionamiento Si presiona el botón durante el proceso de ajuste el horno cambiará a la modalidad de puerta abierta El programa que no fue almacenado se perderá Si existe un programa almacenado como procedimiento de me...

Page 18: ...rimera etapa presione para ajustar la segunda etapa Repita el mismo paso para ajustar la tercera etapa 2 Cuando ajuste la segunda o la tercera etapa presione y la pantalla exhibirá S 2 o S 3 3 Presione el botón para iniciar el periodo de cocción Ejemplo Para ajustar tres etapas como modalidad de memoria La primera etapa es PL7 y el tiempo es de 1 minuto 25 segundos La segunda etapa es PL5 y 5 minu...

Page 19: ...rama no será guardado pero los pasos anteriores quedarán en la memoria Stop Start Start 1 Abra la puerta del horno y presione la tecla 3 durante 5 segundos para acceder al modo de servicio 2 La pantalla muestra SErU 3 Para verificar los tiempos de cierre o apertura de la puerta presione el botón numérico 1 y la pantalla mostrará los tiempos 4 Presione y luego presione el botón numérico 4 en 3 segu...

Page 20: ...ta del horno Esto es normal Está prohibido hacer funcionar esta unidad sin comida en su interior Esto es peligroso El horno no puede iniciarse El horno no calienta Cierre bien la puerta del horno 4 La puerta no cerró bien Desconecte el cable Reconéctelo después de 10 segundos 1 El cable de alimentación no está bien conectado Remplace el fusible o haga que un profesional repare el cortacir cuitos 2...

Page 21: ...TRUCTIONS CAREFULLY Read these instructions carefully before using your microwave oven and keep it carefully If you follow the instructions your oven will provide you with many years of good service MODEL EDMO 1000E ...

Page 22: ... Weight 230V 50Hz 1550W 1000W 25L 511 Approx 14 kg 311mm 7 External Dimensions Net Weight 511 Approx 14 kg 311mm 7 432 a Do not attempt to operate this oven with the door open since this can result in harmful exposure to microwave energy It is important not to break or tamper with the safety interlocks b Do not place any object between the oven front face and the door or allow soil or cleaner resi...

Page 23: ...nt 2 If the supply cord is damaged it must be replaced by competent person to carry out any service or repair operation that involves the removal of a cover which gives protection against exposure to microwave energy when handling the container in delayed eruptive boiling therefore care must be taken 4 WARNING It is hazardous for anyone other than a 6 WARNING Microwave heating of beverages can res...

Page 24: ...If smoke is observed switch off or unplug the appliance 11 Eggs in their shell and whole hard boiled eggs should ovens before consumption in order to avoid burns WARNING jars shall be stirred or shaken and the temperature food checked this oven for ovens provided with a facility to use a 15 Only use the temperature probe recommended for temperature sensing probe 7 The contents of feeding bottles a...

Page 25: ...cord 2 If a long cord set or extension cord is used 1 The marked electrical rating of the cord set or extension cord should be at least as great as the electrical rating of the appliance 2 The extension cord must be a grounding type 3 wire cord 3 The long cord should be arranged so that it will not drape over the counter top or tabletop where it can be pulled on by children or tripped over uninten...

Page 26: ...low manufacturer s instructions Do not close with metal tie Make slits to allow steam to escape Use for short term cooking warming only Do not leave oven unattended while cooking Use to cover food for reheating and absorbing fat Use with supervision for a short term cooking only Use as a cover to prevent splattering or a wrap for steaming Microwave safe only Follow the manufacturer s instructions ...

Page 27: ... into microwave safe dish May cause arcing Transfer food into microwave safe dish May cause arcing and could cause a fire in the oven A Control panel B Observation window C Door assembly D Safety interlock system E Ceramic board SETTING UP YOUR OVEN Names of Oven Parts and Accessories Remove the oven and all materials from the carton and oven cavity Your oven comes with the following accessories I...

Page 28: ...p Never dismantle the applicance s feet nor block the air intake and exhaust opening can damage the oven Place the oven as far away from radios and TV as possible Operation of microwave oven may cause interference to your radio or TV reception outlet Be sure the voltage and the frequency is the same as the voltage and the frequency on the rating label 1 Blocking the intake and or outlet openings 2...

Page 29: ...trol panel and plastic parts as this may cause damage to these parts Use a dry cloth not a soaked cloth to clean these parts 3 Cleaning the oven interior After use be sure to clean up spilled liquids spattered oil and food debris as quickly as possible If the oven is used when dirty efficiency drops and the dirt gets stuck on the oven surface and may cause bad odours Clean the interior with a clot...

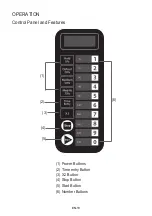
Page 30: ...Control Panel and Features OPERATION 1 Power Buttons 2 Time entry Button 4 Stop Button Start Button 3 X2 Button 6 Number Buttons 5 1 2 3 4 5 6 EN 10 ...

Page 31: ...p 5 quick beeps Repeating Beeper Off Low Medium High Keybeep Off Keybeep On 15 seconds 30 seconds 60 seconds 120 seconds On the Fly Disable On the Fly Enable Door reset Disable Door Reset Enable 60 Minute Maximum Cook Time 10 Minute Maximum Cook Time Manual Programming Disable Manual Programming Enable Single Digit Mode 10 programs Doule Digit Mode 100 programs Five power levels are available Leve...

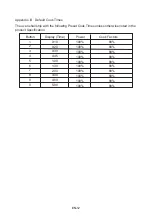
Page 32: ...ss otherwise noted in the product Specification Button Display Time Power 1 2 3 4 5 6 7 8 9 0 0 10 0 20 0 30 0 45 1 00 1 30 2 00 3 00 4 00 5 00 100 100 100 100 100 100 100 100 100 100 Cook Factors 80 80 80 80 80 80 80 80 80 80 Appendix B Default Cook Times EN 12 ...

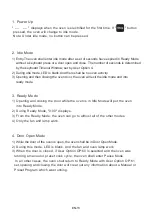
Page 33: ...ode 2 During Ready Mode 0 00 displays 3 From the Ready Mode the oven can go to almost all of the other modes 1 While the door of the oven is open the oven shall be in Door Open Mode 2 During this mode LED is blank And the fan and oven lamp work 3 When the door is closed if User Option OP 60 is selected and the oven was running a manual or preset cook cycle the oven shall enter Pause Mode In all ot...

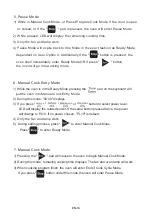
Page 34: ...g the pad will cause to the oven to begin Manual Cook Mode 2 During this mode remaning cooking time displays The fan and oven lamp will work 3 When cooking program finish the oven will enter End of Cook Cycle Mode If you press button under this mode the oven will enter Pause Mode put the oven into Manual Cook Entry Mode 5 Pause Mode 6 Manual Cook Entry Mode 7 Manual Cook Mode 3 Only the fan and la...

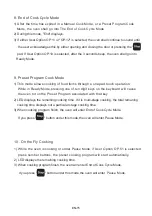
Page 35: ...ill cause the oven to run the Preset Program associated with that key 2 LED displays the remaining cooking time If it is multi stage cooking the total remaning cooking time displays not a particular stage cooking time If you press button under this mode the oven will enter Pause Mode press number buttons the preset cooking program will start automatically If you press button under this mode the ov...

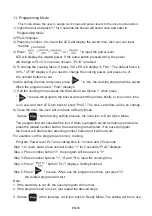
Page 36: ...oven will turn back to Ready Mode If press button during setting process the oven turn to Door Open Mode The program that not saved will be lost If there is program saved as memory procedure press the related number button the saved program will start If no saved program the buzzer will alarm when pressing number button and it will not work For example set the program as memory cooking Program Pow...

Page 37: ...he second or the third stage press S 2 or S 3 displays 3 Press button to start cooking Example To set three stages as memory mode The first stageis PL7 and time is 1 minute 25 seconds The second stage is PL5 and 5 minutes and 40 seconds The steps are follow a Ready state press 1 for 5 seconds LED displays ProG b Press number buttons 3 to save the program in 3 12 Double Quantity cooking The first s...

Page 38: ... the last step the program cannot be saved but stay at previous way 15 Service Mode 1 Open the oven door and press 3 for 5 seconds to enter service mode 2 LED displays SErU 3 To check the times of closing or opening the door just press number button 1 LED will display the times 4 Press and then press number button 4 in 3 seconds the message will be cancelled 4 CL displays 5 Press to enter Door Ope...

Page 39: ... treated If at any time in future you need to dispose of this product please do NOT dispose of this product with household waste Please send this product to WEEE collecting points where available It is forbidden to run the unit without any food inside It is very dangerous Trouble shooting EN 19 PN 16170000A70323 ...

Page 40: ......

Reviews: