background image

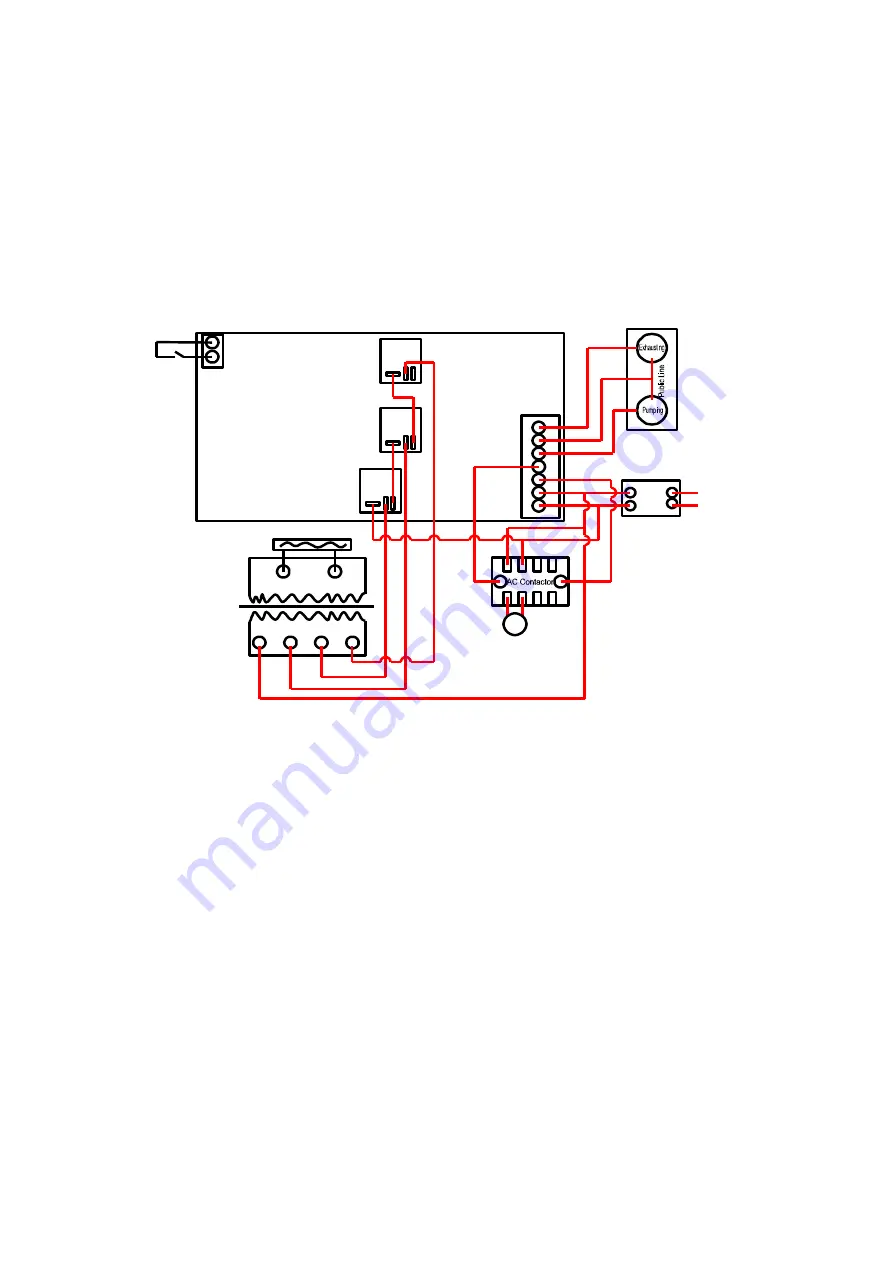
12. Electric Principle Diagram (same for all models) 
 
      Diagrama del principio eléctrico 

0

1

2

3

230V

A1

A2

A1

A2

220V

Working circuit diagram

Breaker

Heating wire

Sealing Transformer out

Sealing Transformer in

Pump

High

Low

Middle

PCB

Micro Swich

230V

/S

ol

enoi

val

ve


Summary of Contents for VAC-20E

Page 1: ...d these instructions carefully before using your microwave oven and keep it carefully If you follow the instructions your oven will provide you with many years of good service Model MICRO 1834 D CHAMBER VACUUM PACKING MACHINE USER S MANUAL ...

Page 2: ...ICAL PARAMETER 5 STRUCTURE AND PRINCIPLE 6 CONTROL PANEL INDICATION 7 INSPECTION AND ADJUSTMENT 8 OPERATION PROCESS 9 TROUBLESHOOTING 10 MAINTENANCE 11 CONTROL PANEL VIEW 12 ELECTRIC PRINCIPLE DIAGRAM 13 MACHINE EXPLODED DIAGRAM 14 ACCESSORIES ...

Page 3: ...onforms to the requirement of food hygienic standard These machine finishes draw vacuum and seal in one time Adjust vacuum degree sealing temperature and sealing time according to different packing material and requirement Choose the best state to get best result The machine has character of advanced design complete function sable behavior wide usage strong sealing and convenient maintenance It is...

Page 4: ...longer time and the higher vacuum degree on the contrary the lower degree of short time the range of exhausting time is between 1 99 second Press set key again after getting the required exhausting time and the sealing pilot lamp is on and the machine enter the heat seal time setting state b To set the sealing time press set two times the sealing pilot lamp is on The machine enters the setting sta...

Page 5: ...n panel to adapt the different thickness material and according to the specification of bag 8 5 When time reached the preset the pilot lamp is off It means the heating seal is finished and exhausting electromagnetic valve works The air enters into vacuum chamber and the cover is lifted up Now the packing process is completed and turns to next process 9 Troubleshooting 9 1 Can not vacuum and vacuum...

Page 6: ...le appears trouble or press the emergency stop 10 6 Lift the cover up after releasing air then turn of power and check it 11 Control Panel VAKSIC 8 E VAKSIC 10 E VACUUM PACKER VACUUM SEALING COOLING DEFLATE TIME S HIGH LOW STOP VACUUM SEALING VACUUM METER WORKING PROCEDURE VAKSIC 20 2A E VAKSIC 20L 2A E VAC 20E VACUUM SEALING COOLING DEFLATE TIME S HIGH MIDDLE LOW STOP VACUUM SEALING INCREASE DECR...

Page 7: ...same for all models Diagrama del principio eléctrico 0 1 2 3 230V A1 A2 A1 A2 220V Working circuit diagram Breaker Heating wire Sealing Transformer out Sealing Transformer in Pump High Low Middle PCB Micro Swich 230V Solenoid valve ...

Page 8: ...ne 1 5 Heating block 1 6 Vacuum chamber 1 7 Chassis 1 8 Breaker 1 9 Solenoid valve 1 10 Micro Switch 1 11 Vacuum pump 1 12 Sealing transformer 1 13 AC contactor 1 14 Control Panel 1 15 Vacuum Meter 1 16 Panel frame 1 17 Chassis s Bottom plate 1 18 Gas spring bracket 2 19 Gas spring pin 2 20 Gas spring 2 21 Power line waterproof connector 1 22 Gland bars 1 23 Low voltage control transformer 1 24 se...

Page 9: ...licone seat 2 4 Silicone 2 5 Heating block 2 6 Vacuum chamber 1 7 Chassis 1 8 Breaker 1 9 Solenoid valve 1 10 Micro Switch 1 11 Vacuum pump 1 12 Sealing transformer 1 13 AC contactor 1 14 Control Panel 1 15 Vacuum Meter 1 16 Panel frame 1 17 Chassis s Bottom plate 1 18 Gas spring bracket 2 19 Gas spring pin 2 20 Gas spring 2 21 Power line waterproof connector 1 22 Gland bars 1 23 Bottom side box 1...

Page 10: ...arts exploded View list 14 Accessories Description Quantity Vacuum packing machine 1 SET Pump oil 1 BOTTLE Heating wire 2 PCS Teflon tape 2 PCS User s manual 1 PC Allen wrench 4mm 5mm 2 PCS Screwdriver 2 PCS Open end wrench pump 1 PC ...

Page 11: ...hese instructions carefully before using your microwave oven and keep it carefully If you follow the instructions your oven will provide you with many years of good service Model MICRO 1834 D ENVASADORA AL VACÍO CON CÁMARA MANUAL DEL USUARIO ...

Page 12: ...PIOS 6 INDICACIONES DEL PANEL DE CONTROL 7 INSPECCIÓN Y AJUSTE 8 PROCESO DE FUNCIONAMIENTO 9 DETECCIÓN Y SOLUCIÓN DE PROBLEMAS 10 MANTENIMIENTO 11 VISTA DEL PANEL DE CONTROL 12 DIAGRAMA DEL PRINCIPIO ELÉCTRICO 13 DIAGRAMA DE DESPIECE DE LA MÁQUINA 14 LISTA DE CONTENIDOS DEL PAQUETE ...

Page 13: ...lidad Cumple los requisitos de la normativa de higiene de los alimentos Esta máquina realiza el proceso de aspiración de vacío y soldadura de una sola vez Es posible ajustar el grado de vacío la temperatura de la soldadura y el tiempo de la soldadura en función de los diferentes materiales y requisitos de envasado Elija el ajuste apropiado para obtener los mejores resultados La máquina cuenta con ...

Page 14: ...trol Hay un manómetro de vacío tecla de parada de emergencia tecla de configuración tecla para aumentar tecla para disminuir tecla de ajuste de temperatura tecla para ver el tiempo y algunas lámparas piloto 2 La máquina entra en estado de espera cuando se cierra el interruptor de aire detrás de la máquina Entonces se establece el grado de vacío tiempo de sellado tiempo de enfriamiento y temperatur...

Page 15: ...peratura de circulación parpadea entre tres turnos y turno neutro Cuando la lámpara está encendida en un turno indica que la temperatura es la de este turno e El grado de vacío tiempo de sellado tiempo de refrigeración y temperatura de sellado se establecen según las necesidades del usuario 7 Inspección y ajuste 7 1 Tras la apertura del paquete compruebe que todos los accesorios estén incluidos qu...

Page 16: ...grado de vacío es bajo Comprobar aceite 9 1 1 Compruebe que la bomba de vacío gira en sentido contrario a las agujas del reloj y que el sentido de la bomba de vacío es el mismo que el de las flechas marcadas en el motor 9 1 2 Cuando se utiliza una máquina nueva la junta de la tapa no toca la cámara de vacío correctamente 9 1 3 Revise si el microinterruptor está bien conectado 9 1 4 La válvula elec...

Page 17: ...está limpia suave y el sellado es resistente 10 5 Desconecte la alimentación de la máquina si hay un problema o pulse la parada de emergencia 10 6 Levante la cubierta después de liberar el aire luego desconecte la alimentación y compruébela 11 Vista del panel de control VAKSIC 8 E VAKSIC 10 E VACUUM PACKER VACUUM SEALING COOLING DEFLATE TIME S HIGH LOW STOP VACUUM SEALING VACUUM METER WORKING PROC...

Reviews: