2.- Do not forget to change the adjustable
feet from Position A to Position B.
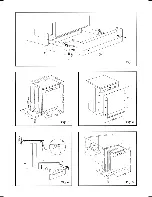
3.- Fit the kitchen unit kickstrip, sawing it to the
size required (according to Figure 4).
Once you have completed these tasks,
proceed with the electrical and water con-
nections according to the instructions.
Integrated dishwashers
Introduction
Our INTEGRATED DISHWASHERS are de-
signed so that the door covering and the
control panel match the shape and size of 60
cm wide kitchen modules with a door and a
drawer at the top.
To do this, proceed as follows:
Dimensions
Figure 5 gives the measurements of your
dishwasher and the minimum requirements
for the kitchen units. These will help you in
the installation process
And remember if your dishwasher is an
integrated model, remove the brackets located
at the bottom of the dishwasher.(Fig. 2).
Levelling and positioning
Refer to the section on levelling and positio-
ning for free-standing and panellable
dishwashers.
Integrating your dishwasher
Adjusting the height of the
dishwasher
Turn the dishwasher feet B anticlockwise,
until the tp of the appliance comes into con-
tact wit the bottom of the kitchen work surfa-
ce (Figure 7).
This enables the DISHWASHER height to be
adjusted up to 870 mm.
Aligning the control panel (Figure 8)
This operation consists of aligning the con-
trol panel of the dishwasher until it is at the
same height as the drawer panels of your
kitchen units.
Use the spacing pieces and screws provided
inside the appliance to carry out this opera-
tion.
If the height of the drawer panel is 110 mm,
it is not necessary to make any adjustments.
If it is higher, add as many spacing pieces as
necessary (spacer A = 5 mm, spacer B = 10
mm), forming 5 mm modules, to adjust the
height of the control panel to that of the
drawer panels of adjacent units (Figure 8).
Once you have done this, bear in mind that
when you fit the door panel, the bottom of it
must be in line with the kickplate of your
kitchen units.
Integrating your dishwasher
INFORMATION NOTE:
The maximum and minimum weights
recommended for the
door covering
to be
fitted to the dish washers are:
-Maximum: 6,5 Kg
-Minimum: 4,5 kg
Once you have carried out the previous
operations, proceed with the integration of
your dishwasher, as follows:
1.- Fit the protective plastic cover supplied
with the appliance to the underside of
your kitchen work surface (Figure 9).
This cover will prevent the condensation
generated during the operation of your
dishwasher from damaging the undersi-
de of your work surface.
2.- Using the template supplied with your ap-
pliance, mark the points where the brac-
kets for fixing to the dishwasher are to go on
the back of the door panel (Figure 10).
Note
When preparing the front panel you must
take into account whetehr or not you have
increased the height of the control panel
with spacing pieces.
A) If you have not, align reference point 0,
located on the top edge of the template,
with the top edge of the door panel.
85


