background image

Quick Start Guide

–  2  –

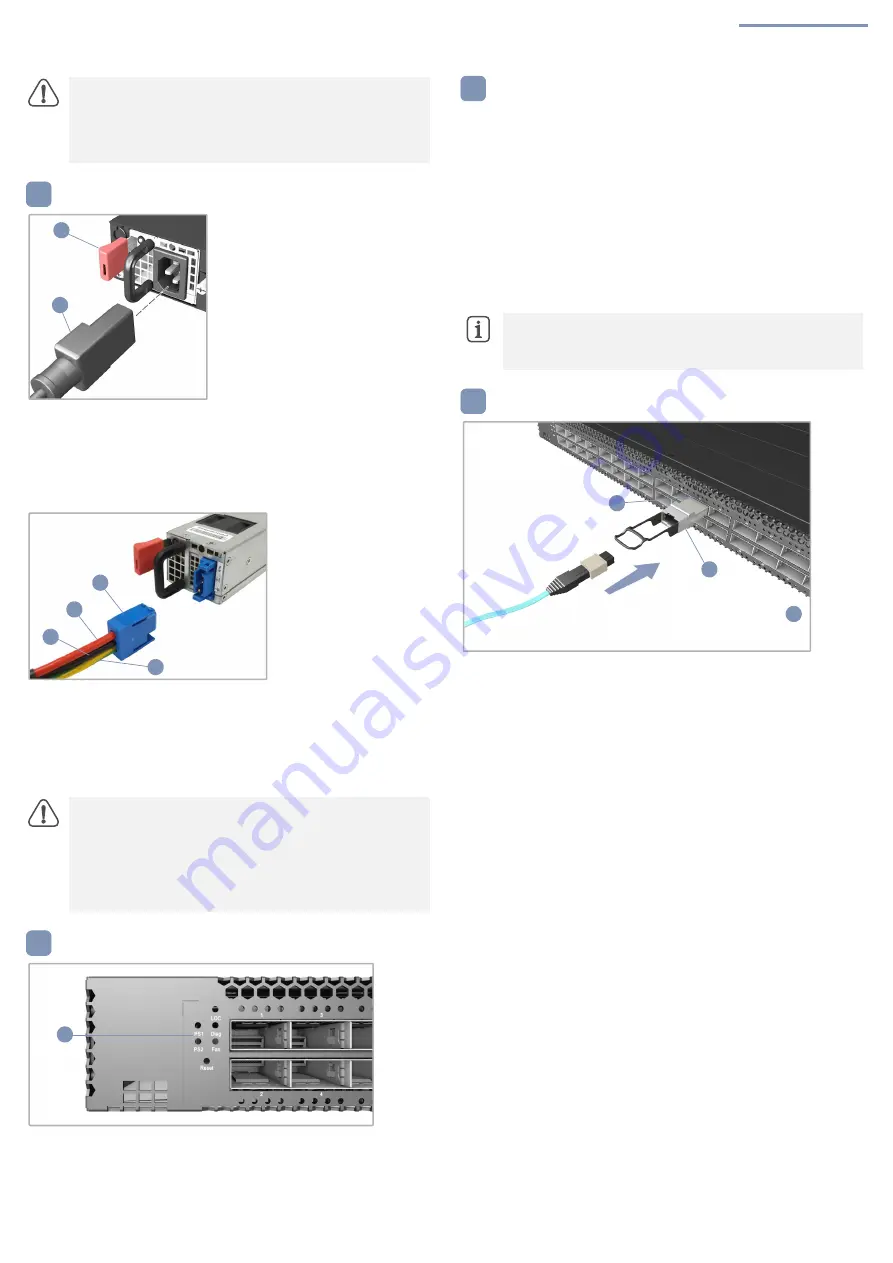
Connect Power

1.

Install one or two AC or DC PSUs in the switch.

The switch supports up to two PSUs that must have the same 
matching airflow direction as the installed fan tray.

2.

Connect an external AC or DC power source to the PSUs.

1.

Positronic PLA03F7000/AA connector

2.

DC Return 

3.

-36 – -72 VDC

4.

Ground 

Verify Switch Operation

1.

Verify basic switch operation by checking the system LEDs.

When operating normally, the PSU1/PSU2 and Fan LEDs should 
all be on green.

Perform Initial System Boot

1.

If the network operating system (NOS) installer is located on a 
network server, first connect the RJ-45 Management (Mgmt) port 
to the network using 100-ohm Category 5, 5e or better twisted-
pair cable. (Not required if the NOS installer is located on 
attached storage.)

2.

Boot the switch. Wait for the ONIE software to locate and 
execute the NOS installer, and then wait for the installer to load 
the NOS software image.

Subsequent switch boots will bypass ONIE and directly run the 
NOS software.

Connect Network Cables

1.

For the RJ-45 Management port, connect 100-ohm Category 5, 
5e or better twisted-pair cable.

2.

Connect DAC cables to the SFP+/QSFP28 slots. Or first install 
SFP+/QSFP28 transceivers in the slots and then connect fiber 
optic cabling to the transceiver ports. 

3.

As connections are made, check the port status LEDs to be sure 
the links are valid. 

For the SFP+ ports:

Green — 10 Gbps mode

Amber — 1 Gbps mode

Each QSFP28 port has four LEDs that indicate valid links in the 
following modes: 

1 LED Blue — 100 Gbps mode

1 LED Orange — 40 Gbps mode

1-4 LEDs White — 25 Gbps breakout mode (four lanes)

1-4 LEDs Green — 10 Gbps breakout mode (four lanes)

Caution:

 The earth connection must not be removed unless 

all supply connections have been disconnected.

Attention:

 Le raccordement à la terre ne doit pas être retiré 

sauf si toutes les connexions d’alimentation ont été 
débranchées.

Caution:

 Use a UL/IEC/EN 60950-1 certified power 

supply to connect to a DC converter, and a #14 AWG wire 
(for -36 VDC to -72 VDC PSU) to connect to a DC PSU.

Attention:

 Utilisez une alimentation certifiée UL/IEC/EN 

60950-1 pour le connecter à un convertisseur CC et un 
câble AWG #14 (pour -36 VDC à -72 VDC) pour vous 
connecter à une alimentation CC.

4

2

1

3

4

1

2

5

1

Note:

 Refer to the network operating system (NOS) installer 

and NOS documentation for details on software options 
and set up for ONIE.

6

7

3

2

1

Summary of Contents for AS7726-32X

Page 1: ...to its chassis All installed modules must have a matching airflow direction That is if the installed power modules have a front to back F2B airflow direction all the installed fan tray modules must also have a F2B airflow direction Attention Le commutateur comprend des modules d alimentation et de bac de ventilateurs installés sur son châssis Tous les modules installés doivent avoir une direction ...

Page 2: ...or better twisted pair cable 2 Connect DAC cables to the SFP QSFP28 slots Or first install SFP QSFP28 transceivers in the slots and then connect fiber optic cabling to the transceiver ports 3 As connections are made check the port status LEDs to be sure the links are valid For the SFP ports Green 10 Gbps mode Amber 1 Gbps mode Each QSFP28 port has four LEDs that indicate valid links in the followi...

Page 3: ... 100 240 VAC 50 60 Hz 650 Watts AC Input 100 240 VAC 50 60 Hz 6 A maximum 48 VDC PSU Power Rating 48 VDC 650 Watts DC Input 36 V 72 V 16 A maximum Regulatory Compliances Emissions EN 55032 2015 AC 2016 Class A EN 61000 3 2 2014 Class A EN 61000 3 3 2013 FCC Class A VCCI Class A CCC GB 9254 2008 Class A BSMI Class A CNS 13438 Immunity EN 55024 2010 A1 2015 IEC 61000 4 2 3 4 5 6 8 11 Safety UL CSA 2...

Page 4: ...入式电源 PSU 以及安装在其机 箱中的风扇架模块 所有已安装模块都要求合适的气流 方向 即 如果安装的电源模块有从前到后 F2B 的气 流通过 则所有安装的风扇架模块也必须有 F2B 气流通 过 注意 本交换机上已预装了 Open Network Install Environment ONIE 软件安装程序 但没有交换机软件 映像 在以下网站可以找到有关兼容交换机软件的信 息 www edge core com 小心 将此交换机安装在机架中时需要两个人 一个人 应在机架中托住交换机 另一个人使用机架螺丝固定 它 1 1 1 2 小心 必须在所有电源连接都断开的情况下才能移除接 地连接 2 1 3 1 2 E092019 CS R03 150200001963A www edge core com 1 100G 以太网交换机 AS7726 32X 2 机架安装套件 2 个前柱支架 2 个...

Page 5: ...机 等待 ONIE 软件找到和执行 NOS 安装程序 然 后等待安装程序加载 NOS 软件映像 以后交换机启动时将跳过 ONIE 而直接运行 NOS 软件 连接网线 1 对于 RJ 45 管理端口 连接 100 欧姆 5 5e 类或以上的双绞 线 2 将 DAC 线连接到 SFP QSFP28 插槽 或先将 SFP QSFP28 收发器安装在插槽中 然后将光缆连接到收发器端 口 3 建立连接后 检查端口状态 LED 确保连接正常 对于 SFP 端口 绿色 10 Gbps 模式 琥珀色 1 Gbps 模式 每个 QSFP28 端口有四个 LED 在以下模式中指示正常连接 1 LED 蓝色 100 Gbps 模式 1 LED 橙色 40 Gbps 模式 1 4 LED 白色 25 Gbps 突破模式 四通道 1 4 LED 绿色 10 Gbps 突破模式 四通道 小心 使用 UL IEC EN...

Page 6: ...0 60 Hz 650 W 交流输入 100 240 VAC 50 60 Hz 最大 6 A 48 VDC PSU 电源额定值 48 VDC 650 W 直流输入 36 V 72 V 最大 16 A 管制符合性 辐射 EN 55032 2015 AC 2016 Class A EN 61000 3 2 2014 Class A EN 61000 3 3 2013 FCC Class A VCCI Class A CCC GB 9254 2008 Class A BSMI Class A CNS 13438 抗干扰性 EN 55024 2010 A1 2015 IEC 61000 4 2 3 4 5 6 8 11 安全 UL CSA 22 2 No 60950 1 UL60950 1 CB IEC EN60950 1 CCC GB4943 1 2011 BSMI CNS 14336 1 台湾...

Page 7: ...修範圍內 注意 交換器包含安裝在其機箱中的插入式電源 PSU 和風扇托盤模組 所有已安裝之模組氣流方向 必須一致 亦即 若已安裝之電源模組具有從前到後 F2B 氣流方向 則所有已安裝之風扇托盤模組也必須 具有 F2B 氣流方向 說明 交換器上有預載入的開放網路安裝環境 ONIE 軟體安裝程式 但沒有交換器軟體映像檔 關於相容交 換器軟體的資訊可參閱 www edge core com 注意 需要兩個人 將交換器裝到機櫃上 一個人應將 交換器放到機櫃中 而另一個人使用機櫃螺絲將其固 定 1 1 1 2 注意 在切斷所有電源接線前 不得移除接地連接 2 1 3 1 2 E092019 CS R03 150200001963A www edge core com 1 100G 乙太網路交換器 AS7726 32X 2 機櫃安裝套件 2 個前柱托架 2 個後柱托架 20 個螺絲 和 2 個固定片鎖...

Page 8: ...ONIE 軟體找尋並執行 NOS 安裝程式 並 等待安裝程式載入 NOS 軟體映像檔 之後交換器啟動時 會跳過 ONIE 直接運行 NOS 軟體 連接網路線 1 使用 100 ohm 第 5 類 5e 類或更優之雙絞線電纜 連接至 RJ 45 管理埠 2 連接 DAC 電纜至 SFP QSFP28 插槽 或先將 SFP QSFP28 收發器裝到插槽中 然後連接光纖電纜至收發器埠 3 連接完成後 請檢查連接埠狀態 LED 確保連結有效 SFP 連接埠 綠色 10 Gbps 模式 黃色 1 Gbps 模式 每個 QSFP28 連接埠有四個 LED 可指出在以下模式中的有 效連結 1 LED 藍 100 Gbps 模式 1 LED 橘 40 Gbps 模式 1 4 LED 白 25 Gbps 突圍模式 四道 1 4 LED 綠 10 Gbps 突圍模式 四道 注意 使用 UL IEC EN 60...

Page 9: ...z 650 瓦 AC 輸入 100 240 VAC 50 60 Hz 最大 6 A 48 VDC PSU 額定功率 48 VDC 650 瓦 DC 輸入 36 V 72 V 最大 16 A 法規符合性 排放 EN 55032 2015 AC 2016 Class A EN 61000 3 2 2014 Class A EN 61000 3 3 2013 FCC Class A VCCI Class A CCC GB 9254 2008 Class A BSMI Class A CNS 13438 電磁耐受性 EN 55024 2010 A1 2015 IEC 61000 4 2 3 4 5 6 8 11 安全性 UL CSA 22 2 No 60950 1 UL60950 1 CB IEC EN60950 1 CCC GB4943 1 2011 BSMI CNS 14336 1 臺灣限用有...

Reviews: