background image

Normal Sounds 

Your new wine refrigerator may make sounds that are not familiar to 
you. Most of the new sounds are normal. Hard surfaces like the 
floor, walls can make the sounds seem louder than they actually 
are. The following describes the kinds of sounds that might be new 
to you and what may be making them. 

  Ratting noises may come from the flow of the refrigerant or the 

water line, Items stored on top of the wine refrigerator can also 
make noises.  

  The high efficiency compressor may make a pulsating or high-

pitched sound. 

  Water running from the evaporator to the water bin may make a 

splashing sound. 

  As each cycle ends, you may hear a gurgling sound due to the 

refrigerant flowing in your wine refrigerator. 

  You may hear air being forced over the condenser by the 

condenser fan. 

Defrosting 

Note that under most refrigerating settings, the unit will 
automatically defrost under most ambient conditions. However, on 
colder settings, some frost may build up. Additionally, the more 
humid the ambient conditions, the more frost may build up. Keep 
the door closed as much as possible and avoid opening the door 
unnecessarily to minimize frost build-up.  
 
If frost is preventing the door from closing properly, you may need 
to power the unit off until the frost melts. Use a soft absorbent towel 
to dry the unit. 
 
WARNING: Never attempt to remove frost with a sharp object! 

Preparing the Wine Refrigerator for Storage 

If the wine refrigerator will not be used for a long time, or is to be 
moved to another place, it will be necessary to defrost the unit and 
dry the interior. 
 
1. Disconnect the cooler from the power supply by removing the 
power plug from the wall socket. 
2. Leave the door open to allow for air circulation and to prevent 
mold, mildew and unpleasant smells. 
 
CAUTION: Store the unit out of the reach of children. If you have 
children, you may want to take additional precautions such as 
removing the door to prevent a child from being trapped inside the 
cooler! 

IMPORTANT: 
 

• Do not touch the power plug 
when your hands are wet. 
• Never unplug the unit by 
pulling on the plug. 

Summary of Contents for CWR1101DZ

Page 1: ...Built in Wine Refrigerator Owner s Manual For more information on other great EdgeStar products on the web go to http www edgestar com CWR460DZ...

Page 2: ...smells or smoke comes out of it and contact customer service Do not remove any part of the casing unless instructed by an authorized technician You should never attempt to repair the unit yourself Con...

Page 3: ...AND MAINTENANCE 10 EXTERIOR CLEANING 10 INTERIOR CLEANING 10 TROUBLESHOOTING 10 TROUBLESHOOTING CONTINUED 11 SPECIFICATIONS 12 EDGESTAR LIMITED WARRANTY 13 First Time Operating Instructions Before use...

Page 4: ...your unit and are needed to obtain warranty service You may also want to staple your receipt to this manual as it is the proof of your purchase and is also needed for service under your warranty Model...

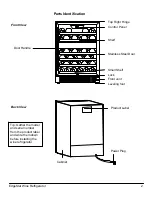
Page 5: ...ew Product Label Cabinet Control Panel Shelf Stainless Steel Door Lock Front vent Leveling foot Small Shelf Power Plug Top Right Hinge Tip Gather the model and serial number from the product label and...

Page 6: ...Types of Installation This wine refrigerator has been designed for free standing or built in installation In every case there must be adequate ventilation and access for service Free standing install...

Page 7: ...can adjust the height of the wine refrigerator by rotating the feet See the Leveling the Wine refrigerator section A standard electrical supply 115 VAC only 60 Hz properly grounded in accordance with...

Page 8: ...ualified electrician Leveling the Wine Refrigerator It is important for the wine refrigerator to be leveled in order to work properly It can be raised or lowered by rotating the plastic sheaths around...

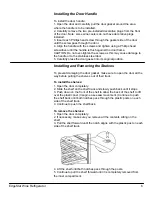
Page 9: ...tion Installing and Removing the Shelves To prevent damaging the door gasket make sure to open the door all the way before pulling the shelves out of their track To install the shelves 1 Open the door...

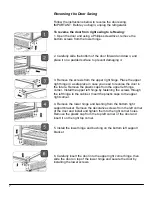
Page 10: ...future Remove the plastic caps from the upper left hinge corner Install the upper left hinge by fastening the screws through the left hinge to the cabinet Insert the plastic caps to the upper right c...

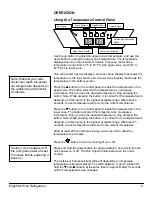
Page 11: ...temperature in the lower zone The button will scroll the temperature by one degree increments Once you see the desired temperature stop pressing the button Note While pressing the button it is normal...

Page 12: ...s some frost may build up Additionally the more humid the ambient conditions the more frost may build up Keep the door closed as much as possible and avoid opening the door unnecessarily to minimize f...

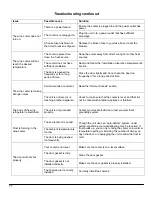
Page 13: ...e contents and shelves 3 Wait until the unit defrosts 4 With a clean cloth wipe down the interior of the unit 5 Reinsert the shelves and beverages 6 Reconnect power to the unit TROUBLESHOOTING Before...

Page 14: ...e normal Read the Normal Sounds section The unit is not level or is touching another appliance Check to make sure that the cooler is level and that it is not in contact with another appliance or furni...

Page 15: ...gerant R134a 6 35 oz Temperature Range 40 65 F Dimensions Height x Width x Depth 33 1 4 x 23 1 2 x 22 3 4 Depth including handle 24 1 2 Weight 100 pounds Note Technical data and performance informatio...

Page 16: ...nstruct in proper usage of the product Damages or operating problems resulting from misuse abuse operation outside environmental specifications uses contrary to instructions provided in the owner s ma...

Page 17: ...edgestar com Register your product download owner s manuals access additional troubleshooting resources and obtain more information on other great EdgeStar products on the web at http www edgestar com...

Reviews: