background image

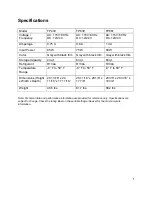
Specifications 


Model  

FP430  

FP630  

FP861  

Voltage / 
Frequency  

AC: 115V~60 Hz 
DC: 12/24 V  

AC: 115V~60 Hz 
DC: 12/24 V  

AC: 115V~60 Hz 
DC: 12/24 V  

Amperage  

0.75 A  

0.8 A  

1.0 A  

Input Power  

65 W  

75 W  

80 W  

Color  

Grey with black trim   Grey with black trim   Grey with black trim  

Storage Capacity  

43 qt.  

63 qt.  

83 qt.  

Refrigerant  

R134a  

R134a  

R134a  

Temperature 
Range  

-8° F to 50° F  

-8° F to 50° F  

-8° F to 50° F  

Dimensions (Height  
x Width x Depth )  

20 13/16” x 24 
11/16” x 17 11/16”  

20 11/16” x 28 1/8” x 
17 7/8”  

23 3/8” x 28 3/16” x 
18 3/4”  

Weight  

48.5 lbs.  

61.7 lbs.  

66.2 lbs.  


Note: Technical data and performance information are provided for reference only. Specifications are  
subject to change. Check the rating label on the portable fridge / freezer for the most accurate 
information. 

Summary of Contents for FP430

Page 1: ...EdgeStar 8606 Wall St Suite 1600 Austin TX 78754 support edgestar com service edgestar com edgestar com FP430 FP630 FP861 Document Type Service Manual Version V2 0 05202019...

Page 2: ...ormation provided nor does it assume any liability in connection with its use The safeguards and warnings indicated in this manual do not cover all possible conditions which may occur Common sense cau...

Page 3: ...ance is properly grounded Do not bypass cut or remove the grounding plug If the power cord is damaged it must be replaced by the manufacturer or a qualified technician Do not use extension cords or po...

Page 4: ...xposed to the weather Disconnect from the power socket before cleaning or maintenance If the plug power cord is damaged it must be replaced by the manufacturer or an authorized service representative...

Page 5: ...pacity 43 qt 63 qt 83 qt Refrigerant R134a R134a R134a Temperature Range 8 F to 50 F 8 F to 50 F 8 F to 50 F Dimensions Height x Width x Depth 20 13 16 x 24 11 16 x 17 11 16 20 11 16 x 28 1 8 x 17 7 8...

Page 6: ...his unit comes pre installed with two 2 probes If a faulty temperature probe is suspected simply connect the unused probe in place of the faulty probe not shown in image NOTE Fuse is located within th...

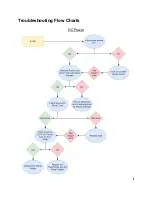
Page 7: ...Troubleshooting Flow Charts DC Power...

Page 8: ...AC Power...

Page 9: ...will show the factory setting 10 0V DC To ensure that suitable battery voltage can be maintained the controller has been programmed to offer three 3 cut out levels 11 8 10 7 and 10 0V DC When using 24...

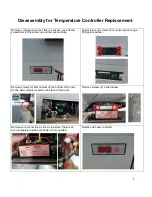
Page 10: ...ve carefully Remove four 4 screws from control panel using a Philips screwdriver Remove screws 2 from cabinet on the bottom of the unit On the older version located on the face of the cover Remove scr...

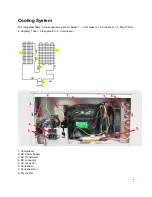
Page 11: ...in the sequence as shown below 1 Compressor 2 Condenser 3 Dryer Filter 4 Capillary Tube 5 Evaporator 6 Compressor 1 Compressor 2 DC Power Supply 3 AC Transformer 4 DC connector 5 AC connector 6 Conde...

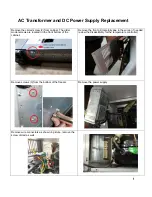
Page 12: ...are located on the front bottom of the cabinet Remove the front grill carefully due to the wires if needed review the disassembly for the temperature controller Remove screws 3 from the bottom of the...

Page 13: ...Remove the DC Power supply by unlatching with a flat tip Remove DC Power Supply Install DC Power Supply AC Transformer...

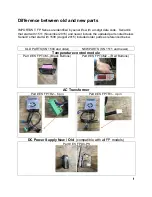
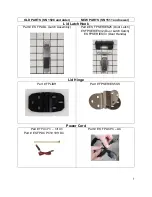
Page 14: ...e updated parts noted below Serial s that start with 1508 August 2015 included older parts as referenced below OLD PARTS SN 1508 and older NEW PARTS SN 1511 and newer Temperature control module Part E...

Page 15: ...newer Lid Latch Hook Part ES FPLIDL Latch Assembly Part ES FPSERIES25 Door Latch ES FPSERIES32 Door Latch Catch ES FPSERIES33 Door Handle Lid Hinge Part FPLIDH Part FPSERIES5SS Power Cord Part FPDCPC...

Page 16: ...EdgeStar 8606 Wall St Suite 1600 Austin TX 78754 support edgestar com service edgestar com edgestar com...

Reviews: