49
ENGLISH
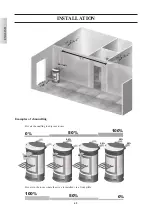
INSTALLATION
n°
KIT 10
1
Box
1
645740
3
Ø 10 pipe
1
162520
4
Smoke outlet end-piece
1
293430
5
Wall medallion
1
644190
6
Flue cover
1
644140
7
Flue cover fastening screws
4
168260
8
Pipe blocking clamp
2
46160
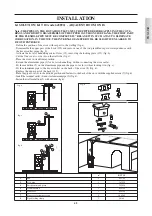
1st SOLUTION: KIT 10 (code 643890) - ADJACENT ROOM ONLY
Note: THE PIPES ON THE HOT AIR OUTLETS MUST BE FITTED BEFORE APPLYING THE COVE-
RINGS AND PRIOR TO DISASSEMBLY OF THE UPPER CAST IRON SIDE FLANK. THE FIRST PART
OF THE FLEXIBLE PIPE MUST BE COMPLETELY "RELAXED" IN SUCH A WAY TO ELIMINATE
CORRUGATION. IN THIS WAY, THE INTERNAL DIAMETER WILL BE SLIGHTLY ENLARGED TO
FAVOUR ENTRANCE.
- Define the position of the stove with respect to the walling (fig. a).
- Disassemble the upper part of the back (132) and remove one of the two predrilled caps in correspondence with
the hot air outlet pipes (fig. b).
- Activate the hot air channelling control lever (13), removing the locking plate (133) (fig. b).
- Cut the flue cover to size (6) on the wall side (fig.c)
- Place the stove in its definite position.
- Extend the aluminium pipe (3) for hot air channelling, without connecting the stove outlet.
- Fit the medallion (5) on the aluminium pipe and the pipe cover (6) without locking it in (fig. c).
- Fit the aluminium pipe to the hot air outlet on the back of the stove (8) (fig. d).
- Replace the upper part of the back (132).
- Place the pipe cover (6) in the definite position and fasten it to the back of the stove with the supplied screws (7) (fig. d).
- Install the terminal outlet (4) and its aluminium pipe (3) (fig. d).
- Fasten the wall medallion (5) with silicone (fig d).
3
5
6
4
8
8
6
7
5
4
3
1
6a
132
132
13
133
fig. b
2
5
6
4
8
6
8
5
7
3
4
8
fig. a
fig. c
fig. d


