62
ENGLISH
Cleaning the smoke duct
•
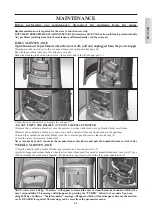
With the stove off and cold, remove the lower cast iron front panel (1), removing the 2 screws (fig D), move the clea-
ning rods (2) with force (fig E), the 4 silicone caps * (fig E), then suction residue.
The amount of residue will depend on the type of fuel and system.
Failure to carry out this cleaning procedure may cause the stove to block.
NOTE: AFTER CLEANING THE LOWER END OF THE PIPES, MAKE SURE THAT THE 4 RUBBER CAPS
(*) ARE REPOSITIONED PROPERLY TO PREVENT STOVE MALFUNCTION (THEY MUST SLIDE ALL
THE WAY DOWN) (fig. F).
MAINTENANCE
SEASONAL MAINTENANCE
(implemented by the DEALER)
• Clean the stove internally and externally
• Carefully clean the heat exchange tubes
• Carefully clean and remove dirt from the combustion chamber and the relative compartment
• Clean fans, verify mechanical and clamp loosening
• Clean smoke channel (replace seals on smoke exhaust pipe)
• Clean smoke duct (see weekly cleaning)
• Clean smoke extraction fan compartment, flow sensor and check thermocouple.
• Clean, inspect and scrape any residue from the ignition resistance compartment and if necessary, replace it
• Clean/check the Synoptic Panel
• Visually inspect the electrical wires, connections and power cable
• Clean the pellet hopper and check loosening of the feed screw - gear motor assembly
• Replace the door seal
• Functionality test: load the feed screw, ignite, let it run for 10 minutes and shutdown
If the stove is used very often, it is recommended to clean the smoke channel every 3 months.
ATTENTION !!!
After implementing a normal cleaning procedure, INCORRECT coupling of the upper (A) and lower (B) com-
bustion chambers can compromise the stove’s performance
(fig. G)
.
Therefore, before igniting the stove, ensure that the combustion chambers are correctly coupled as shown in
(fig. H).
1
fig. D
A
B
fig. G
fig. H
fig. F
NO
YES
* *
* *
fig. E
2
2
YES
YES

