background image

104 

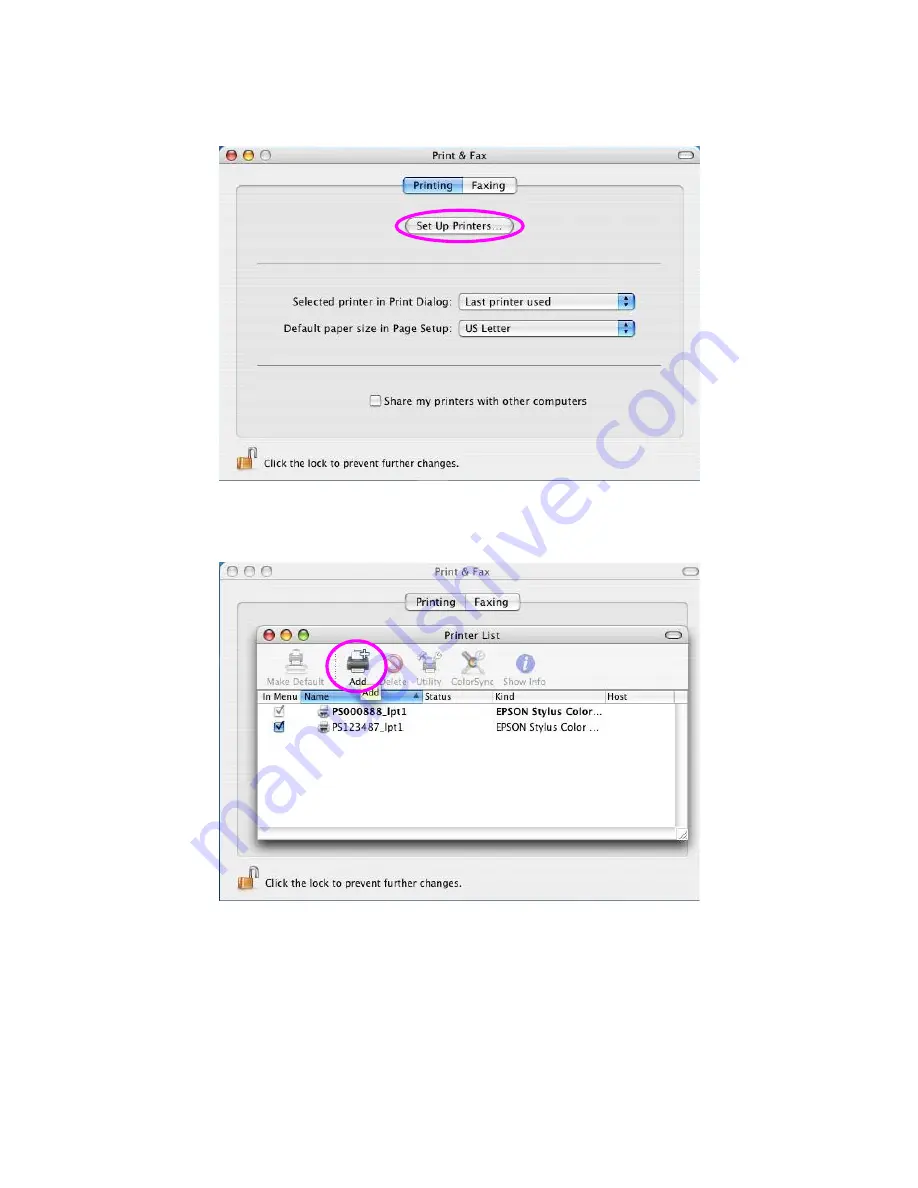
3.  From the “Print & Fax” screen, click “Set Up Printers…”. 


4.  Click “Add” to add the new MFP Server through TCP/IP. 


Summary of Contents for EDIMAX FAST ETHERNET MFP SERVER VERSION: 2.0

Page 1: ...F Fa as st t E Et th he er rn ne et t M MF FP P S Se er rv ve er r User s Manual Version 2 0 August 2006 ...

Page 2: ...publication may be reproduced transmitted transcribed stored in a retrieval system or translated into any language or computer language in any form or by any means electronic mechanical magnetic optical chemical manual or otherwise without the prior written permission of this company ...

Page 3: ...ties either expressed or implied with respect to the contents hereof and specifically disclaims any warranties merchantability or fitness for any particular purpose Any software described in this manual is sold or licensed as is Should the programs prove defective following their purchase the buyer and not this company its distributor or its dealer assumes the entire cost of all necessary servicin...

Page 4: ...20 5 Using the MFP 22 5 1 Printing 23 5 2 Scanning 24 5 3 Card Reader Accessing 25 5 4 Faxing a File 26 6 MFP Manager 28 6 1 MFP Server List 28 6 2 My Favorite 31 6 3 Auto Connect List 33 6 4 Quick Setup 36 6 5 Option Settings 38 6 5 1 General Setting 38 6 5 2 Search for MFP Server 39 7 Server Configuration 40 7 1 Introduction 40 7 2 Search for All Available MFP Server 41 7 3 Status of MFP Server ...

Page 5: ...W Printing 67 11 IPP Printing 73 11 1 Introduction 73 11 2 System Setup 73 11 2 1 MFP Server Side 73 11 2 2 Client Side 73 12 MFP Server Installation in Windows 98SE Me NT 78 12 1 Software Installation 79 12 2 Server Utilities 86 12 3 Network Port Setup 87 12 4 Add Printer 88 13 UNIX Linux System Network 92 13 1 GUI Mode 92 13 2 Console Mode 96 13 2 1 Enable MFP Server s TCP IP Support 97 13 2 2 S...

Page 6: ...14 MFP Server Installation in MAC OS 102 14 1 MAC 10 4 x 10² 14 2 MAC 10 3 x 10³ 15 Troubleshooting 107 Appendix MFP Server Compatibility List 110 ...

Page 7: ... sharing functions in the most popular operating systems Windows 2000 SP4 above and XP SP1 above It also supports Windows XP scanning utility and MFP vendors scanning utilities When you want to scan in the Windows XP you can choose one of the utilities Not only a MFP Server but also this MFP Server is a traditional print server It supports TCP IP network protocol and LPR RAW and IPP printing proto...

Page 8: ...t Package This package contains the following components One MFP Server One Power Adapter One Quick Installation Guide One CD ROM Including all the software utilities drivers multi language QIG and User s Manual ...

Page 9: ...r This enables users to share MFP for printing scanning card reader and faxing If the MFP Server is connected to a printer but not MFP users still can share printing function through the operation mode The supported OS in this mode is Windows 2000 SP4 above and Windows XP SP1 above The MFP Server mode doesn t support Windows 98SE ME NT Linux Unix or MAC OS For the detailed applications please refe...

Page 10: ... supported OS is Windows 98SE Me NT 2000 XP 2003 Unix Linux and MAC OS 9 x above For the detailed applications please refer to the following chapters Chapter 9 LPR Printing Chapter 10 RAW Printing Chapter 11 IPP Printing Chapter 12 MFP Server Installation in Windows 98SE ME NT Chapter 13 Unix System Network Chapter 14 MFP Server Installation in MAC OS ...

Page 11: ...nd the MFP or printer that you want to share on the network 3 Connect the MFP Server to your network by attached the network cable to the network port of the MFP server 4 Connect the power adapter to the MFP Server The MFP Server will perform the Power On Self Test POST after it is powered on When the Status LED is off the MFP Server is ready Note 1 You must use the power adapter shipped along wit...

Page 12: ...e steps below to start installation Tip You have to uninstall all the MFP server drivers and utilities if you have installed the previous version 1 Insert the CD shipped along with the MFP Server into your CD ROM drive The Autorun exe program should be executed automatically If not run Autorun exe manually from CD ROM drive s root directory 2 The following screen will be displayed Click Setup Util...

Page 13: ...7 3 The MFP Server Utilities InstallShield Wizard is displayed click Next ...

Page 14: ...8 4 Click Next to install the MFP Server utilities in the default folder or click Change to specify the destination folder where you would like to install the MFP Server utilities ...

Page 15: ...9 5 The system starts installing the MFP Server Utilities 6 The MFP Server is installing the MFP Server utilities When you find the following screen please click Continue Anyway ...

Page 16: ...se click Continue Anyway 8 The MFP Server Configuration screen is displayed If you want to configure the MFP Server please click Next directly Or you can select No I will configure the MFP Server later and click Next to complete the installation The following steps are for MFP Server Configuration ...

Page 17: ...e MFP Servers in the network Select the MFP Server you wan to setup and click Next to continue 10 Enter the User Name and Password of the MFP Server you have selected to login the MFP Server The default User Name is admin default Password is 1234 ...

Page 18: ... Set the Alias Name and the MFP Server Description to the MFP Server here Click on Next Note You can give a description by filling MFP Server Description to the MFP Server so you can find it easily later on ...

Page 19: ...IP Address fields If no DHCP Server is present within the network please assign the network settings of the MFP Server manually Please click Next once you have found appropriate network settings for the MFP Server Note The MFP Server IP Address should be in the same network segment with the connected computer If the network settings are incorrect a message will be prompted to remind you after you ...

Page 20: ...ings 14 Click Finish to complete the installation Note If the Windows XP Firewall in your system has been enabled the MFP Server will automatically open ports for the MFP Server programs smoothly run in your system It will not cause abnormal behaviors or unsafe on your system ...

Page 21: ...r s Program folder MFP Manager Allows you to manage the connection between the MFP and your computer for sharing MFP function Server Manager Allows you to configure the MFP Server s IP Address network protocols and other advanced features It also allows you to manage the MFP Server Uninstall Assistant for removing all installed MFP Server software programs About Version Display the version of each...

Page 22: ...ervers and the connected MFPs in the network and show it in the MFP Server List Before you start to install the MFP in the MFP Server List please check your computer s MFP installation status You never install the MFP drivers utilities please refer to the Section 4 4 1 You have installed the MFP drivers utilities please refer to the Section 4 4 2 ...

Page 23: ...to your computer Some MFP requires connecting the MFP to your computer during the installation Please refer to the below illustration of HP ALL In One Series which is the screen displayed during the installation To connect the MFP to your computer through the MFP Server just like you have directly connected the MFP to your computer through the USB cable you can follow the steps below ...

Page 24: ... MFP driver please insert the installation CD of the MFP and find drivers in the CD manually Note If the MFP you have connected is a composite device the system will install the driver for composite device at first The following screen will be popped up please click Continue Anyway Follow the screens to finish the installation If the system can t find the MFP driver please insert the installation ...

Page 25: ...19 3 After you have completed the MFP installation you will see the MFP is added to the Printers and Faxes in Windows ...

Page 26: ...rs Follow the screens to finish the installation If the system can t find the MFP driver please insert the installation CD of the MFP and find drivers in the CD manually Note If the MFP you have connected is a composite device the system will install the driver for composite device at first The following screen will be popped up please click Continue Anyway Follow the screens to finish the install...

Page 27: ...llation a copy of the MFP will be added to the Printers and Faxes in Windows Tip The new copy of the MFP is linked to the MFP Server Please use this MFP to share print scan card reader or fax functions through the network ...

Page 28: ...inished using the MFP please click Disconnect to release the MFP Other users can t use the MFP only if the MFP is released Tip 2 It is recommended to enable Auto Release setting The MFP Server will release the connection with the MFP after a period of idle time that you have assigned In this way the MFP will not be occupied too long and other users can share the MFP frequently Please refer to Sect...

Page 29: ... create the connection between the MFP and your computer and then you can print a document just follows the same steps as usual Tip If you have sent a printing job to the MFP while the MFP is connecting by a user you may be prompted that the device is not found or the document is failed to print Please resend the printing job after the MFP is idle or not being connected by the other user ...

Page 30: ... the MFP provides scan utility for users You can scan pictures or documents through the utility In Windows XP user can also scan from Windows XP scanning utility An example HP 1600 Series Utilities Windows XP Scanning Utility ...

Page 31: ...25 5 3 Card Reader Accessing If the MFP supports card reader function you can read the files in the plugged card reader through the MFP Server ...

Page 32: ... the MFP is installed a fax device will be added to Printers and Faxes in the Windows When you connect to the MFP by clicking Connect in the MFP Manager you can fax a file through the MFP Server Procedures to fax a file 1 In the Microsoft Office or other programs select Print from the File menu 2 The following screen will be popped up select the fax device and then click Print ...

Page 33: ...27 3 The Send Fax screen is popped up please configure the file and enter the fax number Click Send Fax to fax the file ...

Page 34: ...status information When you don t want to use the MFP or Printer please click Disconnect so other users can use the device You can also enable the Auto Release setting so that the MFP Server will release the connection after a period of idle time that you have assigned If you unplug the USB cable or turn off the MFP while using the device will not display in the list After you reconnect the USB ca...

Page 35: ...ertime each user can enable the Auto Release setting at the bottom of the MFP Manager utility It is used to automatically disconnect the connection after the MFP is idle for a specified period of time By default it is never released When you click on the MFP in the MFP Server List you will see the information including Status Computer Name and Contact Information Status It displays the status of t...

Page 36: ...hat you frequently use to My Favorite List Auto Release when idle time is over xx minutes 5 255 To avoid you occupy the MFP overtime you can setup auto release function It is used to automatically disconnect the current connection after the MFP is idle for a specified period of time By default it is never released It is recommended to enable the setting after the MFP and MFP Server are installed c...

Page 37: ...e about the quick setup functions My Favorite List My Favorite List The My Favorite List will list your favorite MFP Servers You can find the information of the MFP Servers including MFP Server Name MAC ID IP Address and the device connected to the MFP Server MFP Server MFP Information The information listed here are the same as MFP Server List Please refer to Section 6 1 Refresh Refresh the MFP S...

Page 38: ...55 To avoid you occupy the MFP overtime you can setup auto release function It is used to automatically disconnect the current connection after the MFP is idle for a specified period of time By default it is never released It is recommended to enable the setting after the MFP and MFP Server are installed completely so that the MFP resource will not be occupied permanently ...

Page 39: ...inting job to the MFP while the MFP is connecting by the other user you may be prompted that the device is not found or the document is failed to print It also happens in some MFPs or printers even though the MFP is not connecting by a user Please follow the message to retry and the MFP will queue your printing job in your computer spooler The MFP Server will then print the job after the MFP is id...

Page 40: ...elect the MFP that is connected to the selected MFP Server Click Ok Note that in some cases a printing jobs cannot be printed completed if the MFP is already disconnected It will print unformatted messages Keep connecting for 30 second s after printing has been finished 5 60 is enabled by default It will help to avoid this kind of situation ...

Page 41: ...35 4 The setup is finished ...

Page 42: ...nd check the MFP information from the here easily Quick Setup Status The current status of the MFP will be displayed here Connected indicates that you are connecting to the MFP Busy indicates the MFP is being used Idle indicates that the MFP is free to use by any users Connect If the MFP is free to use the Connect is available to click for connecting the MFP Otherwise it is grayed out ...

Page 43: ...nnect Disconnect the selected MFP The Disconnect is available only for the current user Information To check more information about the MFP Server and the MFP please click this button The information will be shown as above ...

Page 44: ...zed the MFP Manager to an icon in the system tray when you start the MFP Manager By default it is disabled Refresh status every xx seconds 5 300 Setup the refresh interval for device status update By default it is disabled Your Contact Information Enter your contact information here When you connect to the MFP your contact information will be displayed in the right side of the program for other us...

Page 45: ...ur computer you can enter the IP Address of the MFP Server for the remote search The MFP Server in the Remote MFP Server List will be added to the MFP Server List for you to configure Note If the remote MFP Server you searched is behind NAT Router the MFP Server may not operate normally ...

Page 46: ...ration and management functions Search MFP Server Search All Available MFP Servers on the Network Status Display MFP Server Network Status General Configuration Configure general settings about the MFP Server such as Server Name Password etc TCP IP Configuration IP Address and DHCP Server Configuration System Configuration MFP Server Network Ability Setting and Firmware Upgrade MFP Server Manageme...

Page 47: ... several seconds as the utility uses system s available network protocols to search for all MFP Servers on the network All available MFP Servers will be listed under Server Group on the left side of the window You must select the MFP Server you would like to configure from the list The system will at the same time display the selected MFP Server s status on the right side of the window ...

Page 48: ...ide of the window The information of the MFP Server includes MAC ID Model Type Firmware Version status of each server port IP address subnet mask default gateway and supported printing protocols etc You can refresh the MFP Server s status by pressing the Refresh button You can restart the MFP Server by pressing the Reboot button ...

Page 49: ...wed on the right side of the window Double click the icon to set up the selected MFP Server A screen will pop up to verify User Name and Password of the MFP Server The default values are User Name admin Password 1234 Tip When you finish the settings please click to restart the MFP Server to take the settings effect ...

Page 50: ...can configure the Server Name User Name and Password here Server Name the name of the MFP Server You can use this name to identify the MFP Server when you search for the MFP Server by the Server Manger utility User Name Password is used to authenticate the administrator to login the MFP Server to configure it from the Server Manger utility or the Web Management tool ...

Page 51: ... the TCP IP configuration window will pop up You can configure the MFP Server to get IP automatically from DHCP server or specify static IP manually The MFP Server also has a built in DHCP server You can enable this DHCP server and let it manages IP for you ...

Page 52: ...r to the MFP Server DHCP Server Click the DHCP Server button to enter into the DHCP server s setting page By the default the DHCP server is disabled Auto If Auto is selected the MFP Server will detect DHCP server within the network automatically and once the DHCP server doesn t exist the MFP Server will turn on his own DHCP server and assign IP Address to client Please fill in the Starting Address...

Page 53: ...pgrade Firmware tool to update the newest firmware of the MFP Server Click button and select the correct firmware in your PC After selecting the firmware file click the Upgrade button to finish the firmware update process Tip Before you upgrade the firmware please make sure that the IP Address settings of the MFP Server are in the same network as your computer Load Default If you want to reset the...

Page 54: ...ick Force Release will help to you disconnect the current connection between the user and the connected device It is very useful when a user forgets to disconnect the MFP administrator can force to disconnect the connection and let the MFP be free to use MFP Server Description Enter the description max 15 alphanumeric of the MFP Server such as location or other information to help user to find the...

Page 55: ...port icon on the tool bar the Report window will pop up The report lists basic information of all available MFP Servers in the network The information includes Device Name MAC ID Model Type and Firmware Version of MFP Server ...

Page 56: ...administrator can easily configure and manage MFP Server s various main functions by the browser Simply enter MFP Server s IP address into the browser s address bar to access the MFP Server setup page The default IP Address User Name and Password settings of the MFP Server are as follows IP Address 192 168 2 2 User Name Admin Password 1234 ...

Page 57: ...s or configure the settings of the MFP Server After entering the IP address of the MFP Server a login page display You have to enter correct User Name and Password before going to the Web Management pages Note Default User Name is admin default password is 1234 ...

Page 58: ...52 8 3 Device Status 8 3 1 System Status System Information includes Device Name MFP Server Name Model Type Firmware Version MAC Address Wireless LAN Status and the protocols enabled status etc ...

Page 59: ...s Connected Ready Off Line or Paper Out Connected the MFP or printer is connected by a user Ready the MFP or printer is not connected by a user and is ready to use Off Line the MFP or printer is not connected by a user and is not connected to MFP Server through USB cable or it is turned off Paper Out the MFP or printer is not connected by a user and is paper out ...

Page 60: ...54 8 3 3 TCP IP Status This page lists all TCP IP settings of the MFP Server including IP Address Subnet Mask and Gateway It also can tell the DHCP server is On or Off ...

Page 61: ...P Server name and password of the MFP Server here MFP Server Name the name of the MFP Server You can use this name to identify the MFP Server when you search for the MFP Server by the Server Manager utilities Password enter the password you want to change to the MFP Server The password can be up to 7 digit alphanumeric format The default password is 1234 Re types Password enter the same password f...

Page 62: ...Advanced Settings Some advanced feature of the MFP Server can be set here TCP IP Printing This MFP Server supports TCP IP network protocol and LPR IPP RAW printing protocols By default these protocols are enabled ...

Page 63: ...tup an static IP manually If you need the MFP Server to automatically get an IP from DHCP server select Enable Obtain TCP IP Settings Automatically Use DHCP BOOTP You also can select Disable Use the following TCP IP Settings to manually assign IP Address Subnet Mask and Gateway for the MFP Server ...

Page 64: ...58 8 4 3 Save Settings After configuring the MFP Server you have to click the Save Settings to save the settings and restart the system ...

Page 65: ...59 8 5 System Tools 8 5 1 Load Default You can use this page to restore the factory default settings All of your previous setup will be reset ...

Page 66: ...er in this page Click Browse to select the firmware in your storage and then click OK the firmware will be updated in several minutes Be aware that if you have started upgrading firmware you have to follow all the upgrading steps Otherwise the MFP Server will not operate normally ...

Page 67: ...twork MFP Server can support LPR printing by default If you install the MFP Server in Windows 98SE Me NT the MFP Server provides a tool Network Port Setup that helps to add the LPR protocol to users computer easily Please refer to Chapter 10 To configure the LPR setting in Windows 2000 XP 2003 please follow the steps below 1 Click Start choose Settings and select Printers and Faxes 2 Click Add a P...

Page 68: ...62 4 Select Local Printer attached to this computer and click Next 5 Choose Create a new port and Standard TCP IP Port Click Next ...

Page 69: ...sure that the MFP Server and the MFP or Printer have turned on and connected to the network correctly before you continue Click Next 7 Enter the IP Address of the MFP Server in the Printer Name or IP Address Click Next ...

Page 70: ... 8 Select Custom and click Settings When you finish the settings at step 9 click Next to continue 9 Select LPR and enter lpt1 in the Queue Name click OK By default the queue name of the MFP Server is lpt1 ...

Page 71: ...elect a suitable printer manufacturer and the printer model and click Next If your printer is not in the list click Have Disk to install the driver of the printer After installation the printer model will be added to the list ...

Page 72: ...66 12 Choose to set the print as a default printer or not Click Next 13 You have added the network printer to the PC successfully The information of the printer is displayed in the windows Click Finish ...

Page 73: ... XP 2003 operating system can use the protocol to share printing in the network MFP Server can support RAW printing by default To configure the RAW setting in Windows 2000 XP 2003 please follow the steps below 1 Click Start choose Settings and select Printers and Faxes 2 Click Add a Printer 3 The Add Printer Wizard is displayed Click Next ...

Page 74: ...68 4 Select Local Printer attached to this computer and click Next 5 Choose Create a new port and Standard TCP IP Port Click Next ...

Page 75: ...sure that the MFP Server and the MFP or Printer have turned on and connected to the network correctly before you continue Click Next 7 Enter the IP Address of the MFP Server in the Printer Name or IP Address Click Next ...

Page 76: ... 8 Select Custom and click Settings When you finish the settings at step 9 click Next to continue 9 Select RAW and enter lpt1 in the Queue Name click OK By default the queue name of the MFP Server is lpt1 ...

Page 77: ...elect a suitable printer manufacturer and the printer model and click Next If your printer is not in the list click Have Disk to install the driver of the printer After installation the printer model will be added to the list ...

Page 78: ...72 12 Choose to set the print as a default printer or not Click Next 13 You have added the network printer to the PC successfully The information of the printer is displayed in the windows Click Finish ...

Page 79: ... users 11 2 System Setup 11 2 1 MFP Server Side It is needless to do any setting on the MFP Server side Make sure the MFP Server has correct IP settings If you want to share the printers to Internet users you have to set a public IP to the MFP Server You also have to make sure that any gateway router or firewall does not block IPP protocol if you have these gateway devices installed in your networ...

Page 80: ...74 3 The Add Printer Wizard is displayed Click Next 4 Select A network printer or a printer attached to another computer Click Next ...

Page 81: ...RL format is http IP 631 Port Name The IP should be the MFP Server s IP The number 631 is IPP standard port number Port Name is the port name of MFP Server that your printer is connected to The default port name is lpt1 One example of the URL is http 192 168 2 2 631 lpt1 After entering the URL of MFP Server click Next ...

Page 82: ... the printer model and click Next If your printer is not in the list click Have Disk to install the driver of the printer After installation the printer model will be added to the list 7 Choose to set the print as a default printer or not Click Next ...

Page 83: ...77 8 You have added the network printer to the PC successfully The information of the printer is displayed in the windows Click Finish ...

Page 84: ...ng protocols can be used in Windows 2000 XP 2003 The LPR printing protocol can be used in Windows 98SE Me NT 2000 XP 2003 Unix Linux and MAC OS For the LPR RAW and IPP settings in Windows 2000 XP 2003 please refer to Chapter 9 10 and 11 This chapter will introduce you how to install the MFP Server as a print server in Windows 98SE Me NT Before you start you should have One computer with Windows 98...

Page 85: ...dows Me NT the procedures are similar 1 Insert the CD shipped along with the MFP server into your CD ROM drive The Autorun exe program should be executed automatically If not run Autorun exe manually from CD ROM drive s root directory 2 The Installation Manager will be displayed on the screen as following Click Setup Utility ...

Page 86: ...d to remind you that the MFP Server will only support print sharing function since the operation system of your computer is Windows 98SE Me NT Click Ok 4 The MFP Server Utilities InstallShield Wizard will be displayed Click Next ...

Page 87: ...xt to install the MFP Server utilities in the default folder or click Change to specify the destination folder where you would like to install the MFP Server utilities 6 The MFP Server Utilities are being installed ...

Page 88: ...irectly Or you can select No I will configure the MFP Server later and click Next to complete the installation The following steps are for the MFP Server Configuration 8 The MFP Server List will auto search the MFP Servers in the network Select the MFP Server you want to setup and click Next to continue ...

Page 89: ...d to login the MFP Server The default User Name is admin default Password is 1234 10 Set the Alias Name and the Server Description here Click on Next Note You can type the location or other information of the MFP Server for easy to find the MFP by filling Server Description ...

Page 90: ...Address 192 168 2 2 Subnet Mask 255 255 255 0 Please click Next once you have found appropriate network settings for the MFP Server Note The MFP Server IP Address should be in the same network segment with the networking computers If the network settings are incorrect a message will be prompted to remind you after you click Next Please make sure that you have set the right settings before going to...

Page 91: ...85 12 Click Finish to apply the settings 13 Click Finish to complete the installation ...

Page 92: ...d the network ports of MFP Server within the network Server Configuration Allows you to configure IP Address network protocols and other advanced functions Please refer to Chapter 6 for the detail instruction of the configuration Uninstall Remove all installed software About Version Display the version of each utility including in the MFP Server software programs ...

Page 93: ... below If you install another new MFP Server in the network you must run this program first This program will search for new MFP Servers and allow you to add the new network printer port into your computer conveniently Perform the standard Add Printer procedures After you can print directly to the printer through the newly installed MFP Server Note Please be aware that Network Port Setup Utility c...

Page 94: ...low the procedure described below to add printer to the Windows Note the following Add Printer steps are running in Windows 98SE The steps in other Operating Systems are similar 1 Click Start choose Settings and select Printers 2 Click Add Printer 3 The Add Printer Wizard is displayed Click Next ...

Page 95: ...k Next 5 Select a suitable printer manufacturer and the printer model and click Next If your printer is not in the list click Have Disk to install the driver of the printer After installation the printer model will be added to the list ...

Page 96: ...90 6 Choose the suitable Print Server Network Port and click Next 7 Please enter the new name for the printer or click Next to keep the default printer name ...

Page 97: ... Choose to print the test page or not It is recommended to print a test page Click Finish 9 The drivers of the printer will be installed After complete the installation the printer is added to your computer ...

Page 98: ...explains how to set the MFP Server with the LPD protocol in the Unix Linux system Here describes two modes to configure the MFP Server In the GUI Mode we follow the settings in the Fedora Core 4 system If you are in different system you can refer to the configurations in the Console Mode 13 1 GUI Mode 1 Select Printing from System Settings ...

Page 99: ...93 2 Click New to add the MFP or printer connected to the MFP Server 3 Click Forward ...

Page 100: ...rinter and click Forward 5 In the following screen please configure as below Then click Forward to continue Select a queue type Select Network Unix LPD as the queue type Server Enter the IP Address of the MFP Server for example 192 168 2 253 Queue Set the queue name to lpt1 ...

Page 101: ...95 6 Select the MFP or printer manufacturer and model and click Forward 7 Please review the settings If the settings are correct click Finish ...

Page 102: ... Printer configuration fedora screen and configure again 13 2 Console Mode To configure the MFP Server for LPD printing perform the procedures below 1 Enable MFP Server s TCP IP Support 2 Set up MFP Server s IP address 3 Verify MFP Server s IP Address 4 Configure remote LPD printing on the host 5 Print a test page In the next sections we will describe these five procedures step by step ...

Page 103: ...nix Linux systems using any one of the following methods 1 DHCP Dynamic Host Configuration Protocol 2 BOOTP Bootstrap Protocol The MFP Server will use these two methods to obtain IP address automatically if its IP address is configured as Auto 0 0 0 0 13 2 2 1 DHCP There are many Unix Linux systems that support DHCP protocol and the procedures to configure the DHCP server database are different Pl...

Page 104: ... server as the superuser root Perform the following steps to add address entries 1 Optionally assign a name corresponding to the MFP Server s IP address You can add this address to the etc hosts file by adding a line such as 203 66 191 12 pserver 2 Add an entry to the host s etc bootptab file similar to the following hostname ht 1 ha MFP_Server_ethernet_address ip MFP_Server_ip_address Lines shoul...

Page 105: ...ress 203 66 191 12 The entry for this MFP Server in the etc bootptab file should be MF010101 ht 1 ha 0000B4010101 ip 203 66 191 12 13 2 3 Verify MFP Server s IP Address To verify your MFP Server is responding to the newly assigned IP address using a PING command ping ip address ...

Page 106: ... have assigned to the MFP Server 3 The printer name or queue name on the remote host should be lpt1 lpt2 or lpt3 the name of the printer port on the MFP Server You will need to perform the tasks below logged in as the superuser root To configure your Unix Linux host for printing 1 Optionally assign a name corresponding to the MFP Server s IP address You can add this address to the etc hosts file b...

Page 107: ...l bars name1 name2 The rm entry should correspond to the IP address you have assigned to the MFP Server You can also use a host name if you have assigned one in the etc hosts file The sd entry should correspond to the spool directory you created in the previous step The rp entry should correspond to the port name of the remote printer The values should be one of lpt1 lpt2 or lpt3 depends on the pr...

Page 108: ... 2 With the Printing tab selected click the Add button 3 When the Printer Browser opens select IP Printer 4 In the IP Printer screen please configure as below Protocol Select Line Printer Daemon LPD as the Protocol IP Address Set the address to the MFP Server s IP Address for example 192 168 2 3 Queue Set the queue name to lpt1 Name You can set a name for the MFP or printer Location You can enter ...

Page 109: ...103 14 2 MAC 10 3 x To enable LPR Printing in Macintosh 10 3 x please follow the procedures below 1 In the Desktop click System Preferences 2 Click Print Fax ...

Page 110: ...104 3 From the Print Fax screen click Set Up Printers 4 Click Add to add the new MFP Server through TCP IP ...

Page 111: ...the Printer Model to setup the MFP Server Click Add to continue Printer Type LPD LPR Printer Address Input the IP Address of the MFP Server Queue Name The queue name of the MFP Server is lpt1 Printer Model Select the MFP or Printer Model that is attached to the MFP Server ...

Page 112: ...106 6 The MFP Server is installed completely You can see it in the Printer List 7 You can print a file to check whether the MFP Server is installed successfully ...

Page 113: ... The ways to change the IP Address of the MFP Server A DHCP Server is installed in the network If a DHCP Server is installed you can set the MFP Server to get IP Address from the DHCP Server automatically 1 Open Server Manager and then select TCP IP setting 2 Select Auto IP and click Save 3 Reboot the MFP Server Set up the IP Address Manually 1 Open Server Manager and then select TCP IP setting 2 ...

Page 114: ...g is in the Compatibility List in Appendix Attached the MFP to PC directly and try if the MFP is able to use 5 My computer has installed the firewall and the MFP Server can t work normally in my computer Some firewalls for example the Network Access Manager firewall program attached with nVidia network card may block the communication between MFP Server and your computer you have to add the MFP Se...

Page 115: ...ected by other user the printing jobs are been queuing in the Windows spooler Disable Bi Directional Support Please follow the steps below 1 Right click the printer from Printer and Faxes in the Windows 2 Select Properties and select Ports 3 Uncheck the Enable bidirectional support Check if the MFP you are using is in the Compatibility List in Appendix or contact your dealer ...

Page 116: ... 3020 3 3 3 N A 4 HP Laser Jet 3055 3 3 N A N A 5 HP Laser Jet 3380 3 3 3 N A 6 HP PSC 750 3 3 N A N A 7 HP PSC 1210 3 3 N A N A 8 HP PSC 1350 3 3 N A N A 9 HP PSC 1410 3 3 N A N A 10 HP PSC 1510 3 3 N A N A 11 HP PSC 1610 3 3 N A 3 12 HP PSC 2210 3 3 3 13 HP PSC 2310 3 3 N A 3 14 HP PSC 2355 3 3 N A 3 15 HP PSC 2410 3 3 N A 3 16 HP PSC 2510 3 3 N A 3 17 HP PhotoSmart 2575 3 3 N A 3 18 HP PhotoSma...

Page 117: ... EPSON CX1500 3 3 N A N A 39 EPSON CX3700 3 3 N A N A 40 EPSON CX4100 3 3 N A N A 41 EPSON CX4700 3 3 N A 3 42 EPSON PHOTO 4990 Scanner N A 3 N A N A 43 EPSON R340 3 N A N A 3 44 EPSON R350 3 N A N A 3 45 EPSON RX430 3 3 N A 3 46 EPSON RX510 3 3 N A 3 47 EPSON RX520 3 3 N A 3 48 EPSON RX530 3 3 N A 3 49 EPSON RX630 3 3 N A 3 50 EPSON RX650 3 3 N A 3 51 CANON MPC 190 3 3 N A N A 52 CANON PIXMA MP11...

Page 118: ... 3 3 3 N A 68 Brother MFC 210C 3 3 3 3 69 Brother MFC 215C 3 3 3 3 70 Brother MFC 2820 3 N A 3 N A 71 Brother MFC 420CN 3 3 3 3 72 Brother MFC 425CN 3 3 3 3 73 Brother MFC 3240C 3 3 3 N A 74 Brother MFC 7420 3 3 3 N A 75 Brother MFC 7820N 3 3 3 N A 76 Brother MFC 8840D 3 3 3 N A 77 Konica Minolta 2480 3 3 N A N A 78 Samsung SF 565P 3 3 3 N A 79 Samsung SCX 4100 3 3 N A N A 80 Samsung SCX 4720F 3 3...

Reviews: