background image


44 

2-7 WPS Configuration 


Wi-Fi Protected Setup (WPS) is the latest wireless network technology which makes 

wireless network setup become very simple. If you have WPS-enabled wireless access 

point, and you w

ant to establish a secure connection to it, you don‟t have to configure the 

wireless access point and setup data encryption by yourself. All you have to do is to go to 

the WPS setup page of this wireless card, click a button, and then press a specific button or 

enter a set of 8-digit code on the wireless access point you wish to establish a secure 

connection - just three simple steps!   

 
For older wireless access points, it‟s possible to perform a firmware upgrade to become a 

WPS-enabled access point. Since they may not have a hardware button to press for WPS 

setup, you can use an alternative WPS setup method - input the pin code. Every 

WPS-compatible wireless network card support pin code configuration method; you can 

just input the code to wireless access point, and the wireless access point and wireless 

network card will do the rest for you. 


This wireless network card is compatible with WPS. To use this function, the wireless 

access point you wish to connect to must support WPS function too. Now, please follow the 

following instructions to establish secure connection between WPS-enabled wireless 

access point and your wireless network card. 

Summary of Contents for EW-7722UnD

Page 1: ......

Page 2: ...hase the buyer and not this company its distributor or its dealer assumes the entire cost of all necessary servicing repair and any incidental or consequential damages resulting from any defect in the software Further this company reserves the right to revise this publication and to make changes from time to time in the contents hereof without obligation to notify any person of such revision or ch...

Page 3: ...dit an existing profile 35 2 3 3 Delete an existing profile 36 2 3 4 Activate a profile 37 2 4 Advanced Settings 38 2 5 View Network Statistics 41 2 6 WMM Setting 42 2 7 WPS Configuration 44 2 7 1 WPS Button Push Button 45 2 7 2 WPS Setup PBC Push Button Configuration 45 2 7 3 WPS Setup PIN 48 2 8 Radio On Off 50 2 9 About 51 2 10 On line Help 52 CHAPTER III Soft AP Function 53 3 1 Switch to AP Mo...

Page 4: ...5 times further Includes multi language EZmax setup wizard Supports USB 2 0 1 1 interface Supports hardware software WPS configuration function Supports WMM WMM PS IEEE 802 11e QoS standard Supports 64 128 bit WEP WPA TKIP with IEEE 802 1x WPA2 AES with IEEE 802 1x for high security level Supports operating system Windows XP Vista 7 Maximum performance may vary depending on network conditions and ...

Page 5: ...help DO NOT disassemble the network card by your self warranty will be void 6 If the network card falls into water DO NOT USE IT AGAIN BEFORE YOU SEND THE CARD TO THE DEALER OF PURCHASE FOR INSPECTION 7 If you smell something strange or even see some smoke coming out from the network card switch the computer off immediately and call dealer of purchase for help 1 3 System Requirements One CD ROM dr...

Page 6: ...cription Radio Off Green Off Wireless LAN function is disabled Radio On No Link Green Off No link to wireless AP or Router Slow blinking Transmitting management information Radio On Link to AP or Router Green On Link to wireless AP or Router Blinking Transmitting data or management information If user activates WPS mode hold WPS button for 3 seconds the LED will be still blinking 2 3 1 4 ...

Page 7: ...lease follow the following instructions to install your new wireless network card 1 Insert the USB wireless network card into an empty USB 2 0 port of your computer when computer is switched on Never use force to insert the card if you feel it s stuck flip the card over and try again ...

Page 8: ...5 2 The following message will appear on your computer click Cancel Close Under Windows XP Under Windows Vista ...

Page 9: ...nd quick configuration tool for internet connection with series process When you start EZMAX Setup Wizard you will get the following welcome screen Please choose the language to start the configuration The wizard will guide you to finish your network connection We will not provide any instruction for the EZMAX Setup Wizard here If you lose the CD ROM or you prefer the traditional setup procedure p...

Page 10: ...ense agreement and click I accept the terms of the license agreement then click Next button to accept license agreement 5 It is recommend installing driver and utility if the network card is installing the first time If you want to update the driver only choose Install driver only Click Next to continue ...

Page 11: ...y access to all functions of this wireless network card If you prefer to use the wireless configuration tool provided by Windows XP or Vista please select Microsoft Zero Configuration Tool then click Next 7 Now you ll see the following message please click Install to start utility installation If you see Found New Hardware message again please ignore it and wait ...

Page 12: ...9 8 Please wait while the install procedure is running When you see this message please click Finish to complete the driver installation process ...

Page 13: ...of your windows system If you put the mouse cursor on the icon the status of wireless card will be displayed as a popup balloon 10 When you want to configure your wireless connection please right click on this icon and a popup menu will appear You can click Launch Config Utility to start configuration program If you want to close the configuration utility please click Exit HERE ...

Page 14: ...lity by Exit function you ll not be able to maintain the wireless link to the access point you wish to use In this case you can start config utility again by clicking Edimax Wireless Utility icon from Start All Programs Edimax Wireless as shown below ...

Page 15: ...wireless access point you wish to connect The current status of wireless connection will be displayed by Edimax configuration utility icon Wireless connection is established good signal reception Wireless connection is established normal signal reception Wireless connection is established weak signal reception Connection is not established yet Wireless network card is not detected There are two wa...

Page 16: ...icon located at lower right corner of computer desktop and then click Launch Config Utility Edimax setup utility will launch and begin to scan for all wireless access points automatically Utility consists two parts Menu and setup area You can select a setup function Profile Network etc from menu and corresponding setup items will be displayed at setup area Menu Setup Area More Less button ...

Page 17: ...k More less button to expand the setup utility window to display more information You can click More Less button again and setup utility window will resume to its original size Tip If a setup item requires more information to complete the setup procedure the setup utility window will expand automatically ...

Page 18: ...ble for establishing a one to one wireless connection between two wireless devices Before you can connect to any wireless access point or device by infrastructure or Ad Hoc mode there two things you must know a Wireless device s SSID Service Set IDentifier someone will call it access point s name You can scan for the SSID of other wireless devices nearby but if the SSID of the wireless device you ...

Page 19: ...his wireless device and the channel number of this wireless device Means this wireless device is an access point Means this wireless device is a computer Ad Hoc mode point to point connection C The wireless standard supported by this access point n for 802 11n a for 802 11a g for 802 11g and b for 802 11b WPS icon will appear when the access point supports WPS If the access point uses encryption a...

Page 20: ...n see the access point you wish to use here If you still can not see the access point you wish to use after clicking Rescan for more than five times please move your computer closer to the location where the wireless access point is or see instructions in Chapter 3 2 Troubleshooting If you wish to see detailed information for a specific access point please double click on it and you ll be provided...

Page 21: ...rt all listed access point by SSID Channel or Signal signal strength Show dBm Check this box to show the signal strength of access point instead of percentage Rescan Click this button to rescan access points You can click this button for several times if the access point you wish to use does not show in the list Add to Profile You can store a specific access point to profile so you can link to tha...

Page 22: ...utton Instructions will be given as follow 1 Click the wireless access point or network device you wish to connect it will be highlighted then click Connect If the access point you selected does not use encryption you ll be connected to this wireless access point within one minute If the access point you selected uses encryption please proceed to step 3 ...

Page 23: ...k the owner of wireless access point for the exact SSID and input it here then click OK when ready If the SSID you provided here is wrong you ll not be able to connect to this access point 3 If the wireless access point uses encryption you will be prompted to input its WEP key or WPA preshared key ...

Page 24: ... t change it However if you re connecting to an access point uses 802 1x authentication you have to check 802 1x box and input related information Instructions for 802 1x authentication will be given later 5 If the wireless access point is successfully connected you ll see a symbol appears in front of the name of wireless device You can put the mouse cursor over the Edimax configuration utility ic...

Page 25: ...22 ...

Page 26: ...tion of access points and you can recall them anytime you wish to establish connection You can add a found access point to profile or input all information of an access point by yourself To add a found access point to profile please select a found access point first to make it highlighted then click Add to Profile button to input the information of access point by yourself please go to Profile men...

Page 27: ...necting to an access point please select Infrastructure for point to point wireless connection i e connecting to another computer using Ad Hoc mode please select Ad hoc here If you selected an access point from the list above please keep this field unchanged Tx Power You can select the wireless output power here If you re not too far from access point good signal reception you can select a lower o...

Page 28: ... yourself You can drag the slider to set the threshold value or input the value in the box located at right It s recommended to keep this value untouched unless you know the effect of changing this value Fragment Threshold Check this box to set the packet fragment threshold by yourself You can drag the slider to set the threshold value or input the value in the box located at right It s recommende...

Page 29: ...put WPA preshared key here If encryption is not enabled or you select WEP as encryption type this field will be disabled and grayed out WEP Key You can select key type Hexadecimal or ASCII and input WEP key here If encryption is not enabled or you select WPA as encryption type this field will be disabled and grayed out You can set up to 4 WEP keys here There are two types of WEP key Hexadecimal an...

Page 30: ...nnel Authentication Select 802 1x tunnel authentication type from dropdown menu Please ask the administrator of the access point you wish to connect to select a correct tunnel authentication method This pull down menu is only available when authentication type you use is PEAP TLS Smart Card or TTLS When you use EAP FAST as authentication type the protocol setting is always Generic Token Card and c...

Page 31: ...rtificate the certificate must be installed on your computer and you can select the certificate here Server Certification tab Use this tab to use server based certification Please select a CA Certificate Authority from dropdown menu If intermediate certificates are allowed please select Allow intermediate certificates Also if you need to specify CA server s name you can specify it in Server name f...

Page 32: ...n WZC You can also use WZC to configure your wireless network parameter 1 Right click Edimax configuration utility icon and select Use Zero Configuration as Configuration utility 2 Right click Windows Zero Configuration icon and select View Available Wireless Networks If you can not find the icon please follow the procedures from step 3 to step 5 HERE ...

Page 33: ...30 3 Click Start button should be located at the bottom left corner of windows desktop click Control Panel then click Network and Internet Connections in Control Panel 4 Click Network Connections ...

Page 34: ...ireless LAN Card then select View Available Wireless Networks 6 All wireless access points in proximity will be displayed here If the access point you want to use is not displayed here please try to move your computer closer to the access point or you can click Refresh network list to rescan access points Click the access point you want to use if it s shown then click Connect ...

Page 35: ...e here It must match the encryption setting on the access point If the access point you selected does not use encryption you ll not be prompted for security key or passphrase 8 If you can see Connected message the connection between your computer and wireless access point is successfully established ...

Page 36: ...a profile for every access point so you don t have to input these parameters every time when you want to connect to a specific wireless access point To manage profiles right click the Edimax configuration utility icon located at lower right corner of computer desktop then click Launch Config Utility Click the Profile menu All profiles will be listed in Profile List and you can select a profile fro...

Page 37: ...34 2 3 1 Add a profile If you want to click new profile click Profile menu then click Add button You ll be prompted to input detailed information of access point as described in Section 2 2 1 3 ...

Page 38: ...ou wish to change the content of the profile you can use this function Please select a profile from the list first then click Edit button You ll be provided with the contents of selected profile and you can edit them Click OK to save changes or click Cancel to discard changes ...

Page 39: ...36 2 3 3 Delete an existing profile If you no longer need a profile you can delete it Select the profile you wish to delete from the list and click Delete button to delete it ...

Page 40: ...an select it and click Activate button to establish connection with it 1 When you selected a profile and click Activate button to activate the profile a icon will be displayed in front of the profile to show that the connection is failed When the connection is successfully established a icon will be displayed ...

Page 41: ...tings to increase data transfer performance or change operation mode Please follow the following instructions to set advanced wireless settings 1 Right click the Edimax configuration utility icon located at lower right corner of computer desktop and then click Launch Config Utility 2 Click Advanced menu and the following settings will appear ...

Page 42: ...l quality Only adjust value when you understand what it means and you need to roam between multiple access points Show Authentication Status Dialog When your computer is being authenticated by wireless authentication server a dialog window with the process of authentication will appear This function is helpful to find out the problem when you can not be authenticated and you can provide this infor...

Page 43: ...0 connecting to CCX compatible access point check this box to enable measurement on unused radio channels to improve wireless connectivity After you finish the settings click Apply to apply new settings ...

Page 44: ...ng instructions to check network statistics 1 Right click the Edimax configuration utility icon located at lower right corner of computer desktop and then click Launch Config Utility 2 Click Statistics menu and the statistics of wireless connection will be displayed All connection related statistics is displayed here You can click Transmit or Receive tab to view the statistics of transmitted or re...

Page 45: ...you can define the priority of different kinds of data to give higher priority to applications which require instant responding Therefore you can improve the performance of such network applications Please follow the following instructions to set advanced wireless settings 1 Right click the Edimax configuration utility icon located at lower right corner of computer desktop and then click Launch Co...

Page 46: ...battery live longer You also have to select WMM power save modes here AC_BE Best Performance AC_BK Worst Performance AC_VI Video data has priority AC_VO Voice data has priority Direct Link Setup Enable If you have another WMM enabled wireless device you can enter its MAC address here then click Apply button and this network card will establish a direct link to the wireless device you specified her...

Page 47: ...e simple steps For older wireless access points it s possible to perform a firmware upgrade to become a WPS enabled access point Since they may not have a hardware button to press for WPS setup you can use an alternative WPS setup method input the pin code Every WPS compatible wireless network card support pin code configuration method you can just input the code to wireless access point and the w...

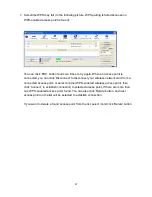
Page 48: ...ess and security setting etc in the adaptor utility 2 7 2 WPS Setup PBC Push Button Configuration 1 Right click the Edimax configuration utility icon located at lower right corner of computer desktop and then click Launch Config Utility 2 Click WPS menu and the following settings will appear 3 Set Config Mode to Enrollee and then push the WPS button on your wireless access point the button used to...

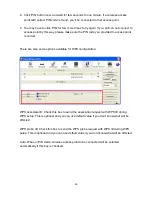
Page 49: ...ck Information button to see the detailed information about selected access point 5 Start PBC pairing procedure at access point side please refer to the instruction given by your access point s manufacturer then click PBC button in wireless configuration utility to start to establish wireless connection by WPS Please be patient This may require several seconds to one minute to complete When you se...

Page 50: ...onnect your wireless network card from a connected access point or select another WPS enabled wireless access point then click Connect to establish connection to selected access point if there are more than one WPS enabled access point found You can also click Rotate button and next access point on the list will be selected to establish connection If you want to delete a found access point from th...

Page 51: ...ity 2 Click WPS Configuration menu and the following settings will appear 3 The PIN code of your wireless network card is an eight digit number located at the upper right position of configuration utility Remember it and input the number to your wireless access point as the WPS PIN code Please refer to the user manual of your wireless access point for instructions about how to do this NOTE If you ...

Page 52: ...t is correct There are also some options available for WPS configuration WPS associate IE Check this box to send the association request with WPS IE during WPS setup This is optional and you can use default value if you don t know what will be affected WPS probe IE Check this box to send the WPS probe request with WPS IE during WPS setup This is optional and you can use default value if you don t ...

Page 53: ...network function you don t have to remove the network card physically 1 Right click the Edimax configuration utility icon located at lower right corner of computer desktop and then click Launch Config Utility 2 To switch wireless radio on off please click Radio On Off button Wireless radio is on Green Wireless radio is off Red ...

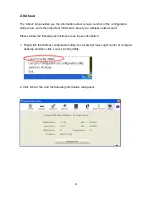
Page 54: ...er important information about your wireless network card Please follow the following instructions to see these information 1 Right click the Edimax configuration utility icon located at lower right corner of computer desktop and then click Launch Config Utility 2 Click About tab and the following information will appear ...

Page 55: ...p If you need to know the directions of how to use specific function in the utility please click Help button On line help documents will be presented in Windows help format Click this button to view on line help documents ...

Page 56: ...ollow the instructions in following chapters to use the AP function of your wireless card 3 1 Switch to AP Mode and Basic Configuration The operating mode of the wireless card is Station Mode becoming a client of other wireless access points by default If you want to switch to AP mode please right click Edimax utility icon and select Switch to AP Mode After you select Switch to AP Mode the Edimax ...

Page 57: ...ection If your computer has another network card which is connected to Internet please select it from Name dropdown menu and click Enable ICS if your computer does not have another network card with Internet connection please click Not enable ICS After you click Enable ICS or Not enable ICS you ll see the basic configuration menu of the AP function ...

Page 58: ...egion Code Wireless Mode Select the operation mode of the access point here When 2 4G is selected the access point is operated as 802 11b g n access point When 5GHz is selected the access point is operated as 802 11a n access point Use Mac Address Click this button to use the MAC address of the wireless card as SSID A prefix AP will be added automatically Security Setting Set the security options ...

Page 59: ...roadcasted to the public Your wireless clients must know the exact SSID to be able to connect to your computer This option is useful to enhance security level Allow BW 40 MHz Check this box to allow BW 40MHz capability TX BURST Check this box to accelerate the data transmit rate It may not work with all wireless access point and wireless devices Beacon ms You can define the time interval that a be...

Page 60: ...57 To save changes click Apply button Or you can click Default to reset all values to factory default value ...

Page 61: ...h will encrypt the data being transferred over the air to enhance data security level It s recommended to enable data encryption unless you wish to open your computer and its internet connection to the public When you click Security Setting in the utility the following window will appear ...

Page 62: ...here You can click the button 10 seconds or Kpackets to change the unit of time interval every 10 seconds or a thousand data packets times the value you specified in Group Rekey Interval field WEP Key Please input the WEP encryption key here when you select WEP as encryption type There are 2 types of WEP key Hex number 0 to 9 and ASCII characters A to F and ASCII all alphanumerical characters plus...

Page 63: ... your computer and wireless resources to the public you can use MAC address filtering function to enforce your access control policy so only wireless clients with MAC address you defined by this function can be connected to your software access point ...

Page 64: ...s access point Reject All Reject wireless clients with MAC address listed here to be connected to this access point MAC address Input the MAC address of the wireless client you wish to allow or reject here No colon or hyphen required Add Add the MAC address you inputted in MAC address field to the list Delete Please select a MAC address from the list then click Delete button to remove it Remove Al...

Page 65: ...ions of every field Item Name Description MAC Address Displays the MAC address of this wireless client AID The serial number of this wireless connection Power Saving Mode Displays the capability of power saving function of this wireless client Status Displays additional information of this wireless Connection like current wireless operating mode and data transfer rate ...

Page 66: ...63 3 5 Event Log This software access point will log all wireless related activities as a log Click Event Log tab and the event log will be displayed You can click Clear to remove all entries in the log ...

Page 67: ...istics If you want to know detailed information about how your software access point works click Statistics tab and the event log will be displayed You can click RESET COUNTERS button to reset all counters to zero ...

Page 68: ...65 3 7 About The About tab provides you the information about version number of the configuration utility driver and other important information about your wireless access point ...

Page 69: ...ulations Data Rate 11b 1 2 5 5 11Mbps 11g 6 9 12 24 36 48 54Mbps 11n 20MHz MCS0 15 up to 144Mbps 11n 40MHz MCS0 15 up to 300Mbps 11a 6 9 12 24 36 48 54Mbps Securities WEP 64 128 WPA WPA2 Cisco CCX Support Antenna 2T2R Internal Printed Antennas Support hardware software WPS button for wireless security Drivers Windows XP Vista 7 LED Link Activity Temperature 32 104 F 0 40 C Humidity 10 95 NonConden...

Page 70: ... Please make sure the wireless network card is inserted into your computer s USB port If the Edimax configuration utility s icon is black the network card is not detected by your computer 2 Reboot the computer and try again 3 Remove the card and insert it into another USB port 4 Remove the driver and re install 5 Contact the dealer of purchase for help I can not establish connection with a certain...

Page 71: ...nable WMM in QoS tab if you need to use multimedia telephony related applications 4 Disable WMM Power Save Enable in QoS tab 5 There could be too much people using the same radio channel Ask the owner of the access point to change the channel number Please try one or more solutions listed above ...

Page 72: ...ng CCK for 11 and 5 5 Mbps and Barker code modulation for 2 and 1 Mbps B A protection mechanism called RTS CTS that governs how 802 11g devices and 802 11b devices interoperate 2 What is the IEEE 802 11b standard The IEEE 802 11b Wireless LAN standard subcommittee which formulates the standard for the industry The objective is to enable wireless LAN hardware from different manufactures to communic...

Page 73: ... with Netware Windows 2000 or other LAN operating systems to support printer or file sharing 11 Would the information be intercepted while transmitting on air WLAN features two fold protection in security On the hardware side as with Direct Sequence Spread Spectrum technology it has the inherent security feature of scrambling On the software side WLAN series offer the encryption function WEP to en...

Page 74: ...r satisfaction is maintained in a wider variety of environments and traffic conditions WMM makes it possible for home network users and enterprise network managers to decide which data streams are most important and assign them a higher traffic priority 15 What is WMM Power Save WMM Power Save is a set of features for Wi Fi networks that increase the efficiency and flexibility of data transmission...

Page 75: ... degree of security and authenticity for digital information wherever and however communicated or stored while making more efficient use of hardware and or software than previous encryption standards It is also included in IEEE 802 11i standard Compare with AES TKIP is a temporary protocol for replacing WEP security until manufacturers implement AES at the hardware level 21 Can Wireless products s...

Page 76: ...ion systems It is designed to trade off bandwidth efficiency for reliability integrity and security In other words more bandwidth is consumed than in the case of narrowband transmission but the trade off produces a signal that is in effect louder and thus easier to detect provided that the receiver knows the parameters of the spread spectrum signal being broadcast If a receiver is not tuned to the...

Page 77: ...less devices from cross interference If there are two wireless devices using the same or near channel and they are close enough radio interference will occur and reduce the radio resource usability 28 What is STBC STBC stands for Space Time Block Coding which is a technique used to transfer multiple copies of data by multiple antenna to improve data transfer performance By using multiple antennas ...

Page 78: ... from that to which the receiver is connected 4 Consult the dealer or an experienced radio technician for help FCC Caution This device and its antenna must not be co located or operating in conjunction with any other antenna or transmitter This device complies with Part 15 of the FCC Rules Operation is subject to the following two conditions 1 this device may not cause harmful interference and 2 t...

Page 79: ...ngers of electric shock and static electricity when working with electrical equipment All guidelines of this and of the computer manufacture must therefore be allowed at all times to ensure the safe use of the equipment EU Countries Intended for Use The ETSI version of this device is intended for home and office use in Austria Belgium Denmark Finland France Germany Greece Ireland Italy Luxembourg ...

Page 80: ...77 ...

Reviews: