background image


55


Troubleshooting


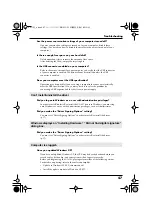
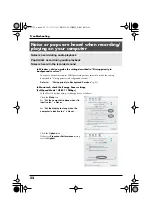
While you were using the UA-101, could your computer have performed 
a task with a heavy processing load, such as accessing a CD-ROM drive 
or network?


If a heavy processing load occurs while the UA-101 is being used, it may not work 
correctly. In this case, stop playback/recording, and then start playback/recording 
once again. If you are still unable to play/record correctly, close all software that 
had been using the UA-101, and re-connect the UA-101.


Is the sample rate setting in your software the same as the sample rate 
of the digital device connected to the digital input connector?


Set your software and the UA-101 to the same sample rate.
If you switch the UA-101’s sample rate, you must turn the power of the UA-101 off, 
then on again to get the setting to take effect.


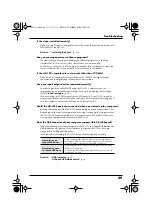
Are the input/output level indicators lit red?


Use UA-101 Control Panel to lower the monitor level.


Playback/recording stops midway, and subsequent playback/recording is 
not possible

Digitally recorded sound has distortion, the wrong pitch, or contains noise

Playback sound from your computer is distorted

UA-101_e.book 55 ページ 2007年8月6日 月曜日 午後1時23分

Summary of Contents for UA-101

Page 1: ...that you have gained a good grasp of every feature provided by your new unit OWNER S MANUAL should be read in its entirety The manual should be saved and kept on hand as a convenient reference 202 Copyright 2005 ROLAND CORPORATION All rights reserved No part of this publication may be reproduced in any form without the written permission of ROLAND CORPORATION Direct Monitor Mixer Level Indicators ...

Page 2: ...pment generates uses and can radiate radio frequency energy and if not installed and used in accordance with the instructions may cause harmful interference to radio communications However there is no guarantee that interference will not occur in a particular installation If this equipment does cause harmful interference to radio or television reception which can be determined by turning the equip...

Page 3: ...hat is uncom fortable If you experience any hearing loss or ringing in the ears you should immediately stop using the unit and consult an audiologist 011 Do not allow any objects e g flammable material coins pins or liquids of any kind water soft drinks etc to penetrate the unit 012b Immediately turn the power off remove the AC adaptor from the outlet and request servicing by your retailer the nea...

Page 4: ...all dust and other accumulations away from its prongs Also disconnect the power plug from the power outlet whenever the unit is to remain unused for an extended period of time Any accumulation of dust between the power plug and the power outlet can result in poor insulation and lead to fire 104 Try to prevent cords and cables from becoming entangled Also all cords and cables should be placed so th...

Page 5: ...receiving or initiating a call or while conversing Should you experience such problems you should relocate such wireless devices so they are at a greater distance from this unit or switch them off 354a Do not expose the unit to direct sunlight place it near devices that radiate heat leave it inside an enclosed vehicle or otherwise subject it to temperature extremes Excessive heat can deform or dis...

Page 6: ... sound level to be extremely low or impossible to hear For information on cable specifications contact the manufacturer of the cable Handling CD ROMs 801 Avoid touching or scratching the shiny underside encoded surface of the disc Damaged or dirty CD ROM discs may not be read properly Keep your discs clean using a commercially available CD cleaner Copyright 852a When exchanging audio signals throu...

Page 7: ... blocks of the UA 101 37 UA 101 Control Panel 38 Adjusting the audio latency 41 Using Separated ports 42 Minimize the ASIO buffer size 43 Using ASIO Direct Monitor 44 System settings 45 Restoring the factory settings Factory Reset 45 Troubleshooting 46 Driver related problems Windows 46 Can t record or play back audio or MIDI 48 No sound 48 Noise or pops are heard when recording playing on your co...

Page 8: ...ized Roland distributor as listed on the Information page Owner s manual This is the manual you are reading Please keep it at hand for reference CD ROM This contains Windows drivers for the UA 101 and demo songs 801 Avoid touching or scratching the shiny underside encoded surface of the disc Damaged or dirty CD ROM discs may not be read properly Keep your discs clean using a commercially available...

Page 9: ... fig XLR TRS This instrument is equipped with balanced XLR TRS type input jacks Wiring diagrams for these jacks are shown on the right Make connections after first checking the wiring diagrams of other equipment you intend to connect 2 Input sensitivity knobs These knobs adjust the input level of the signals received by the front panel combo input jacks 1 3 Input impedance select switch Use this s...

Page 10: ... connected to the digital input connector 8 7 Digital input switch Turn this on pressed inward if you re recording from the digital input This lets you synchronize the UA 101 with an external digital device connected to the digital input connector 8 External synchronization mode When functioning as input level indicators The LEDs will light red at a level immediately before distortion occurs 6 dB ...

Page 11: ...setting Limitations when using the 192 kHz setting The digital input connector and digital output connector cannot be used Input jacks 7 8 and output jacks 7 8 cannot be used 11 STEREO MONO select switch Direct Monitor section This selects whether the input signal will be monitored in stereo STEREO or in monaural MONO If you want to use monaural turn this switch on pressed inward For example if yo...

Page 12: ...power between on ON and standby STANDBY modes 15 Power indicator This will light when the power is on 16 Headphone jack The sound received at the input jacks and the sound being output by your computer will be mixed and output from this jack Use the direct monitor volume knob 13 to adjust the balance between input and output Sound will still be output from the rear panel monitor output jacks 27 ev...

Page 13: ...es for connection Water pipes may result in shock or electrocution Gas pipes may result in fire or explosion Telephone line ground or lightning rod may be dangerous in the event of lightning 19 AC adaptor jack Connect the included AC adaptor to this jack Do not use anything other than the included AC adaptor doing so will cause malfunctions 20 Phantom power switch This is an on off switch for the ...

Page 14: ...has not been correctly recognized either because your computer does support USB 2 0 or for some other reason Hi Speed USB mode can be used only with Windows XP Full Speed USB mode USB1 1 12 Mbps Turn the Hi Speed USB mode switch OFF if you ve connected the UA 101 to a USB 1 1 compliant USB connector You ll be able to record and play back using 2 INs input and 2 OUTs output If the UA 101 is correct...

Page 15: ...ort balanced output 26 Input jacks 3 8 Use these jacks to input audio signals from your mixer audio device or MIDI tone generator They support balanced input 27 Monitor output jacks The sound received via the various input jacks and the sound output by the various audio ports of your computer are mixed and output from these monitor output jacks You can use UA 101 Control Panel to adjust the input ...

Page 16: ...folder of the CD ROM Mac OS The USB1 folder of the CD ROM Use the appropriate driver for your operating system and computer 1 Start up Windows with the UA 101 disconnected Log onto Windows using a user name that has administrative privileges such as Administrator 2 Open the System Properties dialog box 1 From the Windows start menu choose Control Panel 2 In Pick a category click Performance and Ma...

Page 17: ...xit all currently running software applications Also close any currently open windows If you are using antivirus or similar software you must exit all of these programs as well 7 Prepare the CD ROM Insert the CD ROM into your computer s CD ROM drive 8 From the Windows start menu choose Run The Run dialog box will appear If you ve changed the Driver Signing Options return the setting to its origina...

Page 18: ...ear panel of the UA 101 turn the Hi Speed USB mode switch ON If you need to check the drive name choose start My Computer In the window that appears note the drive name of the CD ROM drive into which you inserted the CD ROM in step 7 The D or E that is indicated for that CD ROM drive is the drive name If the Driver Signing Options setting is other than Ignore a dialog box like the following will a...

Page 19: ...dware will appear near the task bar Please wait 19 In the Driver Setup dialog box click Close This completes driver installation If the Change System Settings dialog box appears click Yes Windows will restart automatically Once the connections have been completed turn on power to your various devices in the order specified By turning on devices in the wrong order you risk causing malfunction and o...

Page 20: ...rt menu choose Control Panel 3 In Pick a category click Performance and Maintenance 4 In or Pick a Control Panel icon click the System icon The System Properties dialog box will appears Depending on your system the System icon may appear directly in the Control Panel Classic view If so double click the System icon 5 Click the Hardware tab then click Driver Signing The Driver Signing Options dialog...

Page 21: ...Click the Advanced tab 3 In the right side of the Performance area click Settings The Performance Options dialog box will open fig background 4 Click the Advanced tab 5 In the Processor Scheduling area choose Background services and click OK 6 In the System Properties dialog box click OK The System Properties dialog box will closes Next you ll make audio device and MIDI device settings Driver sett...

Page 22: ...ices SEPARATED ports disabled off SEPARATED ports enabled on Number of ports usable Audio out put device WDM EDIROL UA 101 EDIROL UA 101 10 Out 2 Out 2 Out 2 Out Audio input device WDM EDIROL UA 101 EDIROL UA 101 12 In UA 101 1 2 SEPARATED 2 In 2 In UA 101 9 10 SEPARATED 2 In UA 101 Mon SEPARATED 2 In You can record the UA 101 s monitor output without modification Refer to the block diagram front ...

Page 23: ... want to use input output jacks 3 10 in software such as Windows Media Player that does not support WDM or ASIO you ll need to make settings in UA 101 Control Panel For details refer to Using Separated ports p 42 ASIO Use this driver if you re using the UA 101 with ASIO compatible software such as Cubase Choose EDIROL UA 101 in the ASIO settings of your software You ll be able to use 12 inputs and...

Page 24: ... Sound playback Sound recording and MIDI music playback click each Default device box and from the list that appears choose the following devices 4 Click OK to close the Sounds and Audio Devices Properties dialog box This completes audio and MIDI input output settings Input output device settings Sound playback EDIROL UA 101 Sound recording EDIROL UA 101 MIDI music playback EDIROL UA 101 Depending...

Page 25: ...the permission of the copyright holder is prohibited by law Additionally this data must not be copied nor used in a secondary copyrighted work without the permission of the copyright holder If the volume is low or inaudible try turning the UA 101 s direct monitor volume knob p 12 toward the left of center The contents of the menu that appears will depend on your system Also turn off the direct mon...

Page 26: ... EDIROL UA 101 For details refer to the owner s manual for the software you re using Also refer to Software settings p 33 If you re using your software with software monitoring turned on turn off the UA 101 s hardware monitoring direct monitor to avoid an audio feedback loop or double monitoring Software settings For the most recent information refer to http www edirol net UA 101_e book 26 ページ 200...

Page 27: ...nected to the inputs Input jacks may be low If this happens use connection cables that do not contain resistors such as those from the Roland PCS series Use a USB cable to connect the UA 101 to your computer Both MIDI data and audio data are transferred over the USB cable When you connect headphones or monitor speakers as shown in the diagram you ll be able to monitor the playback from your softwa...

Page 28: ...f the microphone s 2 Relocating microphone s at a greater distance from speakers 3 Lowering volume levels Input sensitivity knob Use the input sensitivity knob to adjust the input level In order to record at the best possible audio quality adjust the input sensitivity knob until it is as high as you can get it without causing the input output level indicator to light in red Recording a mic or guit...

Page 29: ...select to monitor the input signal in stereo or in monaural Direct Monitor Soft Control switch Turn this on if you want to control input monitoring from ASIO 2 0 compliant software or from UA 101 Control Panel p 38 Direct monitor volume This adjusts the balance between the monitor volume and the volume of the audio playback from the computer Using the Direct Monitor volume control to adjust the vo...

Page 30: ...will synchronize to the digital signal being input to the digital input connector If the UA 101 is synchronized to the incoming signal the SYNC indicator will light green If the indicator is blinking green synchronization has not been achieved Please make sure that the sample rate of the connected digital device matches the setting of the UA 101 s sample rate select switch Direct monitor volume Th...

Page 31: ...r etc to input jacks 3 8 Direct monitor volume This adjusts the monitor volume Using the Direct Monitor volume control to adjust the volume will not affect the recording level Connecting various equipment Mixer DJ mixer etc Amplified speakers USB cable Guitar bass Mic Computer Synthesizer etc Effects processor mixer etc UA 101_e book 31 ページ 2007年8月6日 月曜日 午後1時23分 ...

Page 32: ...s in Windows 1 From Windows Control Panel open Sounds and Audio Devices Properties dialog box Input output device settings p 24 2 Click the Audio tab In the Sound playback area click the Default device field and choose EDIROL UA 101 from the list that appears 3 In the Sound playback area click Advanced 4 Click the Speakers tab In the Speaker setup field choose 5 1 surround sound speakers 5 Click O...

Page 33: ...open the Audio Options dialog box 3 Click the Advanced tab In the Playback and Recording area verify that Driver Mode is set to WDM KS If you change this setting click OK and restart SONAR Restart SONAR and from the Options menu choose Audio to open the Audio Options dialog box fig sonar 1 eps 4 In the General tab set Audio Driver Bit Depth to 24 Set the Sampling Rate to the same setting as the UA...

Page 34: ...d and un highlight all other devices Click OK 8 Restart SONAR and from SONAR s Options menu choose Audio to open the Audio Options dialog box fig sonar 1b eps 9 In the General tab make sure that Playback Timing Master is set to EDIROL UA 101 1 2 and Record Timing Master is set to EDIROL UA 101 1 2 Input devices Output devices EDIROL UA 101 1 2 EDIROL UA 101 1 2 EDIROL UA 101 3 4 EDIROL UA 101 3 4 ...

Page 35: ...11 Click OK to close the Audio Options dialog box 12 From SONAR s Options menu choose MIDI Devices to open the MIDI Devices dialog box 13 In the MIDI Devices dialog box choose the UA 101 in the Inputs area and the Outputs area fig sonar 5 eps 14 Restart SONAR 15 Open the Audio Options dialog box once again as described in step 2 Verify that the audio device settings are correct UA 101_e book 35 ペー...

Page 36: ...og box fig cubase 1 eps If you experience clicks or pops in the sound click Expert to open the VST Engine Expert Settings dialog box Setting the Audio Priority to Very High may reduce clicks and pops fig cubase 2 eps If you re using Cubase SX and the UA 101 s sample rate setting differs from the setting of your Cubase SX project a message such as Unable to set the sample rate will appear or you ma...

Page 37: ...Internal blocks of the UA 101 PATCH BAY 1 10 1 10 1 10 1 10 1 2 1 10 1 10 1 2 1 2 1 2 1 2 Input jacks WAVE OUT WAVE IN Patch bay INPUT 1 10 OUTPUT 1 10 Monitor output jacks Headphone jack Direct monitor volume front panel PHONES MONITOR OUT INPUT MONITOR OUTPUT MONITOR INPUT MONITOR INPUT MONITOR OUTPUT MONITOR OUTPUT MONITOR Input monitor mixer Input monitor mixer Output monitor mixer Output moni...

Page 38: ...he Control Panel double click the EDIROL UA 101 icon UA 101 Control Panel will appear fig soft on eps 4 Turn the UA 101 s Direct Monitor Soft Control switch on When this switch is off all settings of the Direct Monitor Mixer will be ignored i e bypassed allowing you to monitor the audio inputs at all input jacks and the outputs from your computer just as they are This provides a convenient way to ...

Page 39: ... output volume PATCH BAY 1 10 1 10 1 10 1 10 1 2 1 10 1 10 1 2 1 2 1 2 1 2 Input jacks WAVE OUT WAVE IN Patch bay INPUT 1 10 OUTPUT 1 10 Monitor output jacks Headphone jack Direct monitor volume front panel PHONES MONITOR OUT INPUT MONITOR OUTPUT MONITOR INPUT MONITOR INPUT MONITOR OUTPUT MONITOR OUTPUT MONITOR Input monitor mixer Input monitor mixer Output monitor mixer Output monitor mixer MONIT...

Page 40: ...e you can control the balance of the five stereo channels of audio data that are sent from the computer to your headphones or monitoring system These settings are ignored if the front panel Direct Monitor Soft Control switch is turned off DEVICE PANEL This displays the state of the various panel switches of the device Up to five sets of settings can be stored within the UA 101 itself These stored ...

Page 41: ...set eps 2 Set the Audio Input Output Buffer Size to the far left Min Click OK to close the Driver Settings dialog box 3 Restart the software that s using the UA 101 If your software provides an audio device test function execute that test function 4 Play back audio data from your software If you hear clicks or pops repeat this procedure gradually increasing the buffer size in step 2 until you no l...

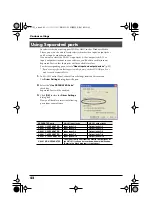
Page 42: ...ngs from the Driver menu The Driver Settings dialog box will open fig driver set1 eps 2 Select the Use SEPARATED Ports check box Separated Ports will be enabled 3 Click OK to close the Driver Settings dialog box Now you ll be able to select the following ports from your software Using Separated ports SEPARATED ports UA 101 input jacks UA 101 output jacks UA 101 1 2 SEPARATED Input jacks 1 2 Output...

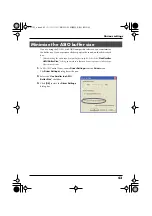
Page 43: ...1 check the Use Smaller ASIO Buffer Size setting and make sure that you do not experience clicks or pops before you continue 1 In UA 101 Control Panel choose Driver Settings from the Driver menu The Driver Settings dialog box will open fig driver set2 eps 2 Select the Use Smaller the ASIO Buffer Size check box 3 Click OK to close the Driver Settings dialog box Minimize the ASIO buffer size UA 101_...

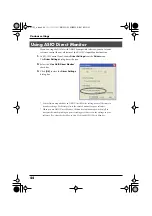
Page 44: ...t Monitor check box 3 Click OK to close the Driver Settings dialog box Your software may also have an ASIO Direct Monitor setting as one of the items in its audio settings For details refer to the owner s manual for your software When you use ASIO Direct Monitor the monitor function may switch on off at unexpected times depending on your recording procedure or on the settings in your software If s...

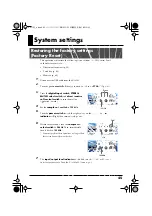
Page 45: ...ward 4 Set the sample rate switch to 192 kHz 5 Turn the power switch toward the right to turn on the power The sync indicator will light then immediately go out fig system 2 eps 6 Within three seconds turn the sample rate select switch to 96 kHz Then immediately turn it back to 192 kHz You must perform these operations no longer than three seconds apart from each other fig system 3 eps 7 The input...

Page 46: ...once again as described in Installing the driver p 16 Is the UA 101 connected correctly Make sure that you have used a USB cable to correctly connect the UA 101 to the USB connector of your computer Is the UA 101 powered up Make sure that the UA 101 s power is on Make sure that the POWER switch is on Could other applications or resident software such as an anti virus program be running Installatio...

Page 47: ...wn power supply Did you log onto Windows as a user with administrative privileges In order to install uninstall reinstall the UA 101 driver in Windows you must log onto Windows as a user with administrative privileges such as Administrator Did you make the Driver Signing Options setting You must set Driver Signing Options in order to install reinstall the driver p 17 Did you make the Driver Signin...

Page 48: ... not be routed properly to the output jacks Check the patch bay settings in UA 101 Control Panel Refer to UA 101 Control Panel p 38 Did you connect disconnect the USB cable or cycle the power to the UA 101 while your software was running You must close all software that uses the UA 101 before powering off the UA 101 If you start up your computer with the UA 101 connected operation may become unsta...

Page 49: ... Properties dialog box If so please update your system to Windows XP Service Pack 1 Could the UA 101 have been connected when you started up the computer Start up the computer with the UA 101 disconnected and then connect the UA 101 Depending on the type of computer you are using starting up the computer when the UA 101 is already connected may cause operation to be unstable In this case start up ...

Page 50: ...ample rate to the same setting If you switch the UA 101 s sample rate you must turn the power of the UA 101 off then on again to get the setting to take effect Is the UA 101 s digital input switch set correctly The sync indicator will blink if the UA 101 is not correctly synchronized with the digital signal being received at the digital input connector Make sure that the sample rate is set correct...

Page 51: ... record play MIDI via the UA 101 you must install the UA 101 driver correctly In addition you must also make settings in your software to specify the MIDI device you want to use Refer to Installing the driver p 16 Driver settings p 22 Can t record play MIDI UA 101_e book 51 ページ 2007年8月6日 月曜日 午後1時23分 ...
Page 52: ...1 1 12Mbps In the Mac OS System Setup set Energy Saver as follows fig power save2 Click the Sleep tab Set Put the computer to sleep when it is inactive for to Never Set Put the display to sleep when the computer is inactive for to Never fig power save1 Click the Options tab If there is a Processor Performance setting set it to Highest Noise or pops are heard when recording playing on your computer...

Page 53: ...Then click OK 6 In the System Properties dialog box click OK 7 Restart Windows Could two or more computers be connected to the UA 101 or to your mixer or audio devices Try connecting the UA 101 to only one computer Check whether the noise disappears when the UA 101 is connected to only one computer Connecting numerous audio devices to a computer may produce noise in some situations If this occurs ...

Page 54: ...mory will improve the processing capability of your computer For details on how to add memory refer to the owner s manual of your computer Is the UA 101 connected to a USB hub Try connecting the UA 101 directly to the USB connector of your computer itself Noise may be entering via the line inputs or mic inputs If a MIDI sound module with a USB connector is connected via USB to the same computer as...

Page 55: ... Is the sample rate setting in your software the same as the sample rate of the digital device connected to the digital input connector Set your software and the UA 101 to the same sample rate If you switch the UA 101 s sample rate you must turn the power of the UA 101 off then on again to get the setting to take effect Are the input output level indicators lit red Use UA 101 Control Panel to lowe...

Page 56: ...s the input level set appropriately If you re inputting audio through input jacks 3 8 use the input level select switches p 15 located on the rear panel of the UA 101 to adjust the input level Is the peak limiter indicator lit red If you re inputting audio through the combo input jacks use the UA 101 s input sensitivity knobs to reduce the input level If you re inputting audio through the INPUT 2 ...

Page 57: ...mputer as possible Are you using the correct jack Connect your guitar to the INPUT 2 combo input jack Is the input impedance select switch set correctly Set the input impedance select switch to Hi Z Is the input level appropriate Turn the input sensitivity knob toward the right to adjust the input volume A substantial amount of noise is present in the guitar sound Insufficient volume from your gui...

Page 58: ...e first time you use the UA 101 with Cubase turn on the power with the UA 101 s sample rate select switch at the 44 1 kHz position If this switch is not set to 44 1 kHz it may be impossible to start Cubase Others Can t start the Cubase UA 101_e book 58 ページ 2007年8月6日 月曜日 午後1時23分 ...

Page 59: ...lready selected proceed to the next step 4 Double click the EDIROL UA 101 icon 5 From the Driver menu of EDIROL UA 101 Control Panel choose Uninstall 6 Follow the instructions in the dialog box to uninstall the driver If you are unable to delete the driver as described above you can use Uninstal exe found in the Driver folder of the CD ROM to delete the driver For details refer to Readme htm in th...

Page 60: ...Conversion 44 1 48 88 2 96 192 kHz Frequency Response 96 0 kHz 20 Hz to 40 kHz 1 1 dB 88 2 kHz 20 Hz to 40 kHz 1 1 dB 48 0 kHz 20 Hz to 22 kHz 1 1 dB 44 1 kHz 20 Hz to 20 kHz 1 1 dB Nominal Input Level Input Jack 1 2 XLR type 50 to 10 dBu Input Jack 1 2 1 4 inch TRS phone type 35 to 4 dBu Input Jack 3 8 10 dBu to 4 dBu balanced Nominal Output Level Output Jack 1 8 4 dBu balanced Residual Noise Lev...

Page 61: ...anel Input Jack 3 8 1 4 inch TRS phone type balanced Output Jack 1 8 1 4 inch TRS phone type balanced Monitor Output Jack L R 1 4 inch TRS phone type balanced MIDI Connectors In Out USB Connector Power Supply DC 9 V AC adaptor Current Draw 1 A Dimensions 218 0 W x 159 1 D x 45 1 H mm 8 5 8 W x 6 5 16 D x 1 13 16 H inches Weight 1 15 kg 1 oz Accessories Owner s Manual CD ROM AC Adaptor USB cable 0 ...

Page 62: ...USB mode 14 Hi Speed USB mode switch 14 I Input impedance select switch 9 29 Input jacks 15 Input level select switches 15 INPUT MONITOR 40 Input sensitivity knob 9 28 Input output level indicators 10 L Limiter switch 10 29 M MIDI 22 MIDI IN 22 MIDI IN OUT connectors 15 MIDI music playback 24 MIDI OUT 22 Monitor output jacks 15 Monitor volume 12 O optical 11 Output jacks 15 OUTPUT MONITOR 40 P PAT...

Page 63: ...GR SK CZ SI LV LT EE PL HU FI SE NO DK NL PT ES IT DE FR UK For EU Countries UA 101_e book 63 ページ 2007年8月6日 月曜日 午後1時23分 ...

Page 64: ...Musicales Nicaragua Altamira D Este Calle Principal de la Farmacia 5ta Avenida 1 Cuadra al Lago 503 Managua Nicaragua TEL 505 277 2557 PERU Audionet Distribuciones Musicales SAC Juan Fanning 530 Miraflores Lima Peru TEL 511 4461388 IRELAND Roland Ireland G2 Calmount Park Calmount Avenue Dublin 12 Republic of IRELAND TEL 01 4294444 ITALY Roland Italy S p A Viale delle Industrie 8 20020 Arese Milano...

Reviews: