background image


8


Introduction


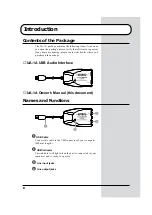
Contents of the Package


The UA-1A package contains the following items. As soon as 
you open the package, please verify that all items are present.
If any items are missing, please contact the dealer where you 
purchased the package.


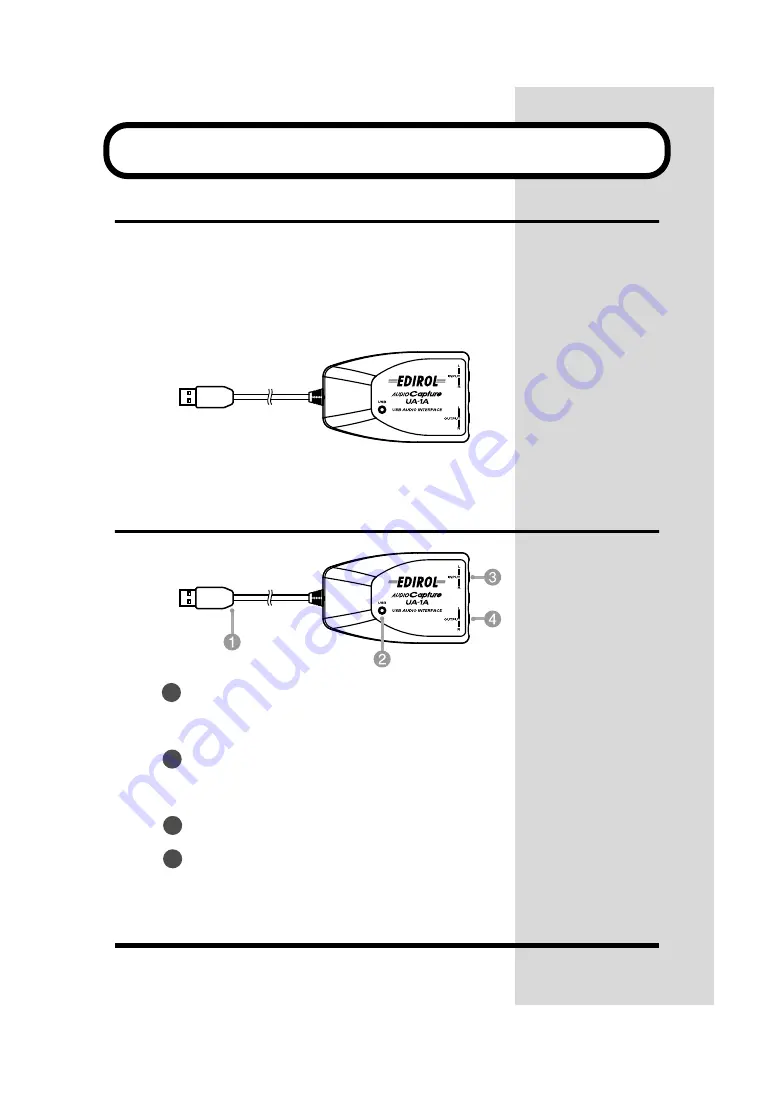
UA-1A USB Audio Interface


fig.UA1A


UA-1A Owner’s Manual (this document)


Names and Functions


fig.UA1Afunc


USB Cable


Connect this cable to the USB connector of your computer. 
(600 mm length.)


USB Indicator


This indicator will light when the unit is connected to your 
computer and is ready to operate.


Line input jacks

Line output jacks

1

2

3

4

Summary of Contents for UA-1A

Page 1: ...all items on the front cover to left or right Before using this unit carefully read the sections entitled USING THE UNIT SAFELY P 3 4 and IMPORTANT NOTES P 5 These sections provide important information concerning the proper operation of the unit Additionally in order to feel assured that you have gained a good grasp of every feature provided by your new unit this manual should be read in its enti...

Page 2: ...s Pedras 8 9 1 Dto 4050 465 PORTO PORTUGAL TEL 022 608 00 60 POLAND P P H Brzostowicz UL Gibraltarska 4 PL 03664 Warszawa POLAND TEL 022 679 44 19 RUSSIA MuTek 3 Bogatyrskaya Str 1 k l 107 564 Moscow RUSSIA TEL 095 169 5043 SPAIN Roland Electronics de España S A Calle Bolivia 239 08020 Barcelona SPAIN TEL 93 308 1000 SWITZERLAND Roland Switzerland AG Musitronic AG Gerberstrasse 5 Postfach CH 4410 ...

Page 3: ...hock hazards Used for instructions intended to alert the user to the risk of injury or material damage should the unit be used improperly Material damage refers to damage or other adverse effects caused with respect to the home and all its furnishings as well to domestic animals or pets Used for instructions intended to alert the user to the risk of death or severe injury should the unit be used i...

Page 4: ...d Service Center or an authorized EDIROL Roland distributor as listed on the Information page when Objects have fallen into or liquid has been spilled onto the unit or The unit has been exposed to rain or otherwise has become wet or The unit does not appear to operate normally or exhibits a marked change in performance 013 In households with small children an adult should provide supervision until...

Page 5: ... or other moisture Maintenance 401a For everyday cleaning wipe the unit with a soft dry cloth or one that has been slightly dampened with water To remove stubborn dirt use a cloth impregnated with a mild non abrasive detergent Afterwards be sure to wipe the unit thoroughly with a soft dry cloth 402 Never use benzine thinners alcohol or solvents of any kind to avoid the possibility of discoloration...

Page 6: ... the like whose copyright is held by a third party is prohibited by law 853 Do not use this unit for purposes that could infringe on a copyright held by a third party Roland assumes no responsibility whatsoever with regard to any infringements of third party copyrights arising through your use of this unit 205 Microsoft Windows are registered trademarks of Microsoft Corporation 206c Windows 98 is ...

Page 7: ...4 Fehlerbehebung 48 Français Introduction 58 Connexions et installation des pilotes Windows 59 Connexions et installation des pilotes Macintosh 70 Dépannage 74 Italiano Introduzione 83 Collegamenti e installazione del driver Windows 84 Collegamenti e installazione del driver Macintosh 96 Ricerca e soluzione dei problemi 100 Español Introducción 109 Instalación del controlador y conexiones para Win...

Page 8: ...ase contact the dealer where you purchased the package UA 1A USB Audio Interface fig UA1A UA 1A Owner s Manual this document Names and Functions fig UA1Afunc USB Cable Connect this cable to the USB connector of your computer 600 mm length USB Indicator This indicator will light when the unit is connected to your computer and is ready to operate Line input jacks Line output jacks 1 2 3 4 ...

Page 9: ...t allows an application program running on your computer to transfer data to and from the UA 1A when it is connected to your computer via a USB cable The driver passes data from the application to the UA 1A and passes data from the UA 1A to the application fig P10 1 Before installing the driver The UA 1A cannot be used with Windows 95 or Windows NT If other Windows programs are running exit all of...

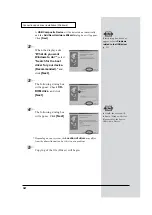
Page 10: ...commended is selected then click Next 3 The search for the driver starts 4 When the correct driver is found driver installation starts fig 02 04 e 5 When a dialog box informing you that driver installation has finished appears click Finish and restart Windows After installing the driver refer to Specifying the audio input output device p 14 and select the device Windows uses Depending on your comp...

Page 11: ...rder of the USB Composite Device driver and then the USB Audio Device driver Use the following procedure to perform the installation fig 02 05 e 1 Turn on the power of your computer and start up Windows Insert the Microsoft Windows CD ROM into your CD ROM drive and use a USB cable to connect the UA 1A to your computer To prevent damage to your speakers turn down the volume on any audio devices you...

Page 12: ...ed and click Next fig 02 07 e 3 The following dialog box will appear Check CD ROM drive and click Next fig 02 08 e 4 The following dialog box will appear Click Next Depending on your system the Location of driver may differ from the above illustration but this is not a problem 5 Copying of the file Driver will begin If this dialog box does not appear refer to Problems related to the USB driver p 2...

Page 13: ...ry same procedure as in steps 2 5 p 12 12 fig 02 14 e 8 When installation of the USB Audio Device driver is finished the following dialog box will appear Click Finish This completes installation of the USB Composite Device driver and the USB Audio Device driver Restart Windows After installing the driver refer to Specifying the audio input output device p 14 and select the device Windows uses If t...

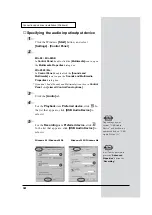
Page 14: ... dialog box If you don t find a Sounds and Multimedia icon then in Control Panel click view all Control Panel options 3 Click the Audio tab 4 For the Playback item Preferred device click In the list that appears click USB Audio Device to select it 5 For the Recording item Preferred device click In the list that appears click USB Audio Device to select it Windows 98 Windows 98SE Windows 2000 Window...

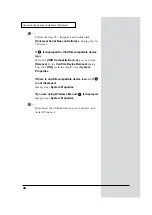
Page 15: ...djust the volume that is output from the audio output device USB Audio Device SW Synth Adjust the volume of the software synthesizer built into Windows CD Player Adjust the CD Music volume for the CD ROM drive of your computer 1 If Volume Control is not installed on your computer use Add Remove Applications in the Control Panel to install it For details on installation refer to the Windows owner s...

Page 16: ...e System Properties dialog box Click the Hardware tab and click the Device Manager button to open the Device Manager From the CD ROM drives double click the CD ROM drive that you are using to open its Properties Click the Properties tab and select the check box located beside the Digital CD playback item Enable digital CD audio for this CD ROM device using Windows 98 or Windows 98 SE Select Start ...

Page 17: ... Manager tab 5 Double click Sound video and game controllers to see a list of the devices 6 From the list select USB Audio Device and click Remove In the Confirm Device Removal dialog box click OK If USB Audio Device is not displayed proceed to step 8 7 Make sure that USB Audio Device is not in the Sound video and game controllers list and click Close to close the System Properties dialog The expl...

Page 18: ...e device icon Select the USB Composite Device icon and click Remove In the Confirm Device Removal dialog box click OK As in the step 7 close System Properties If there is no USB compatible device icon or if is not displayed Simply close System Properties If you are using Windows Me and is displayed Simply close System Properties 9 Disconnect the USB cable from your computer and restart Windows ...

Page 19: ... cause the application to freeze You may hear sound hopping and or noise when you record and play back at the same time due to high load on the CPU However the noise should not be in the recording itself Such noise should only be found in the playback signal If you are going to use the Virtual Sound Canvas 3 you will need to select Performance from the Setting menu and set the Expression Mode to R...

Page 20: ...u should see the following three audio devices in the USB section as shown below fig 03 04 e If the indication is correct the installation of the UA 1A driver is successful Select Quit from the File menu to close the Apple System Profiler dialog then make the sound settings explained below If the indication is incorrect you should try disconnecting the UA 1A from the USB port and waiting about ten...

Page 21: ... 1 From the Apple menu select Control Panels Sound to open the Sound dialog 2 Click the Speakers tab fig 03 06 e 3 Turn down the volume on the UA 1A and on your audio equipment then click Start Test fig 03 07 e 4 Test sounds are output from left to right along with what appears on the screen When you are finished click Stop Test ...

Page 22: ...t choose USB Audio 6 When you have finished making settings select Quit from the File menu to close the Sound dialog If you don t see USB Audio you should close the Sound dialog Then disconnect the UA 1A and wait about ten seconds Then try doing the procedure over again starting at number 2 Do not check Play sound through output device ...

Page 23: ...cintosh If you are using computer for the first time or do not understand the explanation of a procedure refer to the owner s manuals for your computer or for OS If the UA 1A does not operate as you expect check the following points Problems related to the USB driver Add New Hardware Wizard does not start up automatically Add New Hardware Wizard terminates before completion When the USB cable is c...

Page 24: ...ications such as a homemade computer operation may be unstable In such cases you may be able to solve the problem by connecting a USB hub that contains a power supply Is Unknown Device displayed for Other devices or Universal Serial Bus controllers Use the following procedure to delete Unknown Device from Other devices Universal serial bus controller and re start your computer In order to check wh...

Page 25: ...er installation Windows p 9 Check whether there is an item named Unknown Device in Other devices or in Universal Serial Bus controllers If you find Unknown Device delete it A dialog box saying Unknown Device found appears and I can t install the driver Depending on your computer not all of the Windows 98 files required to support audio over USB may have been installed when the computer was shipped...

Page 26: ...r some software you must set the audio data output destination as UA 1A For details on this setting refer to the owner s manual for the software Have the drivers been installed correctly In order to playback audio data using the UA 1A the USB Audio Device driver must be installed For details on installation and settings refer to Connections and driver installation Windows p 9 Macintosh p 19 Are th...

Page 27: ...UA 1A noise from the computer may enter via the MIDI sound module and be heard from the UA 1A In such cases use a self powered hub to connect the MIDI sound module and the UA 1A in parallel or connect the MIDI sound module via the serial interface or MIDI interface Noise may be heard if you record and play back simultaneously If you record and play back simultaneously the playback may be interrupt...

Page 28: ...anel double click System to open the System Properties dialog box and click the Device Manager tab 2 Double click Disk drives to see the list of devices 3 From the list select GENERIC IDE DISK TYPExx and click Properties to access the GENERIC IDE DISK TYPExx Properties dialog box The xx in GENERIC IDE DISK TYPExx will be a number that will differ depending on your system 4 Click the Settings tab c...

Page 29: ...k as requested by OMS when sequencer software is started up You must change the setting yourself using the Chooser In the Memory Control Panel set Virtual Memory to Off Depending on the way in which you connect to the Internet use the UA 1A with the following settings If you connect to the Internet via a LAN cable Use while the LAN cable is connected If you connect to the Internet via the internal...

Page 30: ...indows98 Second Edition and your recording software is set to a bit rate of 8 bits a blank file may be created so that you may not be able to record effectively If this occurs you will be able to record correctly by setting the bit rate to 16 bit Cannot Record Music CD The UA 1A cannot record music CDs in the computer s CD ROM drive The volume changed when you resumed from Suspend or Hibernation s...

Page 31: ...lt nehmen Sie bitte mit dem Händler Kontakt auf von dem Sie das UA 1A bezogen haben UA 1A USB Audio Interface fig UA1A UA 1A Benutzerhandbuch dieses Dokument Namen und Funktionen fig UA1Afunc USB Kabel Verbinden Sie dieses Kabel mit dem USB Anschluss Ihres Computers 600 mm Länge USB Anzeige Diese Anzeige leuchtet wenn das UA 1A an Ihren Computer angeschlossen ist und betriebsbereit ist Line Eingan...

Page 32: ...r Microsoft Windows CD ROM Sie sollten daher die Microsoft Windows CD ROM bereithalten Wenn Sie Windows Me oder 2000 einsetzen ist die CD ROM nicht erforderlich Was ist ein Treiber Ein Treiber ist Software die es einem Anwendungsprogramm das auf Ihrem Computer installiert ist erlaubt Daten zum vom UA 1A zu übertragen wenn das Gerät an Ihren Computer via USB Kabel angeschlossen ist Der Treiber über...

Page 33: ...iter Vor der Installation des Treibers Das UA 1A kann unter Windows 95 oder Windows NT nicht verwendet werden Wenn noch andere Windows Programme ausgeführt werden sollten Sie diese beenden bevor Sie Ihre Arbeit fortsetzen Wenn Sie mehrere Roland USB Geräte gleichzeitig an Ihren Computer anschließen z B das UA 1A und andere USB Geräte wie z B das UA 100G trennen Sie das UA 100G oder andere Geräte v...

Page 34: ...ndet wird Abhängig von Ihrer Computerinstallation kann es etwas dauern bis das Gerät erkannt wird nachdem der Treiber installiert wurde Windows 2000 Anwender Wenn Sie Windows Me verwenden lesen Sie bitte S 33 wenn Sie Windows 98 verwenden lesen Sie bitte S 35 1 Schalten Sie Ihren Computer ein und starten Sie Windows 2 Schließen Sie das UA 1A an Ihren Computer mit einem USB Kabel an Das UA 1A wird ...

Page 35: ...e ein USB Kabel um das UA 1A an Ihren Computer anzuschließen Das Gerät USB Composite Device USB Verbundgerät wird automatisch erkannt und das Dialogfeld Hardware Assistent wird angezeigt Klicken Sie auf Weiter Um Schäden an Ihren Lautsprechern zu vermeiden drehen Sie die Lautstärkeregelung dieses Geräts und aller angeschlossenen Audiogeräte zurück Da einige Computer beim Kauf bereits den Inhalt de...

Page 36: ...gendes Dialogfeld wird angezeigt Wählen Sie CD ROM Gerät und klicken Sie anschließend auf Weiter fig 02 08 e 4 Folgendes Dialogfeld wird angezeigt Klicken Sie auf Weiter Abhängig von Ihrem System kann sich die Position des Treibers von der obigen Abbildung unterscheiden aber das ist kein Problem 5 Das Kopieren der Datei Treiber beginnt In Schritt 4 zeigt der Bildschirm die Meldung Die Treiberdatei...

Page 37: ...7 Anschließend wird das USB Audio Device USB Audiogerät automatisch erkannt und das Dialogfeld Hardware Assistent wird angezeigt Klicken Sie auf Weiter und setzen Sie die Installation wie in den Schritten 2 5 beschrieben fort S 36 36 Wenn sich die Microsoft Windows CD ROM nicht im CD ROM Laufwerk befindet wird eventuell folgendes Dialogfeld angezeigt In diesem Fall legen Sie dieMicrosoft Windows C...

Page 38: ... wählen das Gerät aus das von Windows verwendet wird Angabe des Audioeingabe Ausgabegeräts 1 Klicken Sie auf die Windows Schaltfläche Start und wählen Sie Einstellungen Systemsteuerung 2 Win 98 Win 98SE Doppelklicken Sie in der Systemsteuerung auf das Symbol Multimedia um das Dialogfeld Eigenschaften für Multimedia zu öffnen Win 2000 Me Doppelklicken Sie in der Systemsteuerung auf das Symbol Sound...

Page 39: ...uszuwählen 5 Klicken Sie bei Wiedergabe unter Bevorzugtes Gerät auf Klicken Sie in der angezeigten Liste auf USB Audio Device USB Audiogerät um dieses Gerät auszuwählen Windows 98 Windows 98SE Windows 2000 Windows Me fig 02 15 e 6 Klicken Sie auf OK um die Konfiguration abzuschließen Abhängig von Ihrem System wird USB Audio Device USB Audiogerät eine zusätzliche Ziffer anzeigen z B USB Audio Gerät...

Page 40: ...usgabegerät USB Audio Gerät ausgegeben wird SW Synth Passt die Lautstärke des Software Synthesizer an der in Windows integriert ist CD Wiedergabe Passt die CD Musik Lautstärke des CD ROM Laufwerks Ihres Computers an 1 Wenn die Lautstärkeregelung auf Ihrem Computer nicht installiert ist verwenden Sie Anwendungen hinzufügen entfernen in der Systemsteuerung um sie zu installieren Um Details zur Insta...

Page 41: ... beschrieben Öffnen Sie das Dialogfeld Systemeigenschaften Klicken Sie auf die Registerkarte Hardware und klicken Sie anschließend auf Geräte Manager um den Geräte Manager zu öffnen Doppelklicken Sie auf das CD ROM Laufwerk das Sie verwenden und öffnen Sie die Eigenschaften Klicken Sie auf das Register Eigenschaften und aktivieren Sie das Kontrollkästchen das sich neben der Digitale CD Wiedergabe ...

Page 42: ...stemeigenschaften zu öffnen 4 Klicken Sie auf die Registerkarte Geräte Manager 5 Doppelklicken Sie auf Audio Video und Gamecontroller um eine Liste der Geräte zu erhalten 6 Wählen Sie aus der Liste USB Audio Device USB Audiogerät und klicken Sie auf Entfernen Klicken Sie im Dialogfeld Entfernen des Geräts bestätigen auf OK Wenn USB Audio Device USB Audiogerät nicht angezeigt wird arbeiten Sie mit ...

Page 43: ...Wählen Sie das Symbol USB Composite Device USB Verbundgerät und klicken Sie auf Entfernen Klicken Sie im Dialogfeld Entfernen des Geräts bestätigen auf OK Wie in Schritt 7 schließen Sie nun die Systemeigenschaften Wenn kein Symbol für ein USB kompatibles Gerät vorhanden ist oder wenn nicht angezeigt wird Schließen Sie einfach die Systemeigenschaften Wenn Sie Windows Me verwenden und angezeigt wird...

Page 44: ...wendung abstürzt Sie hören eventuell Sound Aussetzer und oder Rauschen wenn Sie gleichzeitig Sound aufnehmen und wiedergeben Dies ist durch die hohe CPU Auslastung bedingt Das Rauschen sollte jedoch nicht in der Aufnahme selbst auftreten Derartiges Rauschen sollte nur im Wiedergabesignal vorkommen Wenn Sie den Einsatz von Virtual Sound Canvas 3 planen müssen Sie die Option Performance im Menü Sett...

Page 45: ...olgreich erkannt wird wählen Sie Update all information im Menü Commands Sie sollten die folgenden drei Audio Geräte im USB Abschnitt sehen wie unten gezeigt fig 03 04 e Wenn die Anzeige korrekt ist war die Installation des UA 1A Treibers erfolgreich Wählen Sie Quit im Menü File um den Dialog Apple System Profiler zu schließen Anschließend nehmen Sie die Soundeinstellungen vor wie unten beschriebe...

Page 46: ...Soundeinstellungen vornehmen fig 03 05 e 1 Wählen Sie im Menü Apple die Optionen Control Panels Sound um den Dialog Sound zu öffnen 2 Klicken Sie auf die Registerkarte Speakers fig 03 06 e 3 Reduzieren Sie die Lautstärke des UA 1A und Ihrer Audiogeräte und klicken Sie anschließend auf Start Test fig 03 07 e 4 Testsounds werden von links nach rechts zusammen mit der Bildschirmanzeige ausgegeben Wen...

Page 47: ...die Option USB Audio 6 Wenn Sie alle Einstellungen vorgenommen haben wählen Sie Quit im Menü File um den Dialog Sound zu schließen Wenn sie USB Audio nicht sehen sollten Sie den Dialog Sound schließen Anschließend stecken Sie das UA 1A aus und warten ca zehn Sekunden Versuchen Sie danach die Schritte erneut auszuführen beginnend mit Schritt 2 Aktivieren Sie nicht Play sound through output device ...

Page 48: ... Sie zum ersten Mal mit einem Computer arbeiten oder die Erklärung einer Vorgehensweise nicht verstehen lesen Sie bitte im Benutzerhandbuch Ihres Computers oder Ihres Betriebssystems nach Wenn das UA 1A nicht wie erwartet funktioniert sollten Sie zuerst folgende Punkte prüfen Probleme in Verbindung mit dem USB Treiber Hardware Assistent startet nicht automatisch Hardware Assistent endet vor Instal...

Page 49: ... wird das Gerät eventuell instabil In solchen Fällen können Sie das Problem möglicherweise lösen indem Sie einen USB Hub mit eigener Stromversorgung anschließen Wird Unbekanntes Gerät für andere Geräte oder Universelle Serielle Bus Controller angezeigt Verwenden Sie folgendes Verfahren um Unbekanntes Gerät aus Andere Geräte Universelle Serielle Bus Controller zu löschen und starten Sie anschließen...

Page 50: ...Löschen des USB Audiogeräte Treibers S 42 beschrieben wird um den USB Audio Device Treiber zu löschen der auf Ihrem Computer installiert ist und installieren Sie die UA 1A Treiber erneut wie in Anschlüsse und Treiberinstallation Windows S 32 beschrieben Prüfen Sie ob ein Gerät mit der Bezeichnung Unbekanntes Gerät in Andere Geräte oder in Universelle Serielle Bus Controller vorhanden ist Wenn Sie ...

Page 51: ...d eventuell folgendes Dialogfeld angezeigt In diesem Fall legen Sie dieMicrosoft Windows CD ROM in das CD ROM Laufwerk ein und klicken auf OK S 37 Werden mehrere Anwendungen ausgeführt Wenn mehrere Anwendungen gleichzeitig ausgeführt werden wird eventuell eine Fehlermeldung angezeigt Klicken Sie in diesem Fall auf OK und schließen Sie die anderen Anwendungen Auch bei geschlossenem Anwendungsfenste...

Page 52: ...er Anschlüsse und Treiberinstallation Windows S 32 Macintosh S 44 Wurden die verschiedenen Lautstärke Regler nach oben geschoben Passen Sie die Lautstärke mit den Reglern an wie in Einstellung der Lautstärkeregelung Windows S 40 oder Soundeinstellungen vornehmen Macintosh S 46 beschrieben Sound ist verzerrt Ist der Lautstärke Pegel des Instruments das an LINE IN angeschlossen ist zu hoch Stellen S...

Page 53: ...Computer via MIDI Soundmodul übertragen und vom UA 1A ausgegeben werden In solchen Fällen verwenden Sie einen Hub mit selbständiger Stromversorgung um das MIDI Soundmodul und das UA 1A parallel anzuschließen oder schließen Sie das MIDI Soundmodul via serielle Schnittstelle oder MIDI Schnittstelle an Rauschen kann auftreten wenn Aufnahme und Wiedergabe gleichzeitig erfolgen Wenn Sie gleichzeitig Da...

Page 54: ...u zu starten Versuchen Sie folgende Änderungen an den Laufwerkeinstellungen vorzunehmen Die nachfolgend genannten Einstellungen sind möglicherweise auf Ihrem Computer nicht vorhanden 1 Doppelklicken Sie in Windows in der Systemsteuerung auf System um das Dialogfeld Eigenschaften von System zu öffnen und klicken Sie auf die Registerkarte Geräte Manager 2 Doppelklicken Sie auf Laufwerke um eine List...

Page 55: ...eschrieben wird 1 Doppelklicken Sie in Windows in der Systemsteuerung auf System um das Dialogfeld Eigenschaften von System zu öffnen und klicken Sie auf die Registerkarte Geräte Manager 2 Doppelklicken Sie auf Systemgeräte um eine Liste der Geräte anzuzeigen 3 Wählen Sie aus dieser Liste Unterstützung für Advanced Power Management und klicken Sie auf Eigenschaften um das Dialogfeld Eigenschaften ...

Page 56: ... Modemanschluss erfolgt oder wenn Sie nicht mit dem Internet verbunden sind Setzen Sie im Kontrollfeld TCP IP Connect via auf PPP Nachdem Sie diese Einstellungen vorgenommen haben starten Sie den Macintosh neu Do not use software that accesses the network such as a Web browser at the same time that you are using sequencer software or audio editing software Im aufgenommenen Sound ist Rauschen zu hö...

Page 57: ...ne korrekte Aufnahme möglich wenn Sie die Bitrate auf 16 bit setzen Musik CD Aufnahme nicht möglich Das UA 1A kann keine Musik CDs im CD ROM Laufwerk des Computers aufnehmen Das Laufwerk veränderte sich nach der Rückkehr vom Standby Modus oder Ruhezustand Wenn Windows 2000 vom Standby Modus oder Ruhezustand zurückkehrt ändern sich die Einstellungen des Ausgabelaufwerks aufgrund eines Windowsproble...

Page 58: ...qui vous a vendu le paquet Interface Audio UA 1A USB fig UA1A Manuel d utilisation d UA 1A ce document Description de l appareil fig UA1Afunc Câble USB Reliez ce câble au connecteur USB de votre ordinateur 600 mm de longueur Voyant USB Ce voyant s allume lorsque l unité est connectée à votre ordinateur et qu elle est prête à fonctionner Prises jack entrée ligne Prises jack sortie ligne 1 2 3 4 ...

Page 59: ... sur le CD ROM de Microsoft Windows dont vous aurez besoin pendant l installation CD ROM de Microsoft Windows Si vous utilisez Windows Me ou 2000 vous n avez pas besoin du CD ROM Qu est ce qu un pilote Un pilote est un logiciel qui permet à un programme s exécutant sur votre ordinateur de transférer des données de et vers un matériel comme l UA 1A lorsque celui ci est connecté à votre ordinateur à...

Page 60: ...r Suivant Avant d installer le pilote L UA 1A ne peut être utilisé avec Windows 95 ou Windows NT Si d autres programmes s exécutent dans Windows fermez les tous avant de continuer Si vous prévoyez de connecter en même temps plusieurs périphériques USB Roland par exemple l UA 1A et d autres périphériques USB comme l UA 100G à votre ordinateur déconnectez l UA 100G ou les autres périphériques du con...

Page 61: ... le périphérique utilisé par Windows Selon la configuration de votre ordinateur un court délai peut intervenir après l installation du pilote jusqu à la reconnaissance du périphérique Utilisateurs de Windows 2000 Si vous utilisez une machine Windows Me voir p 60 pour Windows 98 voir p 62 1 Allumez votre ordinateur et démarrez Windows 2 Utilisez un câble USB pour connecter l UA 1A à votre ordinateu...

Page 62: ...Composite est détecté automatiquement et la boîte de dialogue Assistant ajout de nouveau matériel apparaît Cliquez sur Suivant fig 02 06 e 2 Lorsque l ordinateur vous demande Que voulez vous faire sélectionnez Rechercher le meilleur pilote pour votre périphérique Recommandé et cliquez sur Suivant Pour éviter d endommager vos haut parleurs baissez le volume sur tout périphérique audio connecté Cert...

Page 63: ...dessus mais ceci ne constitue pas un problème 5 La copie du fichier pilote démarre fig 02 10 e 6 Une fois l installation du pilote Périphérique USB Composite terminée la boîte de dialogue suivante apparaît Cliquez sur Terminer A l étape 4 l écran indique Windows recherche les fichiers du pilote pour ce périphérique Périphérique audio USB Si le CD ROM de Microsoft Windows n est pas inséré dans le l...

Page 64: ... dialogue suivante apparaît Cliquez sur Terminer L installation des pilotes Périphérique USB Composite et Périphérique Audio USB est terminée Redémarrez Windows Après avoir installé le pilote voir Spécification du périphérique d entrée sortie audio p 64 et sélectionnez le périphérique utilisé par Windows Spécification du périphérique d entrée sortie audio 1 Cliquez sur le bouton Démarrer de Window...

Page 65: ...n 3 Cliquez sur l onglet Audio 4 Pour déterminer le Périphérique par défaut pour la Lecture cliquez sur Dans la liste qui apparaît cliquez sur Périphérique Audio USB pour le sélectionner 5 Pour déterminer le Périphérique par défaut pour l Enregistrement cliquez sur Dans la liste qui apparaît cliquez sur Périphérique Audio USB pour le sélectionner Windows 98 Windows 98SE Windows 2000 Windows Me fig...

Page 66: ...riphérique audio de sortie Périphérique Audio USB Synthé SW Règle le volume du synthétiseur logiciel intégré à Windows Lecteur de CD Règle le volume CD Audio du lecteur de CD ROM de votre ordinateur 1 Si le Contrôle du volume n est pas installé sur votre ordinateur utilisez Ajout Suppression d applications dans le Panneau de configuration pour l installer Pour plus de précisions sur l installation...

Page 67: ...e ouvrez la boîte de dialogue Propriétés système Cliquez sur l onglet Matériel puis sur le bouton Gestionnaire de périphériques pour ouvrir le Gestionnaire de périphérique A partir des lecteurs de CD ROM cliquez deux fois sur le lecteur de CD ROM que vous utilisez pour ouvrir ses Propriétés Cliquez sur l onglet Propriétés et cochez la case située à côté de l élément Lecture CD numérique Activer la...

Page 68: ...z deux fois sur l icône Système pour ouvrir la boîte de dialogue Propriétés système 4 Cliquez sur l onglet Gestionnaire de périphériques 5 Cliquez deux fois sur Contrôleurs son vidéo et jeu pour accéder à la liste des périphériques 6 Dans la liste sélectionnez Périphérique Audio USB et cliquez sur Supprimer Dans la boîte de dialogue Confirmation de la suppression du périphérique cliquez sur OK Si ...

Page 69: ...que compatible USB Sélectionnez l icône Périphérique USB Composite et cliquez sur Supprimer Dans la boîte de dialogue Confirmation de la suppression du périphérique cliquez sur OK Comme à l étape 7 fermez Propriétés système Si aucune icône de périphérique compatible USB n apparaît ou si ne s affiche pas Fermez simplement Propriétés système Si vous utilisez Windows Me et que est affiché Fermez simp...

Page 70: ...se bloquer Il est possible que le son soit haché ou qu il soit de mauvaise qualité si vous enregistrez et lisez en même temps en raison d une charge trop importante au niveau du processeur CPU Ce défaut ne devrait pas affecter le résultat de l enregistrement Ce genre de problème ne devrait concerner que le signal de lecture Pour utiliser Virtual Sound Canvas 3 sélectionnez Performance dans le menu...

Page 71: ...e all information du menu Commands Les trois périphériques audio suivants doivent s afficher dans la section USB comme suit fig 03 04 e Si c est le cas l installation du pilote UA 1A est réussie Sélectionnez Quit dans le menu File pour fermer la boîte de dialogue Apple System Profiler puis procédez au réglage du son voir ci dessous Si les trois périphériques ne sont pas affichés déconnectez l UA 1...

Page 72: ... Sound pour ouvrir la boîte de dialogue Sound 2 Cliquez sur l onglet Speakers fig 03 06 e 3 Baissez le volume sur l UA 1A et sur votre appareil audio puis cliquez sur Start Test fig 03 07 e 4 La sortie des sons de test se fait de gauche à droite en suivant l affichage à l écran Lorsque vous avez terminé cliquez sur Arrêter Test ...

Page 73: ... for sound input choisissez USB Audio 6 Lorsque vous avez terminé les réglages sélectionnez Quit dans le menu File pour fermer la boîte de dialogue Sound Si USB Audio n est pas disponible fermez la boîte de dialogue Sound Déconnectez ensuite l UA 1A et attendez environ dix secondes Recommencez l opération en commençant par l étape 2 Ne cochez pas Play sound through output device ...

Page 74: ...z pas l explication d une procédure reportez vous au manuel d utilisation de votre ordinateur ou de votre système d exploitation Si l UA 1A ne fonctionne pas comme vous l attendez vérifiez les points suivants Problèmes liés au pilote USB L Assistant ajout de nouveau matériel ne démarre pas automatiquement L Assistant ajout de nouveau matériel se termine de façon impromptue Lorsque le câble USB est...

Page 75: ...ssemblé par vos soins le fonctionnement peut être instable Dans de tels cas vous pouvez résoudre le problème en connectant un concentrateur USB possédant sa propre alimentation Périphérique inconnu s affiche t il à la place de Autres périphériques ou de Contrôleurs de bus USB Procédez comme suit pour supprimer Périphérique inconnu de Autres périphériques Contrôleur de bus USB puis redémarrez votre...

Page 76: ...nt pas correctement installés Procédez comme décrit dans Suppression du pilote Périphérique Audio USB p 68 pour supprimer le pilote Périphérique Audio USB de votre ordinateur et installez à nouveau les pilotes de l UA 1A comme décrit dans Connexions et installation des pilotes Windows p 59 Vérifiez si vous avez un élément nommé Périphérique inconnu ou Autres périphériques dans Contrôleurs de bus U...

Page 77: ...e d application est fermée elle fonctionne encore si elle reste dans la barre des tâches veillez donc à quitter les applications inutiles présentes dans la barre des tâches Avez vous défini la destination des données audio en sortie pour le système d exploitation La destination des données audio en sortie d un ordinateur doit être positionnée sur UA 1A Pour plus de détails sur ce paramètre voir Sp...

Page 78: ...onnexion ne contenant pas de résistance La lecture audio comporte du bruit La carte graphique de votre ordinateur peut provoquer du bruit lors de la lecture audio Procédez comme suit pour régler l accélération graphique sur Aucunee 1 Dans le Panneau de configuration de Windows cliquez deux fois sur Affichage pour ouvrir la boîte de dialogue Propriétés d affichage puis cliquez sur l onglet Paramètr...

Page 79: ...ifiez également qu aucun périphérique proche n émet de fort champ magnétique comme une télévision ou un four à micro ondes Beaucoup de périphériques audio sont ils connectés La connexion simultanée de nombreux périphériques audio peut provoquer du bruit Ne connectez pas les périphériques audio inutilisés Le son s interrompt pendant la lecture audio Essayez d augmenter la mémoire Vous pouvez augmen...

Page 80: ... de dialogue Propriétés Système cliquez sur OK pour fermer la boîte de dialogue Redémarrez votre ordinateur pour que les paramètres ci dessus soient pris en compte Arrêt de la lecture audio Sur certains ordinateurs les paramètres de Gestion de l alimentation du Panneau de configuration peuvent provoquer l arrêt de la lecture Les Propriétés de la gestion de l alimentation qui s affichent lorsque vo...

Page 81: ... 1A avec les paramètres suivants Si vous vous connectez à Internet à l aide d un câble LAN Utilisez l appareil tant que le câble LAN est connecté Si vous vous connectez à Internet à l aide du port interne de modem ou si vous n êtes pas connecté e à Internet Dans le panneau de contrôle TCP IP définissez Connect via sur PPP Après avoir effectué le paramètrage redémarrez votre Macintosh Ne pas utilis...

Page 82: ...istrer réellement Dans ce cas vous devez pouvoir enregistrer normalement en réglant le débit à 16 bits Impossible d enregistrer un CD audio L UA 1A ne peut enregistrer de CD audio à partir du lecteur de CD ROM de l ordinateur Le niveau du volume est différent à la reprise suivant un état de Suspension ou d Hibernation Lorsque Windows 2000 reprend après une Mise en veille ou une Hibernation le régl...

Page 83: ...uni contattare il rivenditore presso il quale è stata acquistata la confezione Interfaccia audio UA 1A USB fig UA1A Manuale d uso UA 1A la presente documentazione Nomi e funzioni fig UA1Afunc Cavo USB Collegare questo cavo al connettore USB del computer lunghezza 600 mm Indicatore USB Questo indicatore si accende quando l unità è collegata al computer ed è pronta a funzionare Prese d ingresso line...

Page 84: ...ows 98 questo driver si trova nel CD ROM di Microsoft Windows che sarà quindi necessario avere pronto CD ROM di Microsoft Windows Se si utilizza Windows Me o 2000 il CD ROM non è necessario Definizione di un driver Un driver è un programma informatico che permette di eseguire un applicazione sul computer per trasferire i dati da e verso l UA 1A quando l apparecchio è collegato al computer tramite ...

Page 85: ...o in uso scelta consigliata sia selezionata e fare clic su Next Avanti Prima di installare il driver Non è possibile utilizzare l UA 1A con Windows 95 o Windows NT Se altri programmi Windows sono in esecuzione chiuderli prima di continuare la procedura Se si devono collegare contemporaneamente più apparecchi Roland USB ad esempio l UA 1A ed altri dispositivi USB come l UA 100G al computer scollega...

Page 86: ... utilizzato da Windows A seconda della configurazione informatica potrebbe passare un breve intervallo di tempo tra l installazione e il riconoscimento del driver Utenti Windows 2000 Se si lavora in ambiente Windows Me fare riferimento a pag 85 se Windows 98 fare riferimento a pag 87 1 Accendere il computer e avviare Windows 2 Utilizzare un cavo USB per collegare l UA 1A al computer L UA 1A è rico...

Page 87: ...a USB viene rilevato automaticamente e appare la finestra di dialogo Add New Hardware Wizard Installazione guidata Nuovo hardware Fare clic su Next fig 02 06 e 2 Al messaggio What do you want Windows to do Scegliere l operazione da effettuare selezionare Search for the best driver for your device Cerca il miglior driver per la periferica Recommended Scelta consigliata e fare clic su Next Avanti Pe...

Page 88: ...del driver potrebbe essere diversa da quella di seguito illustrata ma non è un problema 5 A questo punto comincerà la copia dei file Al passo 4 la finestra visualizza il messaggio Windows driver file search for the device Ricerca del file del driver per la periferica USB Audio Device Periferica audio USB Se il CD ROM di Microsoft Windows non è presente nell unità CD ROM potrebbe apparire la seguen...

Page 89: ...re Wizard Installazione guidata Nuovo hardware Fare clic su Next Avanti e continuare l installazione seguendo la stessa procedura indicata ai passi 2 5 p 87 88 fig 02 14 e 8 Alla fine dell installazione del driver USB Audio Device Periferica audio USB appare la seguente finestra di dialogo Fare clic su Finish L installazione dei driver USB Composite Device Periferica composita USB e USB Audio Devi...

Page 90: ...a Proprietà multimediali Win 2000 Me NelPannello di controllo fare doppio clic sull icona Suoni e multimedia per aprire la finestra Proprietà suoni e multimedia Se l icona Suoni e multimedia non risulta visualizzata nel Pannello di controllo fare clic su visualizza tutte le opzioni del Pannello di controllo 3 Fare clic sulla scheda Audio 4 Nella sezione Riproduzione Periferica preferenziale fare c...

Page 91: ...re clic su USB Audio Device Periferica audio USB per selezionarla Windows 98 Windows 98SE Windows 2000 Windows Me fig 02 15 e 6 Fare clic su OK per completare le impostazioni A seconda del sistema utilizzato USB Audio Device Periferica audio USB è seguito da un numero ad esempio USB Audio Device Periferica audio USB 1 Il pulsante Proprietà avanzate non sarà accessibile per Registrazione ...

Page 92: ...o Device Periferica audio USB SW Synth Regola il volume del sintetizzatore software incorporato in Windows Lettore CD Regola il volume CD musica dell unità CD ROM del computer 1 Se il Controllo volume non è installato sul computer utilizzare Installazione applicazioni nel Pannello di controllo per installarlo Per ulteriori informazioni sull installazione fare riferimento al manuale utente di Windo...

Page 93: ...re la finestra di dialogo Proprietà sistema Fare clic sulla scheda Hardware e quindi sul pulsante Gestione periferiche per aprire Gestione periferiche Tra le unità CD ROM fare doppio clic sull unità CD ROM utilizzata per aprirne le Proprietà Fare clic sulla scheda Proprietà e selezionare la casella accanto alla voce Riproduzione CD digitale Abilita riproduzione digitale su questo dispositivo CD RO...

Page 94: ...pio clic sull icona Sistema per aprire la finestra Proprietà sistema 4 Fare clic sulla scheda Gestione periferiche 5 Fare doppio clic su Controller audio video e giochi per visualizzare un elenco di periferiche 6 Nell elenco selezionare USB Audio Device Periferica audio USB e fare clic su Rimuovi Nella finestra Conferma rimozione periferica fare clic su OK Se la finestra USB Audio Device Periferic...

Page 95: ...elenco delle periferiche Se è visualizzato per l icona di periferica USB compatibile Selezionare l icona USB Composite Device Periferica composita USB e fare clic su Rimuovi Nella finestra Conferma rimozione periferica fare clic su OK Come al passo 7 chiudere Proprietà sistema Se l icona di periferica USB compatibile o non sono visualizzati Chiudere Proprietà sistema Se si utilizza Windows Me e è ...

Page 96: ...one potrebbe bloccarsi L audio potrebbe essere irregolare e o disturbato se la registrazione e la riproduzione avvengono contemporaneamente con un conseguente sovraccarico per la CPU Tuttavia il disturbo non dovrebbe apparire nella registrazione ma nel segnale di riproduzione Se si utilizza Virtual Sound Canvas 3 sarà necessario selezionare Performance nel menu Setting e impostare Expression Mode ...

Page 97: ...lla sezione USB dovrebbero comparire i seguenti tre dispositivi audio come sotto illustrato fig 03 04 e Se l indicazione è corretta l installazione dell UA 1A è andata a termine con successo Selezionare Quit nel menu File per chiudere la finestra di dialogo Apple System Profiler quindi configurare i parametri audio come sotto indicato Se l indicazione non è corretta provare a scollegare l UA 1A da...

Page 98: ...e selezionare Control Panels Sound per aprire la finestra audio 2 Fare clic sulla linguetta Speakers fig 03 06 e 3 Abbassare al minimo il volume dell UA 1A e degli apparecchi audio e fare clic su Start Test fig 03 07 e 4 I segnali acustici di prova sono emessi da sinistra a destra secondo quanto visualizzato sullo schermo Alla fine fare clic su Stop Test ...

Page 99: ...n Choose a source for sound input scegliere USB Audio 6 Alla fine delle impostazioni selezionare Quit nel menu File per chiudere la finestra Sound Se l USB Audio non è visualizzato chiudere la finestra Sound Scollegare poi l UA 1A e attendere circa dieci secondi Riprendere quindi la procedura a partire dal passo 2 Non selezionare Play sound through output device ...

Page 100: ...ce una procedura fare riferimento ai manuali utenti del computer o del sistema operativo Se l UA 1A non funziona come previsto controllare i seguenti punti Problemi relativi al driver USB Add New Hardware Wizard Installazione guidata Nuovo hardware non si avvia automaticamente Add New Hardware Wizard Installazione guidata Nuovo hardware si interrompe prima di arrivare alla fine Quando il cavo USB ...

Page 101: ...essere il caso di un computer assemblato dall utente il funzionamento potrebbe essere instabile In questi casi il problema potrebbe essere risolto collegando un hub USB provvisto di fonte di alimentazione È visualizzato Periferica sconosciuta per Altre periferiche o Controller USB Universal Serial Bus Seguire la procedura sotto indicata per eliminare Periferica sconosciuta da Altre periferiche Con...

Page 102: ...correttamente Seguire la procedura descritta in Cancellazione del driver USB Audio Device Periferica audio USB pag 94 per eliminare il driver USB Audio Device Periferica audio USB e reinstallare i driver UA 1A secondo quanto descritto in Collegamenti e installazione del driver Windows pag 84 Controllare se è visualizzata una voce denominata Periferica sconosciuta in Altre periferiche o in Controll...

Page 103: ...e apparire un messaggio di errore In questo caso fare clic su OK e chiudere le altre applicazioni Anche se la finestra di un applicazione viene chiusa essa rimane in esecuzione nella barra delle applicazioni accertarsi quindi di chiudere tutte le applicazioni non necessarie visualizzate nella barra delle applicazioni È stata specificata la destinazione di uscita dei dati audio nel sistema operativ...

Page 104: ...to alla LINEA D ENTRATA Il livello del volume dello strumento collegato a LINE IN è troppo basso Viene forse utilizzato un cavo di collegamento dotato di resistore Utilizzare un cavo di collegamento senza resistore La riproduzione audio è disturbata Il disturbo durante la riproduzione audio potrebbe essere causato dall acceleratore grafico del computer Per impostare l accelerazione grafica su None...

Page 105: ...elaio del computer o il polo con messa a terra della presa del cordone di alimentazione fornito insieme al computer Inoltre accertarsi che nelle vicinanze non ci siano dispositivi che emettono forti campi magnetici come un televisore o un forno a microonde Sono collegati molti dispositivi audio Se sono collegati molti dispositivi audio l audio potrebbe essere disturbato Non collegare dispositivi a...

Page 106: ...nuto fare clic su OK o Annulla 5 Nella finestra di dialogo Proprietà sistema fare clic su OK per chiudere la finestra di dialogo Riavviare il computer in modo da rendere effettive le modifiche La riproduzione audio si interrompe Su alcuni computer le impostazioni relative al risparmio energia nel Panello di controllo potrebbero provocare l interruzione della riproduzione audio Le Proprietà di risp...

Page 107: ... con le seguenti impostazioni Se per la connessione Internet si utilizza un cavo LAN Utilizzare l apparecchio quando il cavo LAN è collegato Se per la connessione Internet si utilizza il modem interno o non esiste una connessione Internet Nel pannello di controllo TCP IP impostare Connect via su PPP Dopo aver impostato i parametri riavviare il Macintosh Evitare di utilizzare un software di accesso...

Page 108: ...se succedere sarà possibile registrare correttamente impostando la velocità di trasferimento su 16 bit Impossibile registrare CD musicali L UA 1A non è in grado di registrare CD musicali nell unità CD ROM del computer con CoolEdit Pro LE o altri programmi Dopo aver ripreso l attività dallo stato di sospensione Suspend o Hibernation il volume è cambiato Il cambiamento di volume dopo la ripresa dell...

Page 109: ...llos póngase en contacto con el distribuidor al que compró el paquete Interfaz de audio UA 1A USB fig UA1A Manual del usuario de UA 1A el presente documento Nombres y funciones fig UA1Afunc Cable USB Conecte este cable al conector USB de su PC 600 mm de longitud Indicador USB Este indicador se encenderá cuando la unidad esté conectada al PC y lista para funcionar Jacks de entrada de línea Jacks de...

Page 110: ...que permite que un programa de aplicaciones ejecutado en el PC transfiera datos del UA 1A y viceversa cuando esté conectado al PC mediante un cable USB El controlador pasa los datos de la aplicación al UA 1A y del UA 1A a la aplicación fig P10 1 Aplicación Controlador USB Conector USB PC Cable USB USB AUDIO INTERFACE Antes de instalar el controlador El UA 1A no puede utilizarse con Windows 95 o Wi...

Page 111: ...Encienda el PC e inicie Windows utilice un cable USB para conectar el UA 1A al PC fig 02 03 e 2 Cuando Windows detecte el UA 1A y aparezca el cuadro de diálogo Asistente para agregar nuevo hardware asegúrese de que esté seleccionada la opción Buscar automáticamente el controlador recomendado y a continuación haga clic en Siguiente Para evitar causar daños en los altavoces baje el volumen de los di...

Page 112: ...e el dispositivo que utiliza Windows En función de la configuración de su PC después de que se haya instalado el controlador puede que se produzca un breve intervalo de espera hasta que el dispositivo sea reconocido Usuarios de Windows 2000 Si utiliza un sistema con Windows Me consulte la pág 111 si utiliza un sistema con Windows 98 consulte la pág 113 1 Encienda el PC e inicie Windows 2 Utilice u...

Page 113: ...camente se detectará un USB Composite Device Dispositivo USB Composite y aparecerá el cuadro de diálogo Asistente para agregar nuevo hardware Haga clic en Siguiente fig 02 06 e 2 Cuando la pantalla le pregunte Qué desea que haga Windows seleccione Buscar el mejor controlador para su dispositivo Se recomienda y haga clic en Siguiente Para evitar causar daños en los altavoces baje el volumen de los ...

Page 114: ...del controlador puede ser diferente de la que se muestra en la figura pero esto no supone ningún problema 5 El archivo Controlador se empezará a copiar En el paso 4 la pantalla indicará Windows driver file search for the device USB Audio Device Si no ha insertado el CD ROM de Microsoft Windows en la unidad de CD ROM puede aparecer el siguiente cuadro de diálogo Si esto ocurre inserte el CD ROM de ...

Page 115: ... hardware Haga clic en Siguiente y continúe la instalación utilizando el mismo procedimiento que se indica en los pasos 2 5 p 113 114 fig 02 14 e 8 Cuando haya finalizado la instalación del controlador del Dispositivo de audio USB aparecerá el siguiente cuadro de diálogo Haga clic en Fin De este modo se completa la instalación del controlador del Dispositivo USB Composite y del controlador del Dis...

Page 116: ...o Propiedades multimedia Win 2000 Me En Panel de control haga doble clic en el icono Sonidos y multimedia para abrir el cuadro de diálogo Propiedades de sonido y multimedia Si no encuentra el icono Sonidos y multimedia vaya a Panel de control y haga clic en Ver todas las opciones de Panel de control 3 Haga clic en la ficha Audio 4 Para el elemento de Playback Reproducción Preferred device disposit...

Page 117: ...ista que aparece haga clic en Dispositivo de audio USB para seleccionarlo Windows 98 Windows 98SE Windows 2000 Windows Me fig 02 15 e 6 Haga clic en Aceptar para completar la configuración En función del sistema USB Audio Device Dispositivo de audio USB aparecerá con un número añadido por ejemplo USB Audio Device 1 No será posible pulsar el botón Propiedades avanzadas de la opción Recording Grabac...

Page 118: ...olumen del sintetizador de software integrado en Windows Reproductor de CD CD Player Ajuste el volumen de la música del CD de la unidad de CD ROM del PC 1 Si no tiene instalada en su PC la opción Control de volumen utilice la opción Agregar o quitar programas del Panel de control para instalarla Para obtener más información sobre la instalación consulte el manual del usuario de Windows o la ayuda ...

Page 119: ...l sistema Haga clic en la ficha Hardware y a continuación haga clic en el botón Administrador de dispositivos para abrir el Administrador de dispositivos Desde las unidades de CD ROM haga doble clic en la unidad de CD ROM que está utilizando par abrir las Propiedades Haga clic en la ficha Propiedades y seleccione la casilla de verificación que se encuentra junto al elemento Habilitar el CD de soni...

Page 120: ...ol haga doble clic en Sistema para abrir el cuadro de diálogo Propiedades del sistema 4 Haga clic en la ficha Administrador de dispositivos 5 Haga doble clic en Dispositivos de sonido vídeo y juegos para ver la lista de dispositivos 6 De la lista seleccione Dispositivo de audio USB y haga clic en Quitar En el cuadro de diálogo Confirmar la eliminación del dispositivo haga clic en Aceptar Si no apa...

Page 121: ... el icono del dispositivo compatible con USB Seleccione el icono Dispositivo USB Composite y haga clic en Quitar En el cuadro de diálogo Confirmar la eliminación del dispositivo haga clic en Aceptar Como en el paso 7 cierre Propiedades del sistema Si no hay ningún icono de dispositivo compatible con USB o si no aparece el símbolo Sólo tiene que cerrar Propiedades del sistema Si utiliza Windows Me ...

Page 122: ... grabando Si lo hace la aplicación puede quedar inmovilizada Puede que oiga que el sonido viene y va y o ruido si graba o reproduce al mismo tiempo debido a una sobrecarga de la CPU Sin embargo el ruido no debe aparecer en la grabación El ruido sólo debe aparecer en la señal de reproducción Si va a utilizar Virtual Sound Canvas 3 debe seleccionar Performance del menú Setting y establecer Expressio...

Page 123: ...clic en laficha de control Devices and Volumes 4 Utilice un cable USB para conectar el UA 1A al PC 5 Para asegurarse de que se ha reconocido satisfactoriamente seleccione Update all information del menú Commands Se verán los tres dispositivos de audio siguientes en la sección USB como se muestra a continuación fig 03 04 e Para evitar causar daños en los altavoces baje el volumen de los dispositivo...

Page 124: ...lican a continuación Si la indicación no es correcta intente desconectar el UA 1A del puerto USB y espere unos diez segundos A continuación vuelva a realizar el procedimiento empezando a partir del paso 4 Configuración del sonido fig 03 05 e 1 En el menú Apple seleccione Control Panels Sound para abrir el cuadro de diálogo Sound 2 Haga clic en la ficha Speakers fig 03 06 e 3 Apague el volumen de l...

Page 125: ... 5 Seleccione Input en el cuadro de diálogo Sound A continuación en Choose a source for sound input seleccione USB Audio 6 Cuando haya finalizado la configuración seleccione Quit en el menú File para cerrar el cuadro de diálogo Sound Si no ve la opción USB Audio debe cerrar el cuadro de diálogo Sound Luego desconecte el UA 1A y espere unos diez segundos Intente realizar de nuevo el procedimiento e...

Page 126: ...n PC por primera vez o no entiende las explicaciones que se dan de un determinado proceso consulte el manual del usuario de su PC o de su sistema operativo Si el UA 1A no funciona como desea compruebe los siguientes puntos Problemas relacionados con el controlador USB Add New Hardware Wizard Asistente para agregar nuevo hardware no se inicia automáticamente Asistente para agregar nuevo hardware fi...

Page 127: ...to puede ser inestable En estos casos puede resolver el problema conectando un concentrador USB que contenga una fuente de alimentación Aparece el aviso Dispositivo desconocido para Otros dispositivos o Controladores de bus serie universal Utilice el siguiente procedimiento para eliminar el aviso Dispositivo desconocido de Otros dispositivos Controlador de bus serie universal y reinicie el PC Para...

Page 128: ...nstalado correctamente Utilice el procedimiento que se describe en Eliminación del controlador de dispositivo de audio USB pág 120 para eliminar el controlador del dispositivo de audio USB instalado en el PC e instale los controladores UA 1A de nuevo tal y como se describe en Instalación del controlador y conexiones para Windows pág 110 Compruebe si hay un elemento llamado Dispositivo desconocido ...

Page 129: ...egos con el UA 1A pág 119 Está ejecutando varias aplicaciones simultáneamente Si está ejecutando varias aplicaciones simultáneamente puede que aparezca un mensaje de error Si esto sucede haga clic en Aceptar y cierre las otras aplicaciones Aunque se cierre una ventana de aplicación ésta se encuentra todavía en funcionamiento si sigue en la barra de tareas de modo que debe asegurarse de que únicame...

Page 130: ...ración consulte Instalación del controlador y conexiones Connections and driver installation Windows pág 110 Macintosh pág 122 Se encuentran subidos los diferentes faders atenuadores del control de volumen Ajuste el volumen de cada atenuador tal y como se describe en Configuración del control de volumen Windows pág 118 o Configuración del sonido Macintosh pág 124 El sonido está distorsionado El ni...

Page 131: ...MIDI está conectada a los jacks de entrada de línea de la unidad UA 1A puede entrar ruido del PC a través del módulo de sonido MIDI que se puede oír desde la unidad UA 1A En estos casos utilice un concentrador con alimentación propia para conectar el módulo de sonido MIDI y la unidad UA 1A en paralelo o conecte el módulo de sonido MIDI mediante la interfaz serie o la interfaz MIDI Se oye ruido si ...

Page 132: ... siguientes cambios en la configuración de la unidad de disco Puede que su PC no disponga de las siguientes opciones de configuración 1 En el Panel de control de Windows haga doble clic en Sistema para abrir el cuadro de diálogo Propiedades del sistema y haga clic en la ficha Administrador de dispositivos 2 Haga doble clic en Unidades de disco para ver la lista de dispositivos 3 En la lista selecc...

Page 133: ...iguración 1 En el Panel de control de Windows haga doble clic en Sistema para abrir el cuadro de diálogo Propiedades del sistema y haga clic en la ficha Administrador de dispositivos 2 Haga doble clic en Dispositivos de sistema para visualizar la lista de dispositivos 3 En la lista seleccione Compatibilidad para Administración avanzada de energía y haga clic en Propiedades para acceder al cuadro d...

Page 134: ... la red como un navegador web al tiempo que utilice el software del secuenciador o el software de edición de audio Se oye ruido en las grabaciones Se ha constatado que en las grabaciones realizadas con los modelos de la serie iMac que salieron a la venta después del verano de 2000 se oye ruido En la aplicación SimpleSound que incorpora el sistema operativo Mac se oye ruido en el sonido si se repro...

Page 135: ...ca El UA 1A no puede grabar CD de música en la unidad de CD ROM del PC El volumen ha cambiado cuando ha reanudado el sistema después de haber estado en modo de suspensión o hibernación Cuando se reanuda Windows 2000 después de haber estado en modo de suspensión o hibernación el volumen de salida es diferente debido a un problema de Windows Inicie la aplicación Mixer Mezclador como se describe en C...

Page 136: ...hm Recommended Load Impedance 10 k ohms or greater Interface USB USB Type B Line Input jacks RCA pin jacks x 2 Line Output jacks RCA pin jacks x 2 Power Supply Supplied from the computer Current Draw 120 mA Dimensions 65 W x 112 D x 24 H mm 2 9 16 W x 4 7 16 D x 1 1 16 H inches Weight 110 g 4 oz Accessories Owner s Manual 0 dBu 0 775 V rms 962a In the interest of product improvement the specificat...

Page 137: ...MEMO ...

Page 138: ...MEMO ...

Page 139: ...s Pedras 8 9 1 Dto 4050 465 PORTO PORTUGAL TEL 022 608 00 60 POLAND P P H Brzostowicz UL Gibraltarska 4 PL 03664 Warszawa POLAND TEL 022 679 44 19 RUSSIA MuTek 3 Bogatyrskaya Str 1 k l 107 564 Moscow RUSSIA TEL 095 169 5043 SPAIN Roland Electronics de España S A Calle Bolivia 239 08020 Barcelona SPAIN TEL 93 308 1000 SWITZERLAND Roland Switzerland AG Musitronic AG Gerberstrasse 5 Postfach CH 4410 ...

Page 140: ...all items on the front cover to left or right Before using this unit carefully read the sections entitled USING THE UNIT SAFELY P 3 4 and IMPORTANT NOTES P 5 These sections provide important information concerning the proper operation of the unit Additionally in order to feel assured that you have gained a good grasp of every feature provided by your new unit this manual should be read in its enti...

Reviews: