background image

EDS - TECHNICAL INSTRUCTIONS

3

QUICK INSTALLATION

The procedure below is intended for trained personell with previous experience in installing EDS Beam Smoke Detectors RK100R(S).
If you don’t have the needed experience please refer to the standard installation procedure of this manual. On our site 

www.eds.eu

is available a video with instructions for installing the RK100R-S.

1 - fix the RK100-R detector and FX reflector

2 - connect the cables

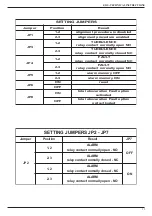
3 - set  JP2-JP3-JP4-JP5-JP7  detector’s jumpers (see pag.10)

4 - perfom the optical allignment with the Laser Pointer BLP-100 with the procedure set out in Chapter 7

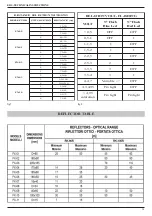
5 - set SW3 selector on the device according to the distance  between Detector and FX (see table in fig.7)

6 - place jumper JP1 in “ON” position (Alignment) and power up the device

7  -  optimize  the  device  signal  using:

• the  P1 trimmer
• the adjustment screws V1-V2-V3 on the optical block
• a  multimeter  (or  the  STS01  instrument)
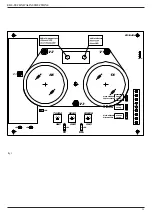
• blue/Red  Led  signal  level  indication  (fig.8  board)

8 - regulate the signal between 4,7V and 5V with the P1 trimmer

9 - verify the functioning obcuring the FX

10  -  select  the  desired  sensitivity  of  the  Obscuration  circuit  with  the  SW2  selector  (40-50-60-70%)

11  -  select  the  desired  sensibility  of  the  Turbulence  (Heat)  circuit  with  the  SW1  selector    (if  used  -  not  present  in  -S
version)

12  - set  JP1  in  “OFF”  position  to  activate  the  device

13  -  close  the  cover  within  5  minutes

14 - wait at least 5 minutes for the device to become operational

15  -  perform  operational  tests

Summary of Contents for RK 100 RS

Page 1: ...CAL BEAM SMOKE DETECTOR RK100 R RK100 RS with Laser Pointer BLP 100 TECHNICAL MANUAL TECHNICAL INSTRUCTIONS FOR INSTALLATION SETUPAND MAINTENANCE EDS V Ca Nova Zampieri 6 37057 S G Lupatoto VERONA Tel 39045547529 Fax 390458750065 eds eds eu www eds eu ...

Page 2: ...nce 17 Sensitivity selection 18 Technical data DEFAULT FACTORYSETTINGS Read ahead SW1 position 1 minimum threshold level SW2 position 1 minimum threshold level SW3 position 4 maximum Transmitter power JP1 position 2 3 optical allignment on JP2 JP3 position 2 3 contact NC JP4 position 1 2 contact NC for Fault relay JP5 position 1 2 memory off JP7 not inserted alarm relays NC P1 level adjustment tri...

Page 3: ...vice according to the distance between Detector and FX see table in fig 7 6 place jumper JP1 in ON position Alignment and power up the device 7 optimize the device signal using the P1 trimmer the adjustment screws V1 V2 V3 on the optical block a multimeter or the STS01 instrument blue Red Led signal level indication fig 8 board 8 regulate the signal between 4 7V and 5V with the P1 trimmer 9 verify...

Page 4: ...cording to the tecnical data and to the information of this manual to the installation and to the ambiental and operational condition 2 RELEVANTSTANDARDS 2 1 For the installation in European Community countries you must follow the EC standard EN54 14 Fire detection and fire alarm systems In extraeuropean countries you must respect the relevant international and national standards 3 INSTALLATION 3 ...

Page 5: ...ontact relay Connection is valid when the detector is not in an alarm state and JP3 jumper is in 2 3 position If JP3 is positioned on 1 2 the contact results normally open C2 N2 terminals are voltage free C3 N3 normally closed fault relay contact Fault relay is normally powered intrinsic safety Connection is valid when the detector is not in Fault state and JP4 jumper is in 1 2 position If JP4 is ...

Page 6: ...ct this variation and when these reach the amplitude and the duration in the time programmed a alarm signal is produced The sensitivity and the delay of intervention of this circuit are independently adjustable so that to fully satisfy the applications of the technician The advantage offered by this circuit is a great speed of fire detection because it is detected in dynamic way in its initial pha...

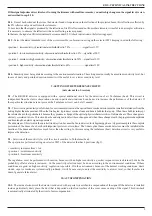
Page 7: ...ned for this application that must be inserted on the special connector CN4 set on the printed circuit of the detector v fig 11 If you don t have a Multimeter or the STS01 you can perform the setup operations anyway evaluating the signal level with the frontal Leds indications as described in chap 8 12 8 8 If available connect a 5V fullscale Multimeter between the SIG terminal and the negative pow...

Page 8: ...one are off if the signal in the range 0 5 1 V the red led performs 1 flash remains off for 2 seconds and then it repeats the sequence if signal is among 1 1 5 V the blue led flashes once remains off for 2 seconds and then it repeats the sequence if signal is among 1 5 2V the blue led flashes once and the red led flashes once They remain off for 2 seconds and then the sequence is repeated if signa...

Page 9: ...d at distances from the ceiling higher than the nominal When the fire begins it produces smoke clouds and hot air bubbles that go up When these bubbles intercept the infrared beam they perturbate it because they produce a change of the optical physical characteristics of infrared beam These changes are obviusly correlated in time This circuit has been designed to detect these changes and when thes...

Page 10: ...l it doesn t stop the alarm and is not removed power for over 5 seconds When the memory is not activated if the detector goes to alarm the alarm relay and the frontal Led are disarmed as soon as it stops the alarm 12 2 Memory of the data of configuration and setting In case of black out the memory inside preserve the data To the return of the feeding the detector later once of initialization of ab...

Page 11: ... 16 MAINTENANCE 16 1 The instrument asks for a simple and periodic maintenance It can be programmed or made automatic on special signaling of the detector During the normal operation and after a certain time from the installation if the maintenance is not performed the detector because of the dirt deposited on the front surface of the cover produces a Fault signal because of the drop of the signal...

Page 12: ...or 0 5 Maximumangularmissallignmentofthereflector 0 5 Selectionoftheobscurationalarmthresholdlevelwitha4positionsswitch position1 70 position2 60 position3 50 position4 40 Selectionoftheturbulencealarmthresholdlevelwitha4positionsswitch AlarmRelayactivationdelay 10s FaultRelayactivationdelay 5s Detector s recovery time with alarm memory dectivated about 5s Detector s recovery time with alarm memor...

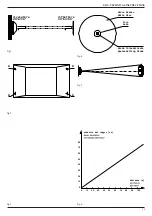
Page 13: ...disco bianco white disc diodo fotoemittente photoemitting diode foro hole 0 10 20 30 40 50 60 0 10 20 30 40 50 60 70 80 distanza m diametro del raggio cm 70 80 90 100 fig 1 fig 2 fig 3 fig 4 fig 5 fig 6 A A A A rivelatore riflettore ...

Page 14: ... 8 0 7 4 0 9 0 8 3 0 X F 1 0 8 0 7 2 0 9 0 8 3 0 0 1 0 9 4 0 1 1 0 0 1 0 1 X F 1 8 5 0 5 2 5 6 8 5 3 5 7 5 6 4 5 8 5 7 fig 7 fig 8 G N I H S A L F T L O V N O I T A L E R T L O V h s a l F N d e L e u l B h s a l F N d e L d e R 5 0 F F O F F O 1 5 0 F F O 1 5 1 1 1 F F O 2 5 1 1 1 5 2 2 2 F F O 3 5 2 2 1 5 3 3 3 F F O 4 5 3 3 1 7 4 4 e l b a i r a V F F O 5 9 4 7 4 t h g i l x i F F F O 5 9 4 n o...

Page 15: ... e p o y l l a m r o n t c a t n o c y a l e r 5 P J 2 1 F F O y r o m e m m r a l a 3 2 N O y r o m e m m r a l a 6 P J N O t e s e r F F O 8 P J N O n o i t p o t l u a F n o i t a r u c s b o l a t o t d e t a v i t c a F F O n o i t p o t l u a F n o i t a r u c s b o l a t o t d e t a v i t c a t o n 7 P J 2 P J S R E P M U J G N I T T E S r e p m u J n o i t i s o P t l u s e R 7 P J 2 P J 2...

Page 16: ...3 1 2 3 1 2 3 JP2 JP4 JP3 alarm relay turbo relay fault relay P1 JP7 1 2 3 CN4 SW1 SW2 SW3 TURBO SENS POWER ON OFF ALI ON OFF MEM 1 2 3 4 5 6 7 8 9 V1 V2 V3 LED di Allarme LED di Allineamento RX TX JP6 Alarmrelais Turborelais Fehlerrelais DS1649A Relè Guasto Turbo Relè Relè Allarme JP8 ...

Page 17: ...ON alignment procedure activated JP1 position 1 2 OFF alignment procedure deactivated JP2 JP3 JP4 Jumpers to set the relay contacts respectively of the alarm relay turbulence if present and fault normally closed NC or normally open NO position 1 2 output contact normally open NO position 2 3 output contact normally closed NC JP4 must be in position 1 2 to have the contact closed because the fault ...

Page 18: ...voltage 11 30 Vcc ALARM relay contact TURBULENCE relay contact FAULT relay contact analog signal output 0 5V 1 2 3 4 5 6 7 8 9 1 2 3 4 1 2 3 4 1 2 3 4 1 2 3 JP1 1 2 3 JP5 1 2 3 1 2 3 1 2 3 JP2 JP4 JP3 alarm relay turbo relay fault relay P1 JP7 SW1 SW2 SW3 TURBO SENS POWER ON OFF ALI ON OFF MEM 1 2 3 4 5 6 7 8 9 V1 V2 V3 LED di Allarme LED di Allineamento RX TX JP6 Alarmrelais Turborelais Fehlerrel...

Page 19: ...nit In this case the detector is a zone of the system The state of the indicated relays correspond to the normal operation condition of the detector Thealarmoutputistheoneofthealarmrelay circuitsensibletoobscurationinalarm ortheonefromtheturbulencerelay circuitsensibletoturbulence heat inalarm The turbulence relay if not necessary can be left unused The fault output is the one from the NC contact ...

Page 20: ...e This base is available with the same color of the base of the detector red or white STS 01 Small analog meter for analog output signal measuring It must be used inserting it on suitable connector on the PCB during the operation of optical alignment Voltage Range 0 5 V EV570 5 Bar Graph Voltmeter It allows the remote measuring of the analog output signal of the optical beam smoke detectors RK90R ...

Page 21: ... 4 Name registered trade name or registered trademark and contact address of the manufacturer as required pursuant to article 11 5 EDS srl Via Cà Nova Zampieri 6 San Giovanni Lupatoto Verona 37057 Italy 5 Where applicable name and contract address of the authorised representative whose mandate covers the tasks specified in article 12 2 Not applicable 6 System or systems of assessment and verificat...

Page 22: ...4 7 4 9 5 16 5 18 Tolerance to supply parameters Pass 5 5 Performance under fire conditions Pass 4 2 Duration of operational reliability Pass 5 11 5 12 temperature resistance Duration of operational reliability Pass 5 15 vibration resistance Duration of operational reliability Pass 5 13 5 14 humidity resistance Duration of operational reliability Pass 5 17 corrosion resistance 10 The performance o...

Page 23: ...or a particular purpose and all implied warranties arising from a course of dealing usage of trade by statute or otherwise is hereby strictly limited to the term of this written warranty This agreement shall be the sole and exclusive remedy available to the Purchaser with respect to the purchase In the event of any alleged breach of any warranty or any legal action brought by the purchaser based o...

Page 24: ... carefully checked and are reliable By the way EDS company is not responsable in any way for possible inaccurancies or errors and it reserves the right to perform changes in any part of this document and or product to improve the quality reliability or the design date 10 07 2019 sw rev R V1 3 filename RK100R_S_ist_en_2019_BLP Copyright 2005 2014 Electronic Detection Systems All rights reserved ...

Reviews: