background image

Securing the seat to your car (cont.)

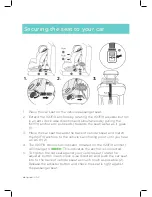
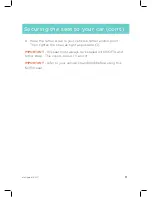
6.  Hook the tether strap to your vehicle’s tether anchor point.  

Then tighten the strap as tight as possible (3)

.

IMPORTANT


- this seat must always be installed with ISOFIX and 

tether strap.  This covers Group I, II and III.

IMPORTANT

 - refer to your vehicle’s handbook before using this 

ISOFIX seat.

designed in NZ

11

Summary of Contents for sicuro ISOFIX

Page 1: ...death read this owner s manual prior to installing and using this car seat Suitable for child from 9kg around 12 months to 36 kg 12 years Conforms to European ECE R44 04 in Group I II III as approved...

Page 2: ...hat you carefully read through this instruction manual before placing your child in this car seat We believe in long lasting relationships with our customers and we d love you to keep in touch You can...

Page 3: ...ING THE SEAT TO YOUR CAR 10 GROUP I 9 18KG INSTALLATION SECURING THE HARNESS 12 ADJUSTING THE HEIGHT OF THE HEAD REST SHOULDER BELT 14 GROUP II III 15 36KG BOOSTER SEAT 15 INSTALLATION REMOVING THE HA...

Page 4: ...t that your child can be released quickly in the event of an emergency This is an ISOFIX car seat and must only be used in a vehicle with an approved ISOFIX and tether strap system ALWAYS refer to you...

Page 5: ...it has been approved by Edwards Co Fit the harness firmly to the child A loose restraint or harness is DANGEROUS GENERAL WARNINGS designed in NZ 5 NOTICE 1 This is a Universal child restraint It is ap...

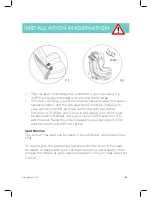
Page 6: ...p III 22 36kg your child must be secured to the seat using your car s 3 point seat belt F1 and the seat frame must be installed to your vehicle s ISOFIX anchors combined with top tether Seat Recline T...

Page 7: ...IMPORTANT always install this car seat into a forward facing passenger seat as indicated above A forward facing passenger seat faces towards the direction of the car s movement Never install this car...

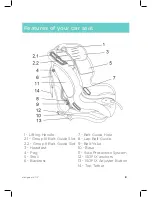
Page 8: ...Group III Belt Guide Slot 2 2 Group II Belt Guide Slot 3 Headrest 4 Peg 5 Shell 6 Backrest 7 Belt Guide Hole 8 Lap Belt Guide 9 Belt Yoke 10 Base 11 Side Protection System 12 ISOFIX anchors 13 ISOFIX...

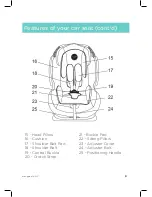
Page 9: ...ar seat cont d 15 Head Pillow 16 Cushion 17 Shoulder Belt Pad 18 Shoulder Belt 19 Central Buckle 20 Crotch Strap 21 Buckle Pad 22 Sitting Pillow 23 Adjuster Cover 24 Adjuster Belt 25 Positioning Handl...

Page 10: ...of vehicle s seat and match the ISOFIX anchors to the vehicle s anchoring point until you hear a CLICK 2 4 The ISOFIX connection indicator located on the ISOFIX anchor will change to GREEN This indica...

Page 11: ...hicle s tether anchor point Then tighten the strap as tight as possible 3 IMPORTANT this seat must always be installed with ISOFIX and tether strap This covers Group I II and III IMPORTANT refer to yo...

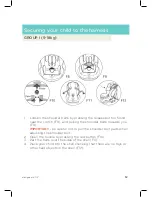
Page 12: ...elts towards you F9 IMPORTANT be careful not to pull the shoulder belt pads when adjusting the shoulder belt 2 Open the buckle by pressing the red button F10 3 Part the belts over the sides of the she...

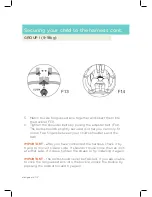
Page 13: ...o fingers between your child s shoulders and the belt IMPORTANT after you have connected the harness check it by trying to move it side to side It shouldn t move more than an inch at either side If it...

Page 14: ...r a CLICK There are four headrest positions 2 The correct height of the shoulder belts is attained when the belt disappears into the shell slightly above the shoulder of the child Ensure that the shou...

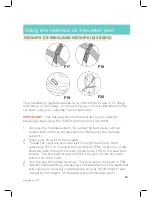
Page 15: ...otch strap see section Removing the harness system 2 Place your child into the car seat 3 Thread the vehicle s shoulder belt through the Group II belt guide slot F17 or Group III belt guide slot F18 o...

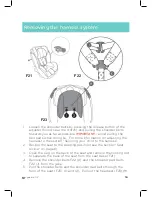
Page 16: ...the section Securing your child to the harness 2 Recline the seat to the sleeping position see the section Seat recline on page 6 3 Open the peg on the back of the seat and remove the holding rod to s...

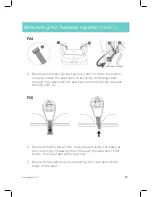
Page 17: ...l K and back around behind the seat through slot L Removing the harness system cont 2 Remove the buckle anchor clips located under the seat at the crotch by threading them through the seat slot F25 No...

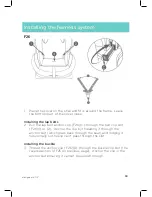
Page 18: ...e belt clip slot F26 1 or 2 Anchor the clip by threading it through the anchor slot which goes back through the seat and lodging it horizontally so the slip can t pass through the slot Installing the...

Page 19: ...the shell then OVER the metal bar fixed at the back of the seat F27 I 6 At the back of the seat attach to the belt ends to the belt yoke F28 K Make sure that the belts are flat and not twisted 7 Secur...

Page 20: ...well ventilated area away from direct sunlight which could damage or fade your car seat Store in a safe place when it is not being used Avoid placing heavy objects on top of it NEVER allow the seat to...

Page 21: ...mal use overloading general wear and tear child outgrowing the product not following instructions transportation damage including airline or freight damage poorly maintained product dropped goods negl...

Page 22: ...www edwardsandcobaby com...

Reviews: