Notes:
Avoid placing objects in front of the motion detector
Avoid installation near air conditioners/central heaters/high voltage systems
Avoid placing the motion detector head towards high movement areas
Clean the solar panel with a moist soft cloth at least once a year
Clean accumulated snow as soon as possible during the snowing season
Do not expose the light to fire/intense heat or immerse in water
Never look directly into the light or shine it into another person’s eyes
Contact Info: (877)579-3889, sales@eesgi.com, www.eleding.com
EE800WF series 022019 page 2
Solar-Power Building/Bus Stop Advertising/Security/Safety Wall Pack LED Illuminator
eLEDing
EE805W1F, EE810W2F & EE820W4F
Quick Set-up Reference
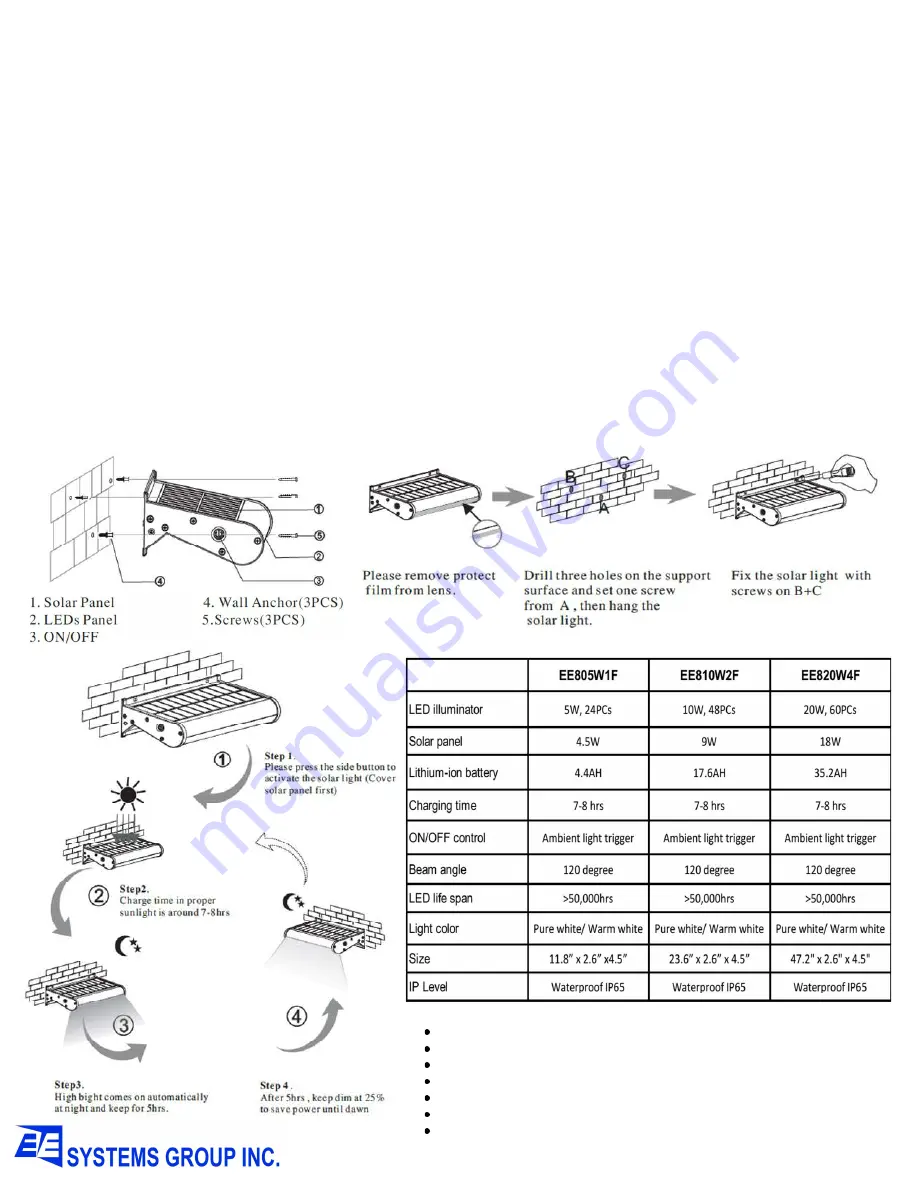
Initial Installation (Fig 1)
For wall-mounted, drill holes on desired locations, secure the light body with provided or by specified screws
(Fig 2)
for wood surfaces
or surfaces of concrete, and consultation from local contractor or experience technician/person is suggested for DIY projects.
Self-Contained Light Fixture and AUX Solar Panel Installation
An ideal installation area should be a flat and stable mounting surface that can ensure the maximum exposure to direct sunlight
without anything blocked it out. An average of 4 hours direct sunlight per day is necessary for dusk-to-dawn performance. The light will
automatically turn off when it detects low battery. This might happens after 3-4 cloudy days, but able to restore by self once sunny
weather gets back. For northern hemisphere installation, a south-facing installation is recommended and vice versa. East/west-facing
installations with good sunlight exposure also works well. Add an auxiliary Solar panel via built on DC input is the method for charging
enhancement to ensure all night long illuminating performance even during the critical weather condition or at location with charging
limitation. 8-15W/17Vmpp solar panel will be for EE810W2F and 15-30W/17Vmpp solar panel will be for EE820W4F.
Functionality Test & Activation (Fig.3)
Highly recommend to charge this light unit for 1-2 days on sunny days before setting it up. Press the RED color ON/OFF button for
1-2 seconds (momentary) to activate the light. If your testing is launched during the day, suggested the solar panel is fully covered
by a piece of cardboard to simulate the darkness condition.
True Dusk to Dawn Illuminating Profile (Fig.3):
During daylight hours, the direct sunlight will charge the battery through solar panel. Features with IPM, when the built-in photocell
senses the ambient light level is lower than 10 LUX (darkness environment), the light will automatically turn on with fixed maximum
brightness for the first 5 hours. After 5 hours, the light will switch to energy-saving mode by dimming down to fixed 25% of maximum
brightness for the rest of the night. When dawn comes, the light extinguishes when ambient light level starts to increase.
Fig. 2
Fig. 3
Specification
Fig. 1


