background image

TROUBLESHOOTING

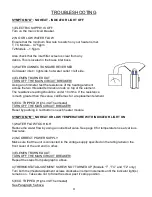
SYMPTOM “A”: NO HEAT - INDICATOR LIGHT OFF

1) ELECTRIC SUPPLY IS OFF
Turn on the main circuit breaker.

2) NO OR LOW WATER FLOW 
Ensure that the minimum flow rate to switch on your heater is met. 
T, TC Models – 0.75gpm
T2 Models – 1.5gpm

Also check that the inlet filter screen is clear from any
debris. This is located in the brass inlet boss.

3) WATER CONNECTIONS ARE REVERSED
Cold water inlet = right side, hot water outlet = left side.

4) ELEMENT BURNED OUT
TURN OFF THE  MAIN CIRCUIT BREAKER!
Using an ohmmeter test the resistance of the heating element
across the two threaded termination rods on top of the element.
The resistance reading should be under 10 ohms. If the resistance
is much greater than this value, call Eemax for a replacement element.

5) ECO TRIPPED (High Limit Thermostat)
TURN OFF THE MAIN CIRCUIT BREAKER!
Reset by pushing in red button on each heater module.

SYMPTOM “B”: NO HEAT OR LOW TEMPERATURE WITH INDICATOR LIGHT ON

1) WATER FLOW TOO HIGH
Reduce the water flow by using an outlet ball valve. See page 8 for temperature rise at various
flow rates.

2) INCORRECT POWER SUPPLY
Make sure that the unit is connected to the voltage supply specified on the rating label on the
front cover of the unit and no other.

3) ELEMENT BURNED OUT
TURN OFF THE MAIN CIRCUIT BREAKER!
Repeat the steps from paragraph 4 above.

4)THERMOSTAT ADJUSTMENT SCREW NOT TURNED UP (Models “T”, “TC” and “T2” only.)
Turn both thermostat adjustment screws clockwise in small increments until the indicator light(s)
remains on.  Take care not to force the screw past it’s stop position.  

5) ECO TRIPPED (High Limit Thermostat)
See Paragraph 5 above.

9

Summary of Contents for EX144 T2

Page 1: ...LL NOT OPERATE PROPERLY AND IT COULD CAUSE DEATH SERIOUS BODILY INJURY AND OR PROPERTY DAMAGE READ ALSO THE ENCLOSED WARRANTY CARD WARRANTY OF THIS WATER HEATER WILL DEPEND ON PROPER INSTALLATION AND OPERATION THE WARRANTY SHALL BE VOID IF THE DESIGN HAS BEEN ALTERED IN ANY WAY WHATSOEVER THE MANUFACTURER OF THIS HEATER WILL NOT BE LIABLE FOR ANY DAMAGES BECAUSE OF FAILURE TO COMPLY WITH THE INSTA...

Page 2: ...DJUSTMENT ALTERATION SERVICE OR MAINTENANCE CAN CAUSE DEATH SERIOUS BODILY INJURY OR PROPERTY DAMAGE REFER TO THIS MANUAL FOR ASSISTANCE OR CONSULT THE LOCAL ELECTRIC UTILITY FOR FURTHER INFORMATION FAILURE TO GROUND THE SYSTEM MAY RESULT IN DEATH OR SERIOUS INJURY WARNING WARNING WATER HEATERS EQUIPPED FOR ONE VOLTAGE ONLY THIS WATER HEATER IS EQUIPPED FOR ONE VOLTAGE TYPE ONLY CHECK THE RATING P...

Page 3: ...M 8 CLEARANCE ABOVE UNIT L N L N RELAY LUGS ELECTRICAL HOOK UP 240 208 V Outlet isolating valve ball valve leave open just enough to obtain adequate flow of hot water Figure 1 3 4 MOUNTING HOLES Two independent circuit breakers L 1 L2 L1 L2 RELAY LUGS ELECTRICAL HOOK UP 277 V ground 10 10 ...

Page 4: ...hand side Under NO circumstances can these be reversed 4 Leave a minimum of 8 above the unit for easy replacement of the element 5 The heater should be fixed to the wall using screws in the four mounting holes at each corner of the backplate NOTE The heater should be installed below the level of all hot water outlets serviced by this heater NOTE PRESSURE AND TEMPERATURE RELIEF VALVE These units ar...

Page 5: ...ves full flow ball valve type on both inlet and outlet pipes This allows unit to be isolated for maintenance purposes Fig 1 4 When all plumbing is complete fully check the system for water leaks at all the plumbing connections If a leak is present take corrective action If the leak is at a compression fitting slowly tighten the compression nut until it stops Fully open both inlet and outlet BALL V...

Page 6: ...n the backplate The live wires should be connected to the slots in the terminal block marked L1 and L2 The ground lead must be connected to the slot marked GND 277 models have neutral N slots GROUND MUST BE BROUGHT TO THE GROUND AT THE CIRCUIT BREAKER PANEL DANGER FAILURE TO GROUND THE SYSTEM MAY RESULT IN DEATH OR SERIOUS INJURY Units rated for 240 V can operate at 220 V or 208V with reduced outp...

Page 7: ...elements burning when energized Note Keep water flowing whilst carrying out the procedures outlined below GO TO APPROPRIATE SECTION FOR YOUR MODEL NOTE For the following sections the first unit is the right hand heating module and the second unit is the left hand heating module IV COMMISSIONING YOUR HEATER T MODELS a Switch on the power to the first unit The power indicator light should illuminate...

Page 8: ... T2 TC models try to adjust both temperature adjustment screws by about the same amount so that the lights pulse at the same rate If you have reduced the temperature considerably from the 140 F setting you could now open up the outlet ball valve slightly to achieve a higher rate of flow When the indicator light is on continuously the unit is emitting full power When it is pulsing the unit is modul...

Page 9: ... value call Eemax for a replacement element 5 ECO TRIPPED High Limit Thermostat TURN OFF THE MAIN CIRCUIT BREAKER Reset by pushing in red button on each heater module SYMPTOM B NO HEAT OR LOW TEMPERATURE WITH INDICATOR LIGHT ON 1 WATER FLOW TOO HIGH Reduce the water flow by using an outlet ball valve See page 8 for temperature rise at various flow rates 2 INCORRECT POWER SUPPLY Make sure that the ...

Page 10: ...78 RELAY P N EX255B 208 240V P N EX253B 277V REPLACEMENT HEATER CORE ASSEMBLY EX144 T2 TC P N EX770 7 5kW 240V EX190 T2 TC P N EX630 9 5kW 240V EX1608 T2 TC P N EX520 8 3kW 208V EX160 T2 TC P N EX960 8kW 277V EX200 T2 TC P N EX760 10kW 277V CONTROL BOARD HEATER CORE 7 Wire EX 100G 8 Wire EX 284 EEMAX REPLACEMENT PARTS DIAGRAM ...

Page 11: ...EL L1 BLK ELEMENT RING TRIAC GATE BLK POWER BLK L1 FROM RELAY LINE SIDE T C BLU T C BLU RELAY ORG TO ECO EL L2 N RED or WHT ELEMENT RING T C BLU 2 PIN CONNECTOR RELAY ORG TO RELAY COIL L1 POWER BLK FROM RELAY LINE SIDE L2 N POWER RED WHT FROM RELAY LINE SIDE CIRCUIT BOARD DIAGRAM 11 ...

Reviews: