background image

15 


BATTERY REPLACEMENT


The computer uses 1 AAA battery. If there is a problem with the display, try changing the battery 
first. The battery is located on the back of the computer.   
 
To replace the battery, please open the battery cover, remove the old battery, replace it with the 
new battery, then put the cover back. Make sure the (-) end of the battery goes to the spring end of 
the battery compartment.   


Summary of Contents for IC037

Page 1: ...CLING BIKE MODEL NO IC037 IMPORTANT Read all instructions carefully before using this product Save this manual for future reference EXERCISE EQUIPMENT QUESTIONS Contact customer service at service zoo...

Page 2: ......

Page 3: ...ult use only Keep children and pets away from the machine DO NOT leave children unattended in the same room with the equipment 4 Use the equipment on a solid flat level surface with a protective cover...

Page 4: ...3 EXPLODED DRAWING 1...

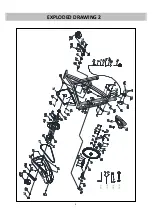
Page 5: ...4 EXPLODED DRAWING 2...

Page 6: ...M8 40 2 19 Left Crank 9 16 170 27 LH 1 56 Carriage Bolt GB T 12 1988 M8 42 4 20 Right Crank 9 16 170 27 1 57 Bolt GB T 70 1 2000 M8 45 1 21 Adjustment Knob 57 66 M16 1 5 2 58 Screw ST2 9 9 5 4 22L R...

Page 7: ...2 89 L R Nut 9 16 LH 2 79 Foam 23 29 465 2 90 Sensor Wire 850 1 80 Seat DD 2681 1 91 Nut GB T 41 2000 M8 2 81 Plastic Washer 20 10 1 3 2 92 Spanner S 10 13 1 82 Bushing 50 25 1 5 60 30 1 5 2 93 Univer...

Page 8: ...7 HARDWARE PACKAGE...

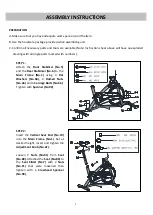
Page 9: ...numbers STEP 1 Attach the Front Stabilizer No 5 and the Rear Stabilizer No 6 to the Main Frame No 1 using 4 Flat Washers No 66 4 Domed Nuts No 44 and 4 Carriage Bolts No 56 Tighten with Spanner No 92...

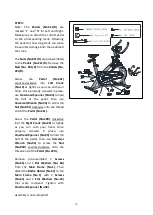
Page 10: ...Hexagon Spanner No 95 Note Make sure attach Computer Bracket No 84 on the upside 2 lock holes in Handlebar No 8 BATTERY INSTALLATION Open the battery cover from the back of Computer No 85 then put 1...

Page 11: ...o hold the bolt of the pedal then use Universal Wrench No 93 to screw the Nut No 89L clockwise onto the thread end of the Pedal No 22L Screw the Pedal No 22R clockwise into the Right Crank No 20 as ti...

Page 12: ...e the Brake Knob No 75 clockwise To decrease the tension turn the Brake Knob No 75 counter clockwise B Emergency Brake Function The Brake Knob No 75 is also the emergency brake Use this safety feature...

Page 13: ...usted re insert and tighten the Adjustment Knob No 21 to secure the Seat No 80 in place B To adjust the Seat No 80 forward and backward loosen the Adjustment Knob No 35 then slide the Seat Slider No 7...

Page 14: ...ilizers No 5 6 To adjust use the Crosshead Spanner No 94 to loosen the Nut No 45 by turning it clockwise With the Nut No 45 loosened rotate the Base Leveler No 34 until it sits level with the surface...

Page 15: ...o loosen Nut No 45 counter clockwise use Inner Hexagon Spanner No 95 to turn Bolt No 57 clockwise then tighten Nut No 45 clockwise with Spanner No 92 You can turn the Crank No 19 20 to see if the Belt...

Page 16: ...ry changing the battery first The battery is located on the back of the computer To replace the battery please open the battery cover remove the old battery replace it with the new battery then put th...

Page 17: ...the Handlebar No 8 Place one foot on the front base and tilt the bike towards you until the Transport Wheels No 76 on the front base touch the ground With the Transport Wheels No 76 on the ground you...

Page 18: ...creen CALORIE CAL Press the MODE key until the pointer lock on to CAL the monitor will display the calorie function on the screen SCAN Display changes according to the next diagram every 4 seconds Aut...

Page 19: ...18...

Page 20: ...19...

Reviews: