background image

ER15-4-1600 Quick Operation Manual for Industrial Robot

8

4. Before entering the safety fence, the teacher must turn the teaching switch on the
teach pendant to the manual position to prevent accidents caused by the control
cabinet mode switch being turned to automatic mode. Once the robot makes any
abnormal movement, immediately press the emergency stop switch and immediately
exit the robot working area from the preset retreat path.
5. Please install an emergency stop switch for the observer outside the safety fence
where the movement of the entire robot can be monitored. Once the robot moves
incorrectly, the observer must be able to press the switch very conveniently to stop
the robot immediately. In addition, if you need to restart the robot after an
emergency stop, please reset and restart manually outside the safety fence.
Demonstrators and observers must be specially trained and qualified personnel.
6. Please clearly indicate that the teaching work is in progress, so as to prevent people
from misusing any robot system devices through the control cabinet, operation panel,
and teaching pendant.
7. After completing the teaching work, before confirming the teaching movement
trajectory and teaching data, please clear all the people and obstacles left in the safety
fence and around the robot. After confirming that there are no people and obstacles
left in the safety fence, Please perform confirmation work outside the safety fence. At
this time, the speed of the robot should be less than or equal to the safe speed
(250mm/s) until the movement is confirmed to be normal.
8. If you need to restart the robot after an emergency stop, please reset and restart
manually outside the safety fence. At the same time, confirm all safety conditions and
confirm that there are no people and obstacles left around the robot or in the safety
fence.
9. During the teaching process, please confirm the movement range of the robot, and
it is forbidden to approach the bottom of the robot arm. To prevent the danger
caused by accidental operation, pay special attention to the prohibition of
approaching the robot arm when there is a workpiece in the robot's claws to prevent
the danger caused by accidental falling of the workpiece.
10. For safety, the maximum speed of the robot is limited to 250mm/s (safe operating
speed) in the teaching or inspection mode. However, when the operator verifies the
teaching data just after the completion of teaching or error recovery, please set the
check operation speed as low as possible.
11. During the teaching process, both the teaching operator and the supervisor must
always monitor the robot for abnormal movements, possible collisions and squeezing
points in the robot and its surroundings. At the same time, please confirm the safe
passage for the teaching operator for retreat in an emergency.
12. After the robot's motion teaching is completed, please set the robot's software
limit to a little bit outside the robot's teaching motion range. How to set the software
limit, please refer to the EFORT Industrial Robot Operation Manual

Summary of Contents for ER15-4-1600

Page 1: ...ER15 4 1600 Quick Operation Manual for Industrial Robot EFORT INTELLIGENT EQUIPMENT CO LTD HOT LINE Tel 86 400 0528877...

Page 2: ...around cause property damage This statement and the manual are the latest version as of this batch of products before leaving the factory Please follow the official website of www efort com cn for th...

Page 3: ...ing 7 1 3 6 Safety during automatic running 9 1 3 7 Safety during repairing 9 1 3 8 Safety during inspection and maintenance 11 Chapter 2 Transport and Installation 14 2 1 Overview 14 2 2 Basic descri...

Page 4: ...7 3 1 Power supply specifications 27 3 2 Connection 27 3 3 Introduction to External Emergency Stop 29 3 4 I O connection 30 3 4 1 Controller local IO definition 30 3 4 2 Controller local IO expansion...

Page 5: ...4 4 2 Notes on jog operation 39 4 4 3 Start jog operation 39 4 4 4 Joint coordinate system jog operation 40 4 4 5 Cartesian coordinate system jog operation 41 4 4 6 Tool coordinate system jog operatio...

Page 6: ...t system operator is reasonably designed and installed correctly Robot operators must be familiar with the operation and handling of industrial robots such as those described in the following applicab...

Page 7: ...cedures are properly applied 4 Carry out maintenance according to the maintenance requirements in this manual to keep the industrial robot clean and tidy 5 A suitable tool box should be prepared to su...

Page 8: ...not loose before operation 4 When using the sling to transfer the control cabinet please remove the teach pendant and its bracket to prevent the cables from hooking other equipment 5 Before transport...

Page 9: ...rm 4 Eliminate any areas where people may be trapped between fixed equipment and mobile equipment 5 Before connecting the power cable please confirm whether the voltage frequency and cable specificati...

Page 10: ...stem make sure that all operators and related personnel know that the robot has been activated before starting the robot 5 Before turning on the motor power starting teaching or automatic operation pl...

Page 11: ...repeatedly in about 2 to 3 cycles If a problem is found stop the robot immediately and make corrections After ensuring that there is no problem gradually increase the speed 50 70 100 and repeat the co...

Page 12: ...safety fence At this time the speed of the robot should be less than or equal to the safe speed 250mm s until the movement is confirmed to be normal 8 If you need to restart the robot after an emerge...

Page 13: ...ly resume operation 4 In automatic operation this situation will be extremely dangerous if the gripping force of the workpiece is insufficient the workpiece may be thrown off during the robot movement...

Page 14: ...the prescribed evacuation route 7 In addition to the emergency stop switch of the teach pendant in the operator s hand please install another emergency stop switch for the inspector outside the safet...

Page 15: ...obot 4 Before performing inspection and maintenance work please confirm that there is enough space around the robot to avoid interference with peripheral equipment At the same time set the peripheral...

Page 16: ...safety functions are the same as the original ones 11 Please use only the parts approved by EFORT In addition during inspection maintenance be sure to use the teaching mode and move the robot at the...

Page 17: ...circuit the positive and negative electrodes of the battery Do not discard used batteries in garbage that is incinerated landfilled or dumped on the ground When disposing of batteries please wrap them...

Page 18: ...ith the order If you find missing or wrong parts please contact the supplier in time Table 2 1 Robot packing list Unpacking list Name Model Quantity Unit Remarks Robot body ER15 4 1600 1 PC Control ca...

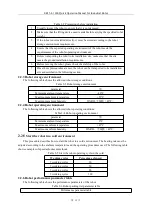
Page 19: ...shows the allowed robot storage conditions Table 2 3 Robot storage environment parameter Minimum ambient temperature 40 Maximum ambient temperature 55 Maximum ambient humidity 93 RH 40 2 2 4 Robot ope...

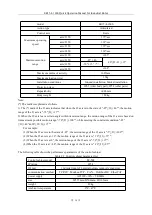
Page 20: ...2 axis is at a certain angle within its motion range the motion range of the J3 axis is based on its maximum possible motion range 70 J3 100 while meeting the constraint condition 85 J2 40 90 J2 J3 15...

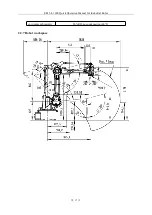
Page 21: ...ER15 4 1600 Quick Operation Manual for Industrial Robot 17 environment humidity 80 RH no condensation 40 2 2 7 Robot workspace...
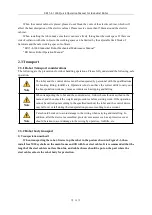
Page 22: ...eration Manual for Industrial Robot 18 Figure 2 1 Robot motion range diagram 2 2 8 Control cabinet working space Overall dimensions of ER15 4 1600 robot control cabinet unit mm Figure 2 2 Robot contro...
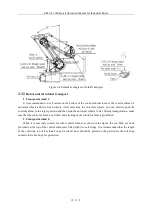
Page 23: ...ors who do not have the correct skills to carry out the transportation work may cause accidents such as tipping and falling Note When transporting the robot and the control device follow the method de...

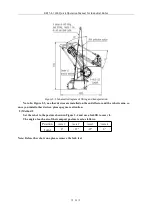
Page 24: ...d on the end effector and the robotic arm so once you install other devices please pay more attention 2 Method 2 Set the robot to the posture shown in Figure 2 4 and use a forklift to carry it The ang...

Page 25: ...trol cabinet to the target position and then lock the universal wheels to fix During transportation make sure that the control cabinet is not tilted and stacking of the control cabinet is prohibited 2...

Page 26: ...ccur 3 When choosing the upside down or wall hanging installation method it should be fixed on the ceiling and wall with sufficient strength and the treatment plan to prevent falling should also be co...

Page 27: ...of the robot installation should be less than 0 5mm The size of the base mounting interface is shown in Figure 2 6 Figure 2 6 Robot base dimensions 2 4 3 Ground installation Ground installation requi...

Page 28: ...e M16 chemical bolts to fix the bottom plate on the ground The base of the robot is firmly fixed on the bottom plate with M16 hexagon socket screws of strength grade 12 9 through the four mounting hol...

Page 29: ...perature 0 45 5 45 Relative humidity 40 90 45 Atmospheric pressure 86 106 kPa vibration Less than 0 5G 4 9m s2 other No corrosive gas Note Note For the robot to be used if there is strong vibration a...

Page 30: ...e 2 8 Dimension drawing of end load mounting flange 2 Other auxiliary interfaces Figure 2 9 Dimension drawing of external parts installed on the boom Figure 2 10 Dimension drawing of external parts in...

Page 31: ...bles signal cables and grounding cables After fixing the robot control cabinet and the robot body to the base connect the cables to the left side of the electric cabinet and the connector part on the...

Page 32: ...he control cabinet and used at any time Table 3 2 Robot cable Cable category description Robot power brake line The driving power is transmitted from the driving device in the control cabinet to the r...

Page 33: ...ept the manual brake release circuit is disconnected from the robot You must perform the restore procedure which is to reset the emergency stop button and clear the alarm to resume normal operation Th...

Page 34: ...rcuit bar at the X6 terminal block in the emergency stop circuit and connect the external emergency stop button in series to the circuit The user can wire as needed recommended wire diameter above 0 5...

Page 35: ...on 1 Emergency stop alarm 1 2 Servo enable 3 Servo confirmation 4 Teach pendant hot swap 5 High temperature alarm 6 Emergency stop alarm 2 7 Security door grating 8 Custom WATCH DOG WATCH DOG Connecti...

Page 36: ...4 16DI 16DO modules input 24 VDC output 24 V DC 500mA Table 3 5 Local IO module extension list Model Icon Qty Remarks Bus coupler 1 Bus base module n Prepare according to expansion requirements n 4 IO...

Page 37: ...n the bus coupler and bus base module respectively 4 Connect the power supply a1 a2 on the IO module is connected to the 24V positive pole b1 b2 is connected to the 24V negative pole 3 4 2 Controller...

Page 38: ...ER15 4 1600 Industrial robot quick user manual 34 Table 3 7 Connection mode of remote IO module Controller Ethernet switch Remote IO module EtherCAT coupler EtherCAT EtherCAT...

Page 39: ...programming control of robot motion setting of IO interactive signals etc Figure 4 1 EFORT Teach Pendant 4 1 2 Ribbon and interface Figure 4 2 EFORT teach pendant Table 4 1 Functions of each part of...

Page 40: ...mode Figure 4 3 Right button Table 4 3 Right button No Name No Name 1 Three color light 11 Axis 4 movement 2 Start 12 Axis 5 movement 3 time out 13 Axis 5 movement 4 Axis 1 movement 14 Axis 6 movemen...

Page 41: ...mode continuous single step entry single step skip etc 8 speed 4 Multi function key F4 9 Speed 5 Turn page 10 Servo power on 4 1 3 How to hold the teaching pendant When holding the teach pendant with...

Page 42: ...The C30 operating system uses the following four coordinate systems according to different reference objects 1 Industrial robot joint coordinate system 2 Industrial robot Cartesian coordinate system...

Page 43: ...mode After the servo is enabled you need to set the robot coordinate system type and movement rate and then perform the jog operation Jog operation is divided into continuous jog and incremental jog 1...

Page 44: ...tching sequence is as follows joint coordinate system Cartesian coordinate system tool coordinate system user coordinate system and the switching result is displayed in the status bar of the teach pen...

Page 45: ...he figure below to adjust the corresponding joint axis of the industrial robot Movement angle Figure 4 9 Teach pendant hand press and right function key 4 4 5 Cartesian coordinate system jog operation...

Page 46: ...system jog operation Figure 4 12 Robot user coordinate system jog As shown in Figure 4 12 switch the coordinate system to XXX click the corresponding and buttons on the right side of the teach pendan...

Page 47: ...4 13 correspondingly in manual low speed mode the speed range can be set to 1 20 Figure 4 13 Robot acceleration and deceleration 4 4 9 Jog slow motion Select the manual full speed mode and the global...

Page 48: ...f 15 degrees 4 5 Shut down and power off 1 On holidays or holidays if the robot needs to be shut down and powered off the operation steps are as follows 2 After the robot has finished running the curr...

Page 49: ...ecifications external dimensions etc are subject to change without modification without notice Technical data and illustrations are for reference only and the right to change is reserved EFORT INTELLI...

Reviews: