background image

Quick Operation Manual for ER3-600 Industrial Robot (EC2-S electric cabinet)

21

3.2 Robot Power Cable, Signal Cable and Ground Wire

A standard delivery should include the robot power cable, signal cable and ground wire cables and the

connection between the robot body and the control cabinet can be completed upon request.

Cable Type

Remarks

Robot power cable

Transfer the driving power from the driving device in the control cabinet to
the robot motor.

Robot signal cable

Transfer the data from the encoder to the serial measurement circuit of the
driver.

Robot ground wire cable

Connect the robot body and the control cabinet.

3.3 Definition of Controller Local IO

Table 3-1 Output Ports Description

Output

IO Sequence of Teach Pendant

External Terminal Sequence

Remarks

DO0

\

system occupied

DO1

\

system occupied

DO2

\

Servo confirmed

system

occupied

DO3

\

system occupied

DO4

\

system occupied

DO5

\

system occupied

DO6

\

system occupied

DO7

\

system occupied

DO8

27

user-defined

DO9

28

user-defined

DO10

29

user-defined

DO11

30

user-defined

DO12

31

user-defined

DO13

32

user-defined

DO14

33

user-defined

DO15

34

user-defined

DO16

35

user-defined

DO17

36

user-defined

DO18

37

user-defined

DO19

38

user-defined

DO20

39

user-defined

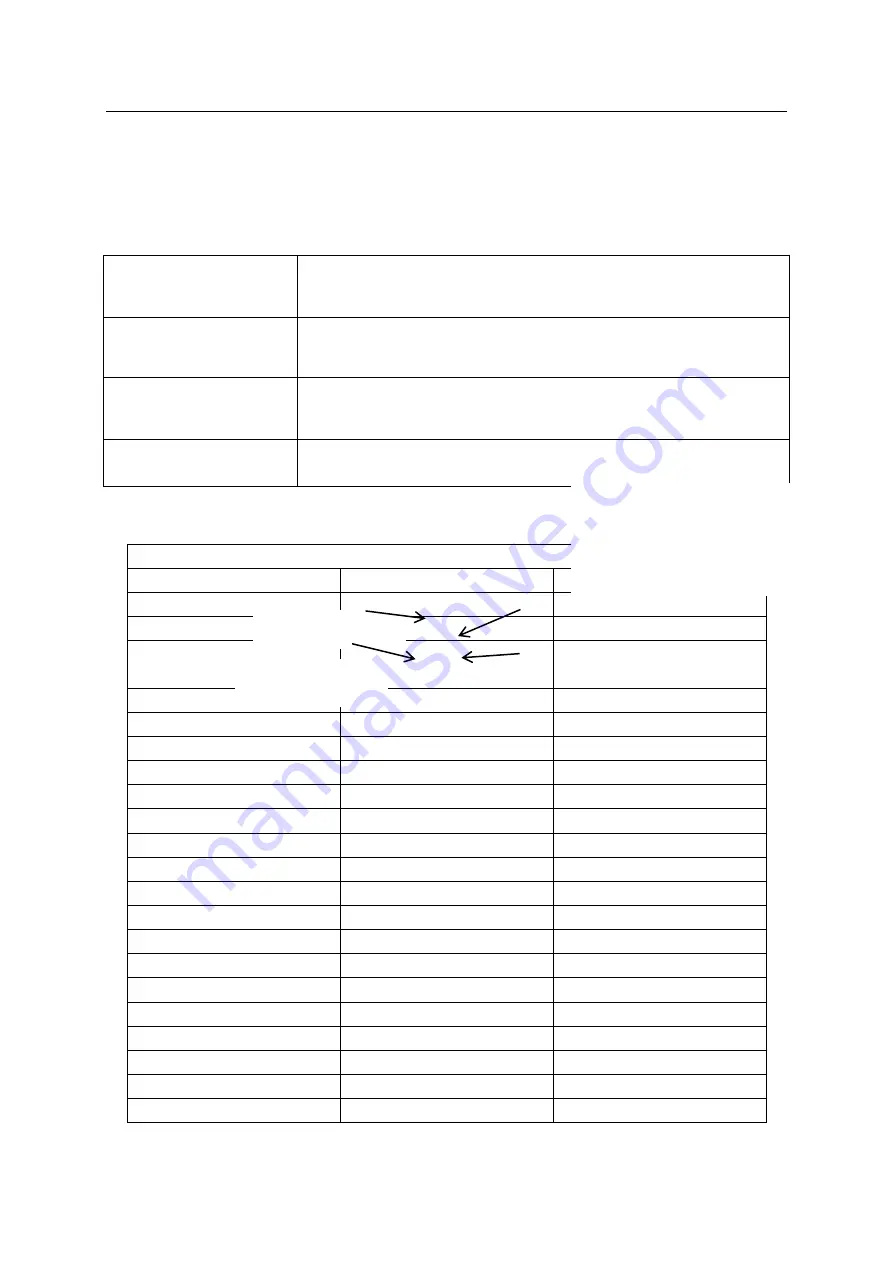
X20 power circular socket

X30encoder signal cable circular socket

PE ground wiring screw

Cable glands*4

Reserved ports *2

Summary of Contents for ER3-600

Page 1: ...ER3 600 Quick Operation Manual for Industrial Robot EC2 S Electric Cabinet EFORT Intelligent Equipment Co Ltd Service Line Tel 86 400 0528877...

Page 2: ......

Page 3: ...he manual may result in physical damage or property loss The statement and instruction manual is the latest version for ER3 600 series More updates can be found at www efort com cn This manual only se...

Page 4: ......

Page 5: ...ronment 5 2 2 5 Starting the Robot in a Low Temperature 6 2 2 6 Robot Performance Parameters 7 2 2 7 Robot Motion Type 8 2 2 8 Control Cabinet Position 8 2 3 Handling the Robot 11 2 3 1 Precautions 11...

Page 6: ...figuration 27 3 5 3 Function IO Configuration 28 3 5 4 Analog IO Configuration 37 3 6 Introduction to Emergency Stop 39 3 6 1 Emergency Stop 40 Chapter Four Quick Start 41 4 1 Teach Pendant 41 4 1 1 A...

Page 7: ...ions and to make sure that the necessary safety protection equipment is reasonably designed and correctly installed An operator should get familiarized with the operation procedures described in the f...

Page 8: ...moved in case of maintenance and the standard maintenance protocols must be followed to ensure the safety of the robot Mandatory Measures 1 Ensure that nobody is in the dangerous areas before booting...

Page 9: ...S electric cabinet 3 Warning 1 The release of the gravity braking system might lead to falling 2 Danger might occur when a repairer performs a regular maintenance for the safety protection equipment...

Page 10: ...packing remains intact or not before unpacking 2 Please check after unpacking whether all the accessories are complete and whether they match with the model information on the order list Contact the s...

Page 11: ...nsure that the lifting equipment is suitable to carry the robot 3 Store the robot in a required environment if it is not installed 4 Ensure the expected working environment meets the standard requirem...

Page 12: ...in low temperature An operator needs to adjust the heating rate based on the environment temperature and the running programs The following table describes the mapping relations between the working cy...

Page 13: ...ts Expansion Supported Communicatio n Type TCP IP Modbus TCP CAN open ProfibusDP EtherCAT Power 220V 10 50 60Hz Size W522mm D430mm H247mm Weight 20kg Environment Temperature 0 45 Robot Performance Par...

Page 14: ...e 40 2 2 7 Robot Motion Type Fig 2 1 Motion Space of ER3 600 Robot Note Fig 2 1 shows the theoretical maximum motion space of ER10 1600 robot which might be affected by the way the robot is installed...

Page 15: ...Quick Operation Manual for ER3 600 Industrial Robot EC2 S electric cabinet 9 Horizontal Installation Air inlet Wind direction Air outlet...

Page 16: ...ed under any circumstance and a minimum separation space of 150 mm around the cabinet should be guaranteed in order to maximize the heating radiator efficiency Ensure that the robot can move freely wi...

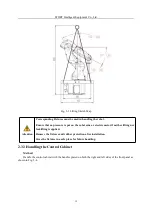
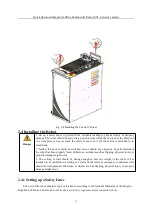
Page 17: ...ontrol cabinet Besides the cables should be covered by a shield to prevent from accidental damage 2 3 2 Handling the Robot Body Method Position the robot as shown in Fig 2 3 Lift the robot body from i...

Page 18: ...on the robot arm or electric motor if neither lifting nor forklifting is applied Remove the fixtures and rubber protection after installation Store the fixtures in a safe place for future handling 2...

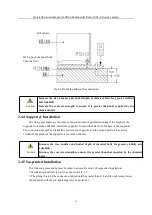
Page 19: ...r should any operation be performed until the robot has been properly fixed Otherwise accidents such as flipping physical injury or property damage might occur 3 The ceiling or wall should be strong e...

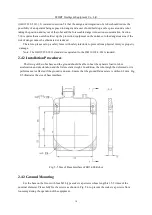
Page 20: ...ury or property damage Note The GB11291 2 2013 standard is equivalent to the ISO 10218 2 2011 standard 2 4 2 Installation Procedures The fixing of the robot base and the ground should be able to bear...

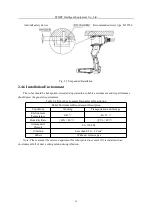
Page 21: ...ied depth of chemical bolts for greater stability and reliability Increase the concrete strength to ensure it is greater than that required by the chemical bolts 2 4 5 Suspended Installation The follo...

Page 22: ...ement Description Robot Environment Requirement Description Conditions Working Transportation and Storage Environment Temperature 0 45 40 55 Humidity Rate 80 40 93 40 Atmospheric Pressure 86 106 kPa V...

Page 23: ...lange Interface Fig 2 8 End Flange Connection Interface Dimension Interface Type Illustration Remarks End flange Interface Fig 2 8 End effector connection interface dimension Air line and IO signal ca...

Page 24: ...terfaces Fig 2 9 Air line and signal cable interface Air inlet 1 connected by a 1 4 pipe thread Air inlet 2 connected by a 1 4 pipe thread Inner air line Air outlet 1 Connected by a M5 type of thread...

Page 25: ...electric cabinet 19 Fig 2 10 Signal Cable Interface Definition Forearm end Wire ID IO function plug 1 1 EC2A DI168 2 2 EC2A DI169 3 3 EC2A DI170 4 4 EC2A DI171 5 5 EC2A DI172 6 6 EC2A DI173 7 7 EC2A D...

Page 26: ...ables in a circle when the excess part is longer than 10 meters otherwise the cable temperature might increase dramatically when the robot is performing a certain task which might damage the cable coa...

Page 27: ...e cable Connect the robot body and the control cabinet 3 3 Definition of Controller Local IO Table 3 1 Output Ports Description Output IO Sequence of Teach Pendant External Terminal Sequence Remarks D...

Page 28: ...the EFORT service team Table 3 2 Input Ports Description Input IO Sequence of Teach Pendant External Terminal Sequence Remarks DI0 E stop 1 system occupied DI1 Servo enabled system occupied DI2 Servo...

Page 29: ...ed and occupied by the system except for those labeled by user defined The PIN number 52 and 53 of IO input can be used for the input signal of safety door An emergency stop of the robot occurs after...

Page 30: ...DC voltage and output voltage is 24 V and the output current is 500 mA Table 3 4 Expandable Local IO Modules List Type Demonstration Quantity Remarks Bus coupler 1 Bus basic module n Expand when in n...

Page 31: ...s coupler and mount the I O module on the bus basic module 3 4 2 Remote IO Module Expansion The remote IO module expansion complies with the EtherCAT bus communication protocols The RJ45 type interfac...

Page 32: ...3 5 1 IO Module Update Table 3 6 IO Module Update Procedures Procedures Demonstration Remarks 1 The teach pendant pops up an alarm message if the controller s IO number does not match the preset numbe...

Page 33: ...edures Demonstration Remarks 1 Enter the Remote IO Configuratio n page Click on IO setting on the teach pendant and choose Adapt to remote IO configuration 2 Configure the remote IO module Type in 197...

Page 34: ...l output occupying1 I16 register space AM600 0032XXX 32 bit digital signal output occupying 2 I16 register spaces AM600 0016END 16 bit digital signal input occupying 1 I16 register space AM600 0032END...

Page 35: ...he setting page 3 Enter the IO setting page The configuration page includes 7 options namely Common function Area monitor Auxiliary axis Advanced pallet Punch Arc welding and Program reserve respectiv...

Page 36: ...refreshed while IO is being edited Click to save the configuration to file Click on Exit to return to the setting page Instructions for Function IO Configuration Input Interface 1 Input Description C...

Page 37: ...Auto mode 8 Restart Return to the 1st line of the current program Pulse Effective in Auto mode 9 Loader Load the programs by the sequence number The sequence number of programs 1 to 4 is calculated b...

Page 38: ...el Effective in Manual Auto mode 4 A1 occupied input A2 occupied input A3 occupied input A4 occupied input Area occupied input signals for areas 1 4 The robot stops immediately upon receiving an area...

Page 39: ...n Auto Manual mode 6 Upper end of current robot The upper end of the current robot High and low level Effective in Auto Manual mode 7 Press emergency stop E stop signal for the press High and low leve...

Page 40: ...iece in the fixture of the conveyor belt detected Confirm that there is a work piece in the fixture of the conveyor belt High and low level Effective in Auto mode Advanced Palletizing No Description R...

Page 41: ...iption Remarks Signal Type Operation Mode 1 Servo status Detect the current servo status high and low level Effective in Manual Auto mode 2 Run status Detect running status of the current program high...

Page 42: ...unching a work piece high and low level Effective in Auto mode 6 Press E stop Robot E stop high and low level Effective in Manual and Auto mode 7 Air pressure released in vacuum sucker 1 Vacuum sucker...

Page 43: ...ow level Effective in Manual and Auto mode 2 IO module address The actual IO port number of the signal needs to be configured If it is not configured it will display 1 The IO occupied by the system ca...

Page 44: ...ration hardware does not exit Otherwise users can enter the configuration page which displays the IO module type and the previously conFig d channel type 3 Configure the channel parameters for analog...

Page 45: ...ally The following effects can be achieved through system configuration E stop type 0 Stop the current operation immediately through cutting off the motor power E stop type 1 Stop the current operatio...

Page 46: ...STOP1 AP 6 STOP1 AM 7 STOP1 BP 8 STOP1 BM Note Both terminals 1 and 2 and terminals 3 and 4 are two circuit pairs for external E stop Both terminals 5 and 6 and terminals 7 and 8 are two circuit pair...

Page 47: ...a robot through the teach pendant such as manual jogging programed jogging and IO configuration etc Fig 4 1 Teach Pendant Table 4 1 Parameters of Teach Pendant No Item Parameters 1 Display size TFT 8...

Page 48: ...Membrane panel 3 EFFORT LOGO 2 3 LCD Display Used for interactive operations 4 Membrane panel 2 Equipped with 10 keys 5 E stop Double circuit E stop switch 6 Mode Switch Three section mode switch 7 Me...

Page 49: ...em No Item 1 Three colored LED 11 J4 Movement 2 Start 12 J5 Movement 3 Pause 13 J5 Movement 4 J1 Movement 14 J6 Movement 5 J1 Movement 15 J6 Movement 6 J2 Movement 16 Step BWD 7 J2 Movement 17 Step FW...

Page 50: ...F3 Multifunctional Key Program mode Continuous Step IN or Step Over 8 Speed 4 F4 Multifunctional key 9 Speed 5 Flip 10 Servo on 4 1 3 How to Hold a Teach Pendant Hold the teach pendant with the left h...

Page 51: ...ing 4 3 1 What is Jogging Jogging is performed under the Manual S mode through the function keys or on the right side of the teach pendant When the servo is on an operator needs to select the coordina...

Page 52: ...h pendant Check the jogging global velocity and the chosen coordinate system before turning on the servo 4 3 3 Start Jogging Choose the user type of Administrator and log on to the system Select Posit...

Page 53: ...tion Keys Please refer to ER Series Robot Operation Manual for detailed programing instructions of ER3 600 industrial robot 4 4 Power Off The procedures for turning off the main power are as follows 1...

Page 54: ...EFORT Intelligent Equipment Co Ltd 48 Fig 4 10 Main Power Switch...

Page 55: ...if its E stop button has been reset 3 Check whether the E stop button on the user defined control panel has been reset 4 Please contact the service professionals if the fault still exists The E stop b...

Page 56: ...rking or not 2 Check if the relevant cables are intact or not 3 Check if the short circuit plug of teach pendant is properly connected and locked Please contact the service professionals if the fault...

Page 57: ...ifications and external dimensions of this product are subject to change without prior notice The technical data and illustrations are for reference only and we reserve the right to change them EFORT...

Reviews: