EG4xxx Owner’s Manual
3
COMMISSIONING
10. Label the newly installed breakers as “
eGauge Disconnect
” so the cus-
tomer can readily find them if it becomes necessary to power-cycle or turn
off the eGauge device for any reason.
IMPORTANT:
Labeling the breaker(s) is essential. Do not skip that step.
Occasionally, it may be necessary to power-cycle the device. The breaker(s)
provide the only safe way to do that, so for safety-reasons, it is important that
the end-customer is able to identify the eGauge breaker(s) without having to
open any enclosures.
3
Commissioning
After installation, it is essential to verify that the device is operating properly and
measuring the expected quantities. Each device ships with a default configuration
that may or may not match your installation situation. In general, it is therefore
necessary to adjust the settings to match your situation. Please see the Configura-
tion Guide for details (available at
http://kb.egauge.net/
).
For revenue-grade accuracy compliance, the eGauge must be paired with revenue-
grade CTs tested and supported by eGauge. Please contact eGauge Systems for
details.
Use a laptop or another computer to connect to the device’s built-in web-server
(see next section). Then, as described in the Configuration Guide,
Tools
→
Chan-
nel Checker
can be used to confirm that:
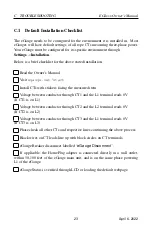
1. All voltages have the expected values (use voltage meter to verify).
2. All CTs report the expected currents (use clamp-on current meter to verify).
3. CTs are indeed installed on the phases set under
Settings
→
Installation
.
The voltage between the wire that the CT is clamped onto and the power-
plug pin (L1-L3) that corresponds to the phase it is configured for should
be zero Volts.
4. All reported power values have expected polarity and power-factors. As a
general rule, eGauge convention requires that power coming into the site
shows as positive values and power being consumed at or diverted from the
site shows as negative values.
April 6, 2022
14


