background image

19

18

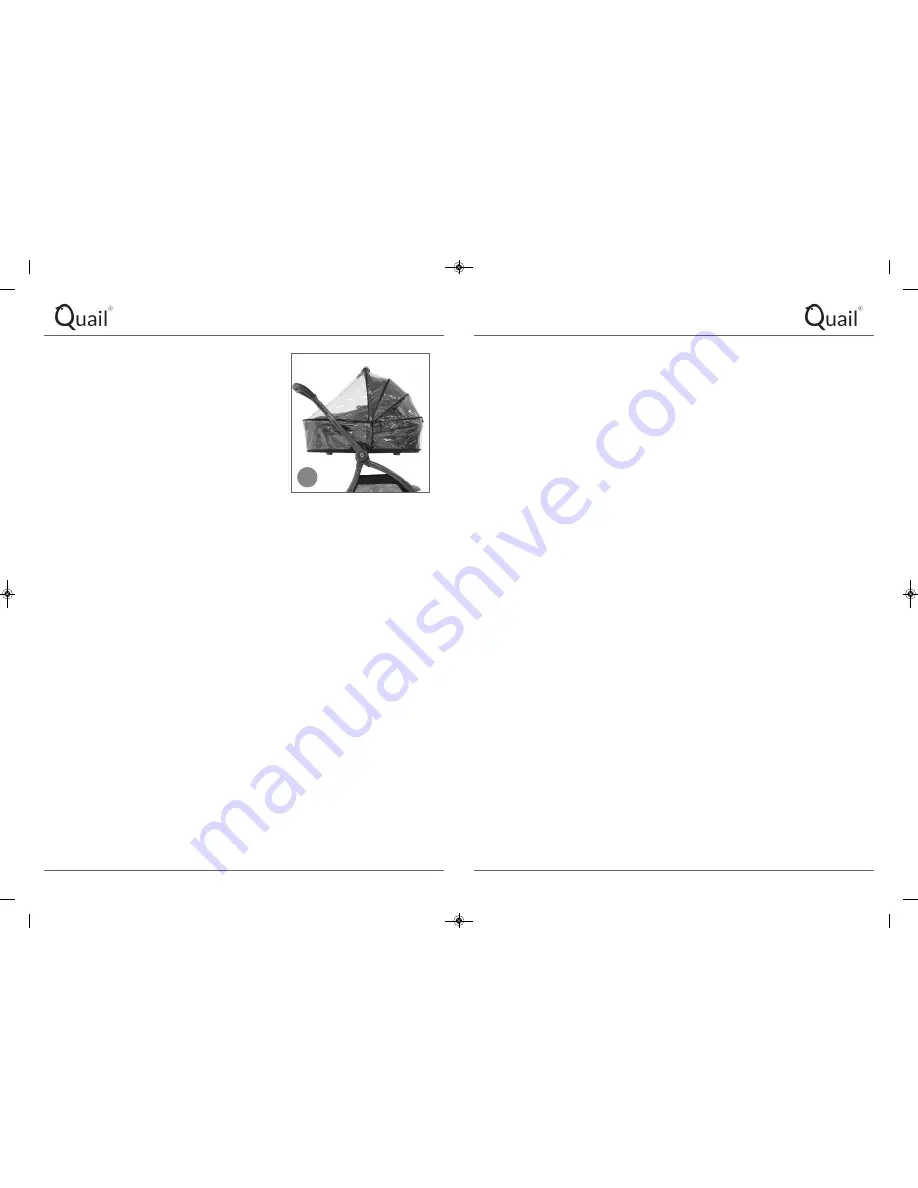
23. Fitting the carrycot rain cover.  

The carrycot hood must be fully extended to
support the rain cover. Place the rain cover over
the carrycot and secure the side panels (left and
right) using the Velcro tabs. 

WARNING: Never leave rain covers, hoods,
aprons and baby-nests etc on or over the stroller
indoors or in a hot atmosphere or near a heat
source; your child may overheat.

IMPORTANT.

Only use replacement parts supplied or approved by the
manufacturer.

Do not place the carry cot near an open fire or other source of
strong heat.

The handles and the bottom of carry cot should be inspected
regularly for signs of damage and wear.

Before carrying or lifting, make sure that the handle(s) is (are) in
the correct position of use.

The head of the child in the carry cot should never be lower than
the body of the child.

Do not add another mattress on the mattress provided or
recommended by the manufacturers.

Care and Maintenance.

•  Regularly check screws, rivets, bolts and fastenings to ensure they are locked tight and 

secure. Replace any parts in an inferior condition. When using this product during the 
winter, by the sea or off-road it is important to clean using clean fresh water and dry 
thoroughly. Salt water and salt and grit from the roads will corrode metal parts unless 
removed. 

•  Check on a regular basis that all chassis locking devices are working correctly. 

•  If any part of the product is damaged, contact your local egg/quail retailer 

immediately. 

•  Do not expose the product to excessive sunlight for extended periods of time, even 

normal exposure to sunlight may cause change to the colour of the fabrics. 

•  Take care not to tear fabrics when transporting the product. 

•  Light oil or silicone spray can be used to lubricate moving parts.  Periodically remove 

the rear wheels; clean; lubricate and replace. 

•  Ensure zips are either fully open or closed to prevent damage. 

•  Always use the rain cover in inclement weather. 

•  Do not place items on top of the hood/canopy, it could damage the fabrics or render 

the product unsafe. 

•  Any load attached to the handle and/or on the back of the backrest and/or on the sides

of the vehicle will affect the stability of the vehicle. 

•  Tyres can leave marks on some surfaces such as vinyl flooring and carpet. 

•  Fabrics should be cleaned in accordance to the care labels. 

•  Do not place fabrics in a washing machine, hand wash or sponge clean only using a 

mild detergent and warm water (30

C). 

23

Quail Instruction Manual Dec 2017 v1_Layout 1  22/12/2017  12:12  Page 18

Summary of Contents for QUAIL

Page 1: ...Instruction Manual Quail Instruction Manual Dec 2017 v1_Layout 1 22 12 2017 12 12 Page 1 ...

Page 2: ...sleep then it should be placed in a suitable pram body cot or bed IMPORTANT Read these instructions carefully before use and keep for future reference Important Safety Information This vehicle is intended for children from birth to a maximum of 22kg Age and weight usage Pram body carrycot 0 to 9kg Car seat 0 to 13kg follow manufacturer s guidelines Seat unit 0 to 22kg Ride on board platform max 20...

Page 3: ... unlocking the front swivel wheels Rotate the barrel shaped collar at the top of the front wheel unit left or right to lock or unlock the swivel wheels When locked the front wheels will not be able to swivel and this may help when travelling over uneven surfaces e g cobblestones 3 Fitting Removing the rear wheels Press and hold the button in the centre of the rear wheel and push the wheel into the...

Page 4: ...st CAUTION The chassis cannot be folded with the swivel front wheels locked Please also ensure that the wheels are reverse pointing as if you had been pulling the vehicle backwards 4d While supporting the seat back rotate the seat base down from the seat back The seat base will rotate until it reaches its stop position 4e The seat back can then be rotated backwards away from the seat base until it...

Page 5: ...your thumb on the lever Rotate the seat unit backwards with your left hand so that it is resting against your forearms and position your left hand over the other central hub release lever 6 Operating the parking brake Press down on the pedal to engage the parking brake Press down and release to disengage the parking brake WARNING Never leave the vehicle without first fully engaging the parking bra...

Page 6: ...h both levers with your thumbs and lift the seat up and off the chassis to detach it 9c To fit the seat unit to the chassis position the folded seat unit above the unfolded chassis align the central hubs on the seat unit with the central hubs on the chassis and lower the seat unit until it clicks and locks into position Unfold the seat base to engage the seat locks and then fold the back of the se...

Page 7: ...wn to the position that best suits your child Replace the magnetic seat back cover Further adjust the strap lengths to suit your child using the buckles on the harness WARNING To avoid serious injury always use the 5 point safety harness Important Always ensure the parking brake is engaged when seating or removing children from the vehicle 11 Adjusting the hood canopy height position Remove the ma...

Page 8: ... into the left and right sides also marked L and R of the chassis central hub until they click and lock in position 15 Removing the car seat adaptors Use your thumb to push the lever located just above the chassis central hub on the car seat adaptor and lift the adaptor up and away from the chassis central hub Repeat this process for the other adaptor 16 Folding the chassis with the car seat adapt...

Page 9: ...assis 16 Section 4 Carrycot 18 Assembling the carrycot Remove the apron and mattress to gain access to the stay bars in the bottom of the carrycot Using the webbing tabs pull the stay bars into the clips on the baseboard until you hear them click into place Replace the lining and the mattress refit the apron Important Ensure that the stay bars are fully engaged before using the carrycot 19 Fitting...

Page 10: ...ortant to clean using clean fresh water and dry thoroughly Salt water and salt and grit from the roads will corrode metal parts unless removed Check on a regular basis that all chassis locking devices are working correctly If any part of the product is damaged contact your local egg quail retailer immediately Do not expose the product to excessive sunlight for extended periods of time even normal ...

Page 11: ...and that this product is free from defects in workmanship and material at the time of purchase During the production process this product has gone through rigorous quality checks Despite our efforts if this product does show a manufacturing or material defect within the 24 months warranty period for the chassis and seat frames and 6 months for carrycot seat fabrics and PVC rain cover we will compl...

Page 12: ...23 22 Notes Notes Quail Instruction Manual Dec 2017 v1_Layout 1 22 12 2017 12 12 Page 22 ...

Page 13: ...harles Street Sileby Leicestershire LE12 7RJ T 01509 816444 E info eggstroller com eggstroller com BabyStyle UK Ltd RWH1106 15122017v1 Quail Instruction Manual Dec 2017 v1_Layout 1 22 12 2017 12 12 Page 24 ...

Reviews: