background image


3.2 Technical data 


Rated voltage:  

230 V, 115 V 

Frequency:    

230 V: AC 50 Hz / 60 Hz   –   115 V: 60 Hz 

Dimensions:    

315 x 320 x 300 mm 

Weight:  


17.5 kg 


3.3 Spare parts and equipment


1 Liter coupling kit   


Art. No.: 54505 

5 Liter coupling kit   


Art. No.: 54553 

Support for 5 Liter canister   


Art. No.: 54504 

Material Reservoir (2 pcs. à 1.3 L.)  

Art. No.: 54552 

Mixing canulas (50 pcs.)   


Art. No.: 25151 

Mixing canulas (100 pcs.)   


Art. No.: 25152 


3.4 Set up/Connecting the unit


The egger ESG 2 corresponds to the current technical standard and is in accor-
dance with the safety regulations. Nevertheless, you have to observe carefully the 
safety regulations which are the following: 

Only qualified persons are to work on the device. 
Observe the current safety regulations. 
Only work on a device which is in perfect technical condition. 
Observe the manual. 
Set up the device horizontally and bring it in a perfect position. 

Please make sure that the device has a solid base. 
Check if the device is in technical perfect condition especially the main plug. 


4. Operation 


4.1 Operation and controlling elements 


Main plug with controlling lamp 

Place: Front plate of the device 
Function: The plug supplies the device with electric power. The additional green 
lamp shows that the device is switched on. 


Push-button with additional lamp 

Place: Front plate of the device 
Function: By pressing the button the mixing process is started. Additionally, in pressed 
condition an orange control lamp is activated. 


Mixing head for fixing the mixing canula 

Place: On side of device 

Function: Receiving holder for the mixing canula 


Coupling plug for the components A and B 

Place: Reverse side of the device. 

Function: Coupler plug for fixing the coupling of the material 


Page 9 of 16 

Summary of Contents for ESG 2

Page 1: ...eitsbewusst arbeiten 3 Installation 3 1 Lieferumfang 3 2 Leistungsmerkmale 3 3 Ersatzteile Zubeh r 4 Bedienung 4 1 Bedien und Kontrollelemente 5 Inbetriebnahme 5 1 Bef llen des Ger tes 5 2 Flaschen Ka...

Page 2: ...leitung lesen und bei even tuellen Unklarheiten beim Hersteller r ckfragen Das Ger t nur an zugelassene Steckdosen anschlie en siehe Leistungsmerkmale Abschnitt 3 2 Ger t nur an einem trockenen Arbeit...

Page 3: ...hkan len S 50 System 40 Stk Art Nr 25151 Mischkan len S 50 System100 Stk Art Nr 25152 3 4 Ger t aufstellen und anschlie en Das egger ESG 2 entspricht dem aktuellen Stand der Technik und den anerkannte...

Page 4: ...chalter Ort Linke Seite des Ger tes Funktion Durch das Dr cken wird der Mischvorgang gestartet 5 Inbetriebnahme 5 1 Vorbereitung der Silikonbeh ltnisse Es k nnen Materialreservoirs 1 Liter Flaschen od...

Page 5: ...am Mischkopf befestigen Das egger ESG 2 ist nun betriebsbereit Negativform unter die Auslauf ffnung der Mischkan le stellen und Drucktaster bzw Fu schalter bet tigen Solange das Silikon in der Mischk...

Page 6: ...t das Ger t in bereinstimmung mit dieser Bedienungsanleitung verwendet wird Erweiterungen Neueinstellungen nderungen oder Reparaturen durch von ihr er m chtigte Personen ausgef hrt werden 7 Service Ku...

Page 7: ...on 3 1 Equipment 3 2 Technical data 3 3 Spare parts Equipment 3 4 Setting up connecting the unit 4 Operating instructions 4 1 Operating and controlling elements 5 Bringing the machine into service 5 1...

Page 8: ...standard plug sockets as described in chapter 3 2 Make sure that the de vice is only used on a dry working place Please observe the working instructions of the materials on which you work The unit has...

Page 9: ...in perfect technical condition Observe the manual Set up the device horizontally and bring it in a perfect position Please make sure that the device has a solid base Check if the device is in technica...

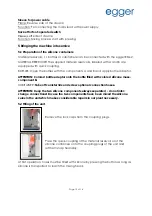
Page 10: ...aptor ATTENTION Colored bottle adaptor onto the bottle filled with colored silicone mass component B CUBITAINER Take off canister lids and screw optional connection hoses ATTENTION Keep the two silico...

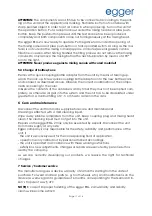
Page 11: ...of the containers at any time They must not be emptied com pletely as otherwise air gets into the system and the unit has to be deaerated under great effort A minimal filling of 2 3 cm has to remain i...

Page 12: ...n case of damage or other malfunctions You may also contact egger Otoplastik Labortechnik GmbH Ayb hlweg 59 D 87439 Kempten Telefon 49 0 8 31 5 81 13 60 Fax 49 0 8 31 5 81 13 14 E mail sales egger lab...

Page 13: ...Seite 13 von 16 Page 13 of 16...

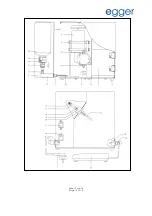
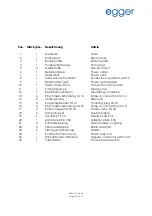
Page 14: ...nser 13 4 Einschraubverbindung G1 4 Screw in connection G1 4 14 2 Verl ngerung Extension 15 2 Kupplungsstecker G1 4 Coupling plug G1 8 16 2 Einschraubverbindung G1 8 Screw in connection G1 8 17 2 R ck...

Page 15: ...t foot operated switch M1 Zahnradpumpe Gear pump CB Betriebskondensator Operating condenser S1 Netzschalter mit Beleuchtung Power switch with lights S2 Taster START mit Beleuchtung Push button with li...

Page 16: ...Notizen Notes Seite 16 von 16 Page 16 of 16...

Reviews: