background image

Summary of Contents for GHOST Drone

Page 1: ......

Page 2: ...cur liabilities for violation of laws or regulations Once this product is used it will be assumed that the user has acknowledged and accepted all the contents of this statement Users will be held accountable for their actions or any direct or indirect consequences caused by incompliance with the aviation restrictions of this manual Aviation Restrictions ...

Page 3: ...uction Parts List Preparation Battery G Box GHOST Propeller Prop guard Gimbal Landing Gears Camera GHOST APP Voice Package GHOST APP The interface Flight Pre flight Examination Flight Environment Flight Safety Caution during Flight After sales Contents 02 03 04 06 22 23 26 27 28 ...

Page 4: ...thout permission Repair Please do not disassemble or try repairing the GHOST which may cause damage to the GHOST or even injure yourself If it is broken malfunctions or gets exposed to liquids please contact EHANG or its authorized dealers Battery Please do not dismantle squeeze strike burn drop or tread on EHANG batteries Avoid short circuit or exposing the battery terminal to metals Do not use t...

Page 5: ...product 1 Video Website www ghost drone com 2 Disclaimer Website www ghost drone com 3 Quick start Manual To help you start easily and quickly 4 GHOST Aerial Advanced Manual To provide detailed instructions Video Please visit our website www ghost drone com to learn how to use GHOST from the video Symbols Do not operate Attention needed Tips Reading Instructions 03 ...

Page 6: ...ecting BVR flight and following It is easy to operate With GHOST flying is no longer a privilege Please check the contents of the box before using GHOST with two pairs of propellers and four prop guards G Box with charging cable Battery and battery charger with two charging cables Number Item Picture 1 2 3 4 Introduction Parts List 04 Gimbal and camera 5 Landing gear screwdriver and eight 2 0 screws...

Page 7: ...is being charged When the green indicator is on the battery is fully charged 1 1 About the Battery It is a charge discharge lithium polymer battery specially designed for GHOST products with a capacity of 5400mAh cell voltage of 11 1v and an XT60 connector The battery must be charged with the original charger provided by EHANG Battery Charger Please make sure the following devices are fully charge...

Page 8: ...termine not to use the battery for a long period of time keep its electric voltage between 11 4V and 11 6V single cell between 3 8V and 3 85V 7 Do not apply external force on the battery do not drop the battery from high places do not disassemble or modify the battery 8 Please replace the battery with new one if it bulges 9 Please do not charge the battery for over three hours 1 3 Put in the Batte...

Page 9: ...f Long press the ON OFF button until the PWR light is off Charging Four indicators flicker in turn Fully charged Indicator on far left flickers the other three are on USB cable G BOX 07 On off Charging cable port Data indicator Charging indicator Power indicator Smartphone App G BOX GHOST G Box is connected to GHOST through radio wave Smartphone App is connected to G Box Preparation After it is full...

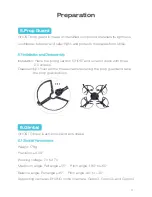
Page 10: ... GHOST is in normal state it flickers during flight indicating there is something wrong with electricity consumption and you must pay attention to low battery 5 Red indicator stays on when GHOST is unlocked or during flight 3 1 About the GHOST GHOST without Gimbal and camera has a built in GHOST flight controller and can move forwards backwards left right up and down rotate or fly to a certain point or...

Page 11: ...he supporting tools Notice grey part indicates the back sides of GHOST and parts 4 2 Install Propellers 1 Identify front and back ends R indicates right propeller L indicates left propeller The character can be found on the propeller s rim on the front end No character on the back of propellers L R GHOST drone Left Right Back Front Right propeller 2 Left propeller 2 Cushion 4 Nut 4 Screw driver Ba...

Page 12: ...perience 2 Assemble propellers Pick the cushion in the red circle and fit it in the small holes on the backside of propellers respectively Before After 3 Install propellers Keep GHOST upside down The propeller should be placed on the motor with propeller s front ends with character facing downwards L propeller should be fixed to the R motor and R propeller to L motor fasten the nuts at the back Noti...

Page 13: ... guard on GHOST and screw it down with three 2 0 screws Disassembly Unscrew the three screws fastening the prop guard and take the prop guards down 6 Gimbal GHOST Gimbal is anti knock and anti shake 6 1 Gimbal Parameters Weight 178g Precision 0 09 Working voltage 7V to 17V Maximum angle Roll angle 55 Pitch angle 180 to 60 Balance angle Roll angle 45 Pitch angle 90 to 30 Supporting cameras EHANG mo...

Page 14: ...brace to the camera and 1 5 short screws to connect the camera such as GoPro to the lower seat of Gimbal Notice Parts must be fastened with screwdriver Step 2 Install the upper seat of Gimbal Put the GHOST upper seat upwards use 2 0 screwdriver to fasten the upper seat to GHOST and cover the upper seat with buffer balls Finished Gimbal upper seat 2 0 short screws Buffer balls Finished ...

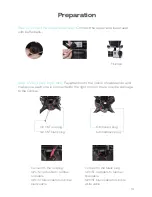
Page 15: ...nds and make sure each one is connected to the right color or there may be damage to the Gimbal Finished GHOST red plug GHOST black plug Gimbal red plug Gimbal black plug Connect to the red plug GHOST red cable to Gimbal red cable GHOST black cable to Gimbal black cable Connect to the black plug GHOST red cable to Gimbal blue cable GHOST black cable to Gimbal white cable ...

Page 16: ...aration Assembly Assemble the landing gear pay attention to the direction in which the cross bar is installed the finished landing gear is as follows Base Cross bar Head Assembly Seen from the bottom Seen from the front side ...

Page 17: ...apixel HD wide angle lens HDMI HD output Web camera Memory card support maximum of 32G Video definition supported 1080P 720P WVGA MOV filming Shooting modes Stop motion and continuous capture Lock during video recording Mini size 8 1 Features 8 2 Camera Up Down Spreaker Screen Active indicator Charging indicator Battery lid Locking key of battery door Indicator Confirm MIC MICRO SD USB HSMI Lens On o...

Page 18: ...f screen tap CONFIRM to start filming during filming is flickering tap CONFIRM again to stop filming the symbol on top left disappears 02 Photographing and settings Turn it on and you can see mode selection when there is on top left corner of the screen you can take a picture tap CONFIRM to take pictures stop motion self timer 2 5 10 seconds continuous capture 03 Save and play Use USB cable to move th...

Page 19: ...r filming Time for charging Operating system Items Parameters 1 5LTPS 170 A high resolution wide angle lens Simplified Chinese Traditional Chinese English German French Spanish Italian Portuguese Russian Japanese 1080P 1920 1080 30FPSȠ720P 1280 720 60FPSȠ VGA 848 480 60FPSȠQVGA 640 480 60FPS MOV H 264 12M 8M 5M Micro SD Shot motion self timer 2 5 10 seconds continuous snapper 50Hz 60Hz USB2 0 5VIA 9...

Page 20: ...loading Download GHOST APP You must use GHOST APP to use GHOSTAerial Aerial Plus You can down load the application in the following manners 01 Visit www ghost drone com to download EHANG GHOST APP Pic 1 02 Download GHOST APP from Google Play APP Store Pic 2 03 Visit downloading page on our website connect your smartphone to computer and tap One click Setup button Pic 3 Smartphone iPhone 4S IOS 6 0...

Page 21: ... operation error EHANG should not be held accountable for acci dents that could have been avoided by following the voice notice 9 2 APP Interface Instruction Step1 Enter start up page and start the APP Step2 With Bluetooth on it will search for devices automatically and get connected Notice You will see the following page if you log in for the first time before you take step 2 19 ...

Page 22: ...s will be shown on this page Tap SEARCH button on bottom right corner to search for new devices Step3 When new Bluetooth device is detected tap to get connected Step5 Tap the button on the right to rename t he new Bluetooth device Step4 New Bluetooth device is added Notice If you want to cancel the search tap the button to cancel 20 ...

Page 23: ... device is renamed Step1 Tap INITIAL button on top left corner to turn to Bluetooth setup page Step3 Tap REMOVE to remove Bluetooth pairing Step4 Bluetooth pairing is removed 9 5 Remove Bluetooth Pairing 21 Step2 Tap button on the right to turn to Bluetooth editing page ...

Page 24: ...ion and Bluetooth pairing is completed turn to the page on the left GHOST setting page will pop up 22 If you choose correctly you will see GHOST parameters set it turns to APP operation page if you need to reset tap button on top left corner and choose GHOST settings if with a certain model recommended you must proceed based on the GHOST actually used ...

Page 25: ...GHOST APP INTERFACE 23 Notice Flight starting point 10m above the takeoff point The map above is for indicative purpose only The actual map may differ Buttons can t be used when in grey ...

Page 26: ...r and GHOST on the GPS map See picture above A is GHOST s spot Click any destination B on the map to direct GHOST to B from A to C to B If the destination is updated in midway GHOST will fly from current spot C to the updated destination D from A to C to D Tapping Hover in any status will terminate the previous command and keep GHOST hovering Ascend Descend is not available during flight Estimate th...

Page 27: ...adually Do not stop immediately or GHOST will fly over the user at high speed as it has no brakes To terminate auto following tap any available button on screen Investigate surroundings before using auto following GHOST cannot automatically dodge While climbing adjust GHOST s height accordingly GHOST cannot auto matically adjust height It is recommended to fly GHOST at a height higher than the user ...

Page 28: ...position after release GHOST locks automati cally five seconds after landing Micro control enables accurate landing GHOST will move horizontally Red lights mark the front blue lights mark the rear Drag the virtual compass to the destination spot and release to direct GHOST to the destination 6 Ascend Descend Rotating GHOST APP Functions and How to Use GHOST APP 7 Follow 8 Land 9 Micro control Ascen...

Page 29: ... fly GHOST in extreme weather including high temperature snow strong wind over scale 5 and heavy fog 2 Pre flight Examination 2 1 Check whether G Box and battery are fully charged 2 2 Check whether propellers are installed correctly 2 3 Check whether motor starts normally after unlocking Please contact EHANG dealers or customer service in case of any trouble during installation or use 3 Flight Safet...

Page 30: ...t side of the APP interface 4 3 It is normal for the battery level to rise again after landing It is not advisable to launch your GHOST when battery level is less than 30 It is best to fly GHOST with a fully charged battery 4 4 Please tap HOVER immediately in times of emergency If GHOST fails to hover please ensure your own safety before attending to GHOST 5 After sales 5 1 GHOST products are guara...

Page 31: ... to try to correct the interference by one or more of the following measures Reorient or relocate the receiving antenna Increase the separation between the equipment and receiver Connect the equipment into an outlet on a circuit different from that to which the receiver is connected Consult the dealer or an experienced radio TV technician for help This device complies with part 15 of the FCC rules...

Page 32: ......

Reviews: