15. Where possible, avoid the use of extension cords as they may overheat
and cause a risk of fire. However, if you have to use an extension cord,
the cord must be of minimum 1.5 mm
2
core cross sectional area or larger
and rated a minimum of 2000 Watts. If you use a coiled (cable-tidy type)
extension cord, ensure that all cable is uncoiled from the cable drum.
Leaving coiled cable on the drum will cause overheating of the cable.
Never use a single extension cord to operate more than one heater.
16. Always check power cord for damage before plugging the appliance into
the mains socket. Do not use the appliance if the power cord or insulation
is damaged. Always use an RCD (Residual Current Device) socket or
plug adaptor to prevent an electrical shock due to accidental damage of
the power cord or appliance.
17. Always unplug the heater when not in use. To disconnect from the power
supply, grip the plug and pull from the power socket. Never pull by the
cord.
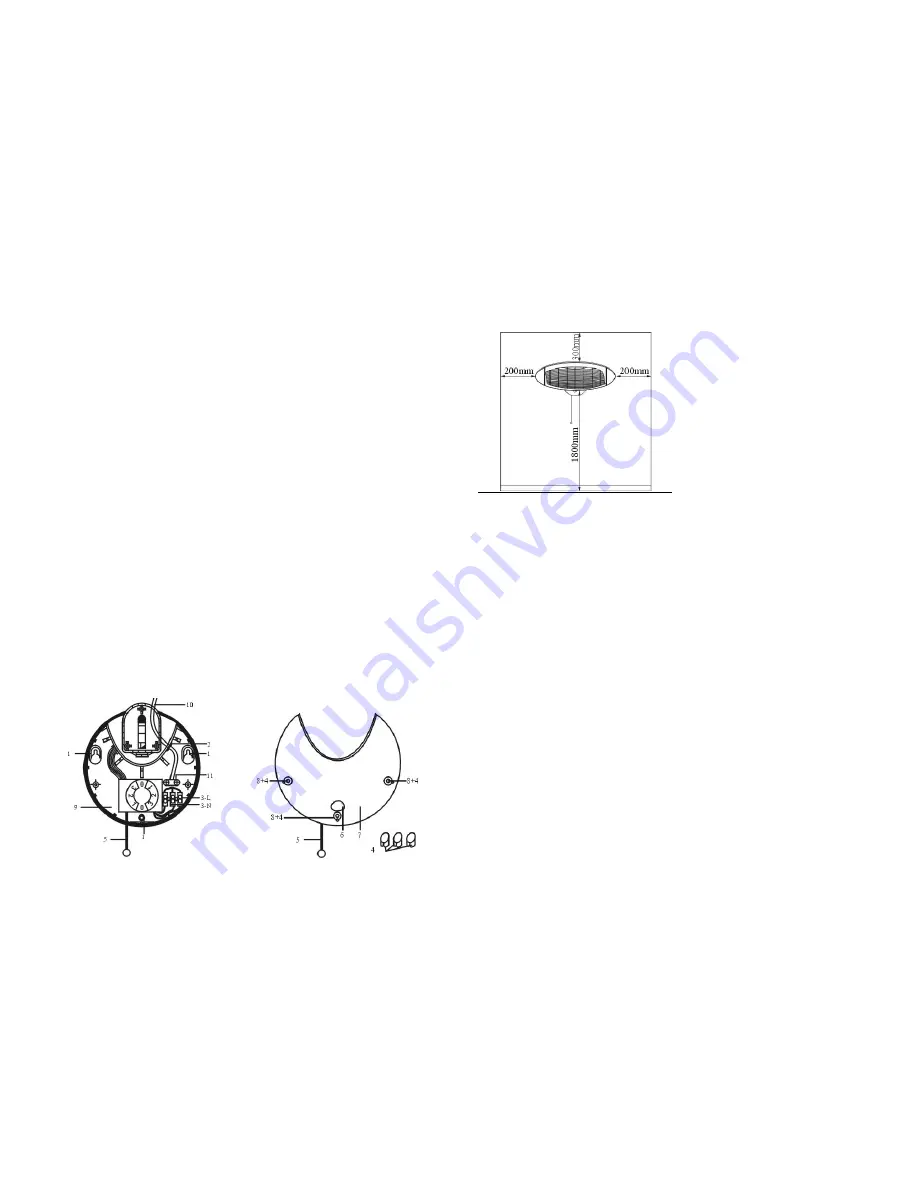
Parts Description
1. Fastening
holes
2. Power cable holding clip
3. Live & Neutral wires
4. Screw hole covers
5. Heat setting & heat selector pull switch
6. Heat setting display window
7. Front covering plate
8. Screw
holes
9. Backing
plate
10. Power cable exit point
11. Power cable clamp
fig 1
fig 2
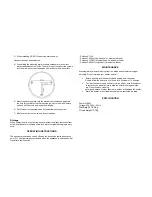
fig 3
The unit must be screwed to the wall in a horizontal position
Never install in vertical position this may damage the heating
elements and void the warranty
Never install directly above or below wall sockets
Ensure you have a suitable clearance from each side of the unit,
minimum space indicated above (fig 3)
Installation instructions
When installing DO NOT connect the mains power.
The heater is supplied with accessories for wall mounting:
3 wall plugs, 3 screws, 3 screw covers
N.B
. Power cord length is 1.8m Please ensure suitable location to
accommodate this.
1) Remove the three screw caps from the front cover and screws to take
off plastic front cover (Fig 2).
2) Select the correct positioning as per the diagram (Fig3).
Do not install in a vertical position. This will damage the unit.
Do not install below an electrical socket or appliance due to high very
radiant heat.
Do not install close to any flammable objects such as petrol or paint.
Ensure that the wall is of sound construction. The appliance weighs
1.65 kg’s.


