Operating instructions for Shearing Clippers
EG 727 “Flex” Item no. 7727-000
4
Servicing
Servicing and cleaning work is permitted only whilst the shearing clippers are switched off.
Do not touch the clippers in the region of the clipper blades, even if they are switched off, unless
mains cord is unplugged. Do not work on the clipper blades/clipper head unless mains are
unplugged.
4.1
Cleaning
Cleaning the clipper head and clipper blades
After shearing, remove any oil from the clippers using a dry cloth; carefully clean the clipper
head and blades with a dry cleaning brush or brush. Then lubricate the parts to prevent rust
formation. The slightest rust on the clipper blades will impair or even prevent shearing.
4.2
Fitting the clipper blades
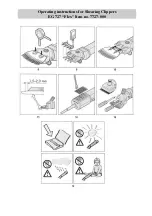
A pair of clipper blades consists of a comb plate/lower blade (Figure 6, Pos. 2) and an upper blade
(Figure 6, Pos. 1). Ensure that the areas mate properly when fitting the blades. The blades are
fitted as follows:
Loosen the shearing tension adjusting screw (Figure 7) and place the clippers on a hard surface
such that the blade fastening screws (Figure 8) face upward.
Loosen the screws and remove the two old clipper blades.
Ensure that the new clipper blades are clean. Especially ensure that the honed surfaces are free of
dirt. Otherwise, even newly honed clipper blades will not produce satisfactory shearing results.
Place the new upper blade into the cam cones of the pressure forks (Figure 9 + Figure 3, Pos. 2)
and slide the new comb plate between the loosened screws (Figure 10).
Now tighten the blade fastening screws until the new comb plate can only just be moved sideways
by hand.
Then turn around the clippers again, pointing the clipping tension adjustment head upward.
It is important here to ensure that the blades mate such that the honed surface of the comb plate
protrudes approx. 1.5 – 2.0 mm beyond the tips of the upper blade (Figure 11).
Having adjusted the clipper blades, arrest the position of the comb plate and tighten the blade
fastening screws.
Check that the clipper blades have been fitted properly and that the cam cones of the pressure
forks (Figure 3, Pos. 2) are properly seated in their holes in the upper blade.
Now turn the clipping tension adjustment head until the upper blade presses against the comb
plate and a slight resistance is noticed.
4.3
Re-honing the clipper blades
Only work with sharp clipper blades. Replace blades that are blunt or faulty or have teeth missing.
Re-honing of clipper blades requires special machines and a specialist.
4.4
Cleaning the air filter
The air filter elements are located on the side of the clipper motor. The air filter elements are
removed from the clippers for cleaning. Regular cleaning of the elements with a dry brush or
Summary of Contents for 7727-000
Page 14: ...Bedienungsanleitung für Schermaschine EG 727 Flex Art Nr 7727 000 ...
Page 15: ...Bedienungsanleitung für Schermaschine EG 727 Flex Art Nr 7727 000 ...
Page 28: ...Bedienungsanleitung für Schermaschine EG 727 Flex Art Nr 7727 000 ...
Page 29: ...Bedienungsanleitung für Schermaschine EG 727 Flex Art Nr 7727 000 ...
Page 42: ...Operating Instructions for Shearing Clippers EG 727 Flex Item no 7727 000 ...
Page 43: ...Operating Instructions for Shearing Clippers EG 727 Flex Item no 7727 000 ...
Page 56: ...Operating instructions for Shearing Clippers EG 727 Flex Item no 7727 000 ...
Page 57: ...Operating instructions for Shearing Clippers EG 727 Flex Item no 7727 000 ...


