background image

NOTE: 

This symbol and recycle system apply to EU

countries only and do not apply to countries in other
areas of the world. 


Please dispose of this equipment at your local
community waste collection/recycling centre. In the
European Union there are separate collection systems
for used electrical and electronic products. 

Your EIKI product is designed
and manufactured with high
quality materials and
components which can be
recycled and reused. 
This symbol means that
electrical and electronic
equipment, at their end-of-life,
should be disposed of
separately from your household

t

Federal Communication Commission Notice 

Note: This equipment has been tested and found to comply with the limits for a Class B digital device, pursuant to 
part 15 of the FCC Rules. These limits are designed to provide reasonable protection against harmful interference in 
a residential installation. This equipment generates, uses and can radiate radio frequency energy and, if not 
installed and used in accordance with the instructions, may cause harmful interference to radio communications. 
However, there is no guarantee that interference will not occur in a particular installation. If this equipment does 
cause harmful interference to radio or television reception, which can be determined by turning the equipment off 
and on, the user is encouraged to try to correct the interference by one or more of the following measures: 
 

–  Reorient or relocate the receiving antenna. 
–  Increase the separation between the equipment and receiver. 

– 

Connect the equipment into an outlet on a circuit different from that to which the receiver is connected. 

– 

Consult the dealer or an experienced radio/TV technician for help. 


Do not make any changes or modifications to the equipment unless otherwise specified in the instructions. If such 
changes or modifications should be made, you could be required to stop operation of the equipment. 
Model Number : CS-Wi4 
Trade Name : EIKI 
Responsible party : EIKI International, Inc. 
Address : 30251 Esperanza Rancho Santa Margarita CA 92688-2132 
Telephone No. : 800-242-3454 (949-457-0200)


EIKI  


CS-Wi4


   Tested 

To 

Comply 

   With 

FCC 

Standards


FOR HOME OR OFFICE USE 

An introduction to the CS-Wi4


Thank you for choosing 

Eiki CS-Wi4. 


CS-Wi4 is a unique hand-held touchscreen 
remote control. Fully and easily 
programmable, CS-Wi4 can function stand-
alone as a replacement for multiple remote 
controls or as part of a larger system. 
CS-Wi4’s high power Infra-Red transmitter 
removes the line-of-sight constraints 
suffered by ordinary IR remote controls. 
The CS-Wi4 is powered by 4 ordinary AA 
alkaline cells and is specially designed for 
high energy efficiency to achieve maximum 
battery life.


How it works 

CS-Wi4 comes with 

Eiki Control System 

Editor

 software. This software lets you build 

screens and menus from graphical objects 
either from the supplied library or that you 
have created yourself. 
Once you have established your menus with 
buttons, you can program the buttons to 
control almost any IR controllable devices 
using codesets, again either from the 
extensive library or sampled using 

Eiki Code 

Organizer.


This manual takes the form of a tutorial, to 
guide you through the process of building an 
application. 


V:E1.02 

Summary of Contents for CS-Wi4

Page 1: ...Qty Touch screen remote control 1 Programming cable 1 AA alkaline cells 4 Manual 1 Software CD ROM 1 The latest software is also available for download at www eiki com Eiki CS Wi4 4 LCD Wireless Touch Pad Instruction Manual ...

Page 2: ...d receiver Connect the equipment into an outlet on a circuit different from that to which the receiver is connected Consult the dealer or an experienced radio TV technician for help Do not make any changes or modifications to the equipment unless otherwise specified in the instructions If such changes or modifications should be made you could be required to stop operation of the equipment Model Nu...

Page 3: ...n Follow the Installshield Wizard s prompts to complete the installation Starting the editor An Eiki Control System Editor icon should now appear on your desktop Double click it to begin The Eiki Control System Editor can be used to program a wide range of products so that you only have to learn to use one software tool Choose the product you wish to work with from the list If you wish to change d...

Page 4: ...rance and operation of the final result The Graphics Toolbox is just that it contains the tools to help you assemble the various screens you will need for your application We will start by introducing the methods you can use to build a screen Once you have mastered this we will show you how to plan your application A little planning makes the job much faster and easier as well as delivering a bett...

Page 5: ... this Choose the one you prefer 1 Using the Add Bitmap button in the Graphics Toolbox Click on Add Bitmap A file requester will open Navigate to the folder that contains the graphic you wish to use Click on the Views button and choose Thumbnails This will allow you to preview the button before you add it ...

Page 6: ...a screen To do this open an Explorer window and position it alongside your Eiki Control System Editor window Navigate to the graphics library for the CS Wi4 as shown Click on Views on the toolbar and select Thumbnails You should see the result shown here Next choose a background graphic and holding down your left mouse button Drag and Drop it into the Eiki Control Systems Editor window ...

Page 7: ...age to fit the screen as shown The Bitmap Controls buttons can be used to scale any image to any size as required btn will scale a graphic to fit a button 1 1 and px px pixel for pixel give no scaling effects depending on the DPI setting that was used when the original image was created They are useful for retaining the original scale and detail of an image Use care when applying large degrees of ...

Page 8: ...me control buttons to our screen Add the button using Drag and Drop or the Graphics Toolbox method Scale it using the Bitmap controls buttons in the Graphics Toolbox Tick the Transparency box Transparency works by replacing whatever colour is used by the top left hand corner pixel of the graphic with the image underneath You can see the result here Drag the new button to its intended position on t...

Page 9: ...ed You may find it easier to select Align Left as this will always allow you to see the text Type the word Volume Set its colour to White and its size to 16 Drag it into position between the and buttons as shown A TIP You can use the arrow keys on your keyboard to nudge the text object into position independently of the Snap setting This also works for graphics objects Add Bold and Shadow text att...

Page 10: ...Scale the object to a suitable size by dragging the corner ears You may find this easier to achieve with SNAP disabled The result should look like the top picture you will note that it now covers the volume buttons 3 In Graphics Toolbox you will see all the objects that are on the screen in a list 4 Click on the Block Black object to highlight it 5 Click on the Send Back button to move the item do...

Page 11: ... a prime cause of perceived unreliable operation of any touchscreen Duplicating a screen provides a useful way of creating sub menus with the same basic graphical appearance of the main menu Once you duplicate a screen you can add to it items that differ from the main or initial screen while those objects that are supposed to be the same on each screen will not seem to twitch when you select a sub...

Page 12: ...ics and Edit Behaviour Click on the Edit Behaviour button This changes the editor from Graphics to Behaviour mode A single click will now simulate pressing the button while a double click will allow you to edit its behaviour Double click the new Back button now A window will open as shown Under Other Actions choose the Go to screen radio button Drop down the list and choose Screen 1 Click OK Now w...

Page 13: ...does not scale well Add text as a single continuous line using spaces for alignment This guarantees correct vertical alignment and looks neater Be consistent with the use of shading on text Use the arrow keys to do fine alignment of objects Next double click the VCR icon and select Go to screen Choose Screen 2 Click OK Test your work Click on VCR Screen 2 will be selected Clicking on Back in this ...

Page 14: ... VCR control screen Here s how to do it Press Add to add a code sequence The Code Sequencer window will appear Choose Load New Codeset Locate the codeset for the projector and select Open You only need to add a codeset once for each device Choose the On code Because the projector will need a few seconds delay between its Power On and an Input Select command add as many other commands as you can to...

Page 15: ...performs all the actions necessary for connecting the item and then displays a set of controls to allow the use of the item they have chosen Each of the sub menus is different except that all menus have volume controls and all except the main menu have a Back button that will let the user go back to the main menu Screen 2 can serve as the basis for all other menus i e VCR DVD CD etc A little plann...

Page 16: ...where you will need to use the extra features of the Code Sequencer to get the results you need If you have a key such as a number key that requires a single transmission of the code to avoid a double number being interpreted add a Begin Loop at the end of the code sequence This will stop the code being repeated while a button is held down Begin Loop is also valuable to add at the end of a sequenc...

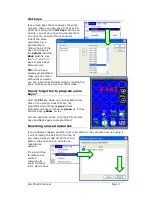
Page 17: ...g by making the key a hot key while you are in that screen Have I forgotten to program some keys Hold the Ctrl key down on your keyboard and click on the screen Keys that are not programmed will show as grey circles Programmed keys will show as green or if they are Hot Keys yellow circles You can see that so far only the VCR Volume keys and Back keys are programmed Removing unused resources If you...

Page 18: ...downloading to the CS Wi4 If you are using Eiki Control System Editor for the first time you will need to set the serial port that your PC will use to communicate with the CS Wi4 At the same time you may also want to change other items including file locations If you are a dealer or installer you may wish to set the default Configurations location to your Client folder For Bitmaps you may want to ...

Page 19: ...oad the program you have created Click the button on the toolbar From here you can choose what you want to download While you are still making changes you can save downloading time by not downloading all the bitmaps i e screens if you don t need to change them just yet If you can t achieve communications with your CS Wi4 check the following The CS Wi4 is powered and awake The serial cable is fully...

Page 20: ...ction accessed through the Handset menu Replace Codeset This function allows you to quickly substitute one brand of a piece of equipment for another Replace Codeset will be of most use when you are substituting codesets from the library or where you have used templates when sampling a new IR codeset If there are differences you will be shown a comparison of the two codesets as shown here You can c...

Page 21: ...r change or reverse it if it doesn t work Edit Source Edit Source allows you to access the underlying code behind the program you create when you use the software Don t use this tool unless you know what you are doing You will be warned Here is a small part of the code It s quite readable You can delete items at will provided you also delete matching pairs of braces Where Edit Source can be very u...

Page 22: ...s There are a few tips when you are creating images for CS Wi4 Use library or exported graphics as a guide for similar image size and colour Use an editor that correctly supports fixed palettes such as Paintshop Pro which is highly recommended Editors such as Windows Paint may create graphics in which the colours do not display correctly You can only use the 8 primary and secondary colours so when...

Page 23: ... of the affected object to be replaced with the new copy Because you can change graphics or codeset files without having to re insert the changes into your application the uses and implications of this feature are far reaching If you are testing an IR codeset any changes to that codeset are very quick to download and test You don t have to re edit your application You can change the entire graphic...

Page 24: ...lications 1 A CS Wi4 is shown here in its simplest application as a universal remote control In this form it is ideal for many home theatre type installations where all the equipment is visible to the remote Projector Infra Red Amp DVD VCR ...

Page 25: ...f a motorised screen and lights from the CS Wi4 Apart from the connection from the A 7 IR receiver to the A 2 IR relay box all control is still wireless Projector Infra Red Amp DVD VCR Screen Lights Down Up N 12 volts DC at 250mA Eiki A 7 IR receiver Eiki A 2 IR relay box ...

Page 26: ...use most projectors need a 30 second warmup time before they are ready to accept input commands 12 volts DC at 250mA Eiki A 2 IR relay box Eiki A 7 IR receiver Amp DVD VCR Projector RS232 Macro send RS232 RS485 IR IRBus activity Power MacroBox The Eiki IR Relay Box IR receiver and Macro Box can share a power supply via the IRBus so that a separate power supply is not required Eiki A 5 Macro Box Sc...

Page 27: ...iki A 7 IR receiver Amp DVD VCR Projector RS232 Macro send RS232 RS485 IR IRBus activity Power MacroBox The Eiki IR Relay Box IR receiver MCS 1 and Macro Box can share a power supply via the IRBus so that a separate power supply is not required Eiki A 5 Macro Box Screen Lights Down Up N Eiki MCS 1 Control panel IRBus connections Data 12v Gnd ...

Page 28: ... 0088 Fax 86 21 5396 0318 E mail info eikichina com cn Canada EIKI CANADA Eiki International Inc P O Box 156 310 First St Unit 2 Midland ON L4R 4K8 Canada Tel 800 563 3454 705 527 4084 Fax 800 567 4069 705 527 4087 E Mail canada eiki com Eastern Europe EIKI CZECH spol s r o Umělecká 15 170 00 Praha 7 Czech Republic Tel 42 02 20570024 42 02 20571413 Fax 42 02 20571411 E Mail easterneurope eiki de J...

Reviews: