65
Description on using Memory Viewer function
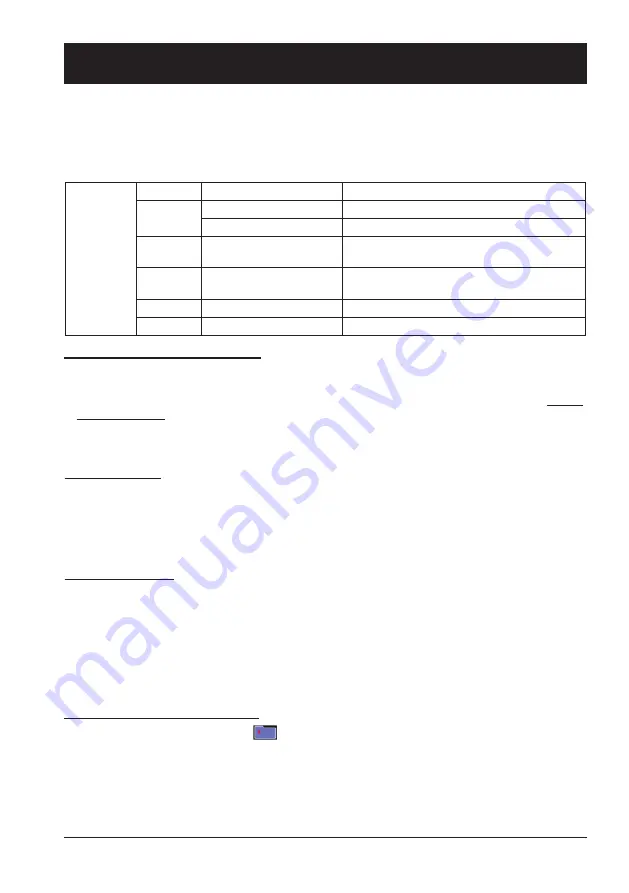
Memory Viewer function supports the following image files.
Display the Memory Viewer screen
The Memory Viewer function is used to project the pictures which are stored in the USB memory when
the USB memory is inserted into USB A(VIEWER) terminal of the projector.
Picture
Extension
Format
Description
jpg/jpeg
Baseline encoder 24 bit Max. resolution : 10000 x 10000
Progressive RGB 24 bit Max. resolution : Panel Resolution
bmp
1, 4, 8 bit Palette-based
RGB 24, 32 bit
Max. resolution : 1280 x 800
png
24, 48 bit True color
24 bit color palette space
Max. resolution : 1024 x 768
gif
1, 4, 8 bit Palette-based Max. resolution : 800 x 600
tiff
—
Max. resolution : 800 x 600
1. Press the INPUT button on the remote control or on the control panel to select the input source as
Memory Viewer.
2. Insert the USB memory into the USB-A terminal of the projector directly, the standby screen of please
press RC ENTER appears when the USB memory icon is displayed on the screen.
3.
Press the OK button on the remote control
, the root directory of the USB memory will appear in
thumbnail on the screen.
It will display a picture when play the picture manually every time.
1. Press ▲▼◄► to select a file on the thumbnail screen.
2. Press the OK button, the picture will display on the full screen.
3. Press ►to switch to the next picture, press◄ to return to the previous picture.
4. Press the OK button on the remote control to return to thumbnail screen.
Play the pictures
All pictures in the same folder will play automatically when "Slide Transition Effect" of "Memory
Viewer" menu is set to the special setting.
1. Press ▲▼◄► to select a file.
2. Press the "MENU" button to select the "Memory Viewer" → "Set Slide".
3. Press the OK button.
●
The picture will display on the full screen.
●
Press the OK button to return to the thumbnail screen.
Executing the slide
Memory Viewer function
1. Press ▲▼◄► to the thumbnail which is displayed on the upper left corner.
2. Press the OK button on the remote control to return to the standby screen of Press "OK ".
3. Remove the USB memory directly.
Termination of the Memory Viewer
Summary of Contents for EK-355UK
Page 1: ...Owner s manual Multimedia Projector EK 355UK V1 0 ...
Page 13: ...This chapter presents names and functions of individual component Overview ...
Page 20: ...This chapter introduces the information of install Installation ...
Page 27: ...This chapter introduces you to basic operation of the projector Operation ...
Page 56: ...Description on using useful function ...
Page 73: ...Appendix ...


