background image

EZtrol 


200L


L                   


Manual

Summary of Contents for EZtrol 200L

Page 1: ...EZtrol 200L L Manual...

Page 2: ...ning and building products that are not going to fail in the field and that are adaptable to a technical environment that changes at breakneck speed We also truly understand the frustration that comes...

Page 3: ...aller 2 Preloaded Eiki Code 3 Preloaded Timer 4 EZtrol 200L Layout 5 EZtrol 200L Software Installations 6 Programming EZtrol 200L 7 17 Labeling Buttons 18 19 Installing EZtrol 200L 20 24 EZtrol 200L S...

Page 4: ...1 EZtrol 200L Parts List EZtrol 200L AC DC Power Supply EZlink Hub 2 Screws Label Sheet...

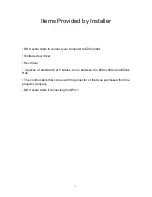
Page 5: ...ter to EZtrol 200L Slotted screw driver Hex driver 2 pieces of standard Cat 5 cables to run between the EZtrol 200L and EZlink Hub The control cable that comes with the projector or that was purchased...

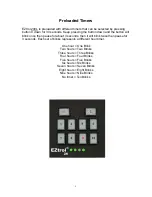
Page 6: ...pause for about 3 seconds then it will blink twice then pause for 3 seconds Each set of blinks represents the following drivers for EIKI model projectors LC X1100 One Blink LC X986 One Blink LC XNB4M...

Page 7: ...will blink once then pause for about 3 seconds then it will blink twice then pause for 3 seconds Each set of blinks represents a different hour timer One hour One Blink Two hours Two Blinks Three hour...

Page 8: ...5...

Page 9: ...allation 1 Using your web browser connect to http www eztrol com softwareprograms_eztrol200 shtml 2 Then select EZtrol 200 Software from the menu 3 Save the file to your PC 4 Then install the program...

Page 10: ...female cable and plug one end into RS 232 2 and the other into your computer 3 Set the dip switches on the EZlink Hub see page 25 4 Connect the power supply to the EZlink hub 5 Then choose which leve...

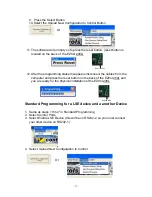
Page 11: ...e EZtrol 200L 8 After the programming status disappears disconnect the cables from the Computer and press the reset button on the back of the EZtrol 200L and you are ready for the physical installatio...

Page 12: ...Configuration to Control Button Or 9 The software will prompt you to press the reset button reset button is located on the back of the EZtrol 200L 10 After the programming status disappears disconnect...

Page 13: ...r 2 Devices 1 Same as steps 1 thru 7 in Standard Programming 2 Select Projector from the top of the EZtrol 200 software 3 Enable Second Projector 4 Select Projector 5 Select Model 6 Select Control Por...

Page 14: ...us disappears disconnect the cables from the computer and press the reset button on the back of the EZtrol 200L and you are ready for the physical installation of the EZtrol 200L Standard Programming...

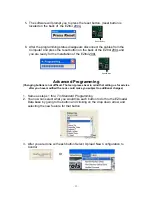
Page 15: ...EZtrol 200L Advanced Programming Changing buttons is not difficult That said please bear in mind that calling us for service after you have modified the code could make you subject to additional charg...

Page 16: ...hysical installation of the EZtrol 200L 6 Now you can save the configuration for other installations Selecting Contact Closure Use the contact closure feature on the EZtrol 200L by selecting switch re...

Page 17: ...n Standard Programming 2 Type in the custom coding you need for each button by selecting the View Button Detail Reconfigure button under each button 3 Then select the configure button 4 Enter in the n...

Page 18: ...7 The software will prompt you to press the reset button reset button is located on the back of the EZtrol 200L 8 After the programming status disappears disconnect the cables from the computer and pr...

Page 19: ...hours The LEDs on the bottom of the EZtrol 200L are indicators to let you know how much time you have left before the devices shut down in this example the first LED will shut off after 1 hour then th...

Page 20: ...top up of the lens from the diffuser Diffuser Lens 4 Remove plastic plate that lays in between the lens and the diffuser Plastic Plate Lens Diffuser 5 Place label between lens and plastic plate When...

Page 21: ...are is open select labels 9 Select layout 10 Select the button you would like to change and click on it then type in the new label 11 After your done customizing the labels select print Use transparen...

Page 22: ...ink hub to the desired port that it was programmed for RS 232 1 or RS 232 2 4 Connect the power to the EZlink hub do not plug the power into the wall yet 5 Connect the Cat 5 cables from the Hub to the...

Page 23: ...ice for the first device 2 For the second device pull a DB9 serial cable from the EZlink to the second device location 3 Connect the cable that is coming from the device into the port which it was pro...

Page 24: ...trol 200L with 1 device for the first device 2 If connecting to another EZtrol 200L connect a db9 female to female between RS232 2 on the first EZlink hub and RS232 2 on the second EZlink hub 3 Set yo...

Page 25: ...22 Two EZtrol 200Ls...

Page 26: ...lay in the programming section Then connect your device into the relays 3 For Example connecting a low voltage screen you would program the on button to switch relay 1 and the off to switch relay 2 4...

Page 27: ...4 Connect the cable from the NPC 1 into the RS 232 2 port of the EZlink hub 5 Connect the power to the EZlink hub do not plug the power into the wall yet 6 Connect the Cat 5 cables from the Hub to the...

Page 28: ...2 3 4 5 6 7 8 9 10 11 12 RS 232 2 Null Modem off off off off off on on off off off off off When Hooking up a 2 devices using a Null Modem RS 232 Cable RS 232 1 Null Modem 1 2 3 4 5 6 7 8 9 10 11 12 R...

Page 29: ...store factory setup button this will set everything back to factory specs EZtrol 200L Installation Troubleshooting 1 If the data projector does not require a null modem connection you make the connect...

Reviews: