-12-
z
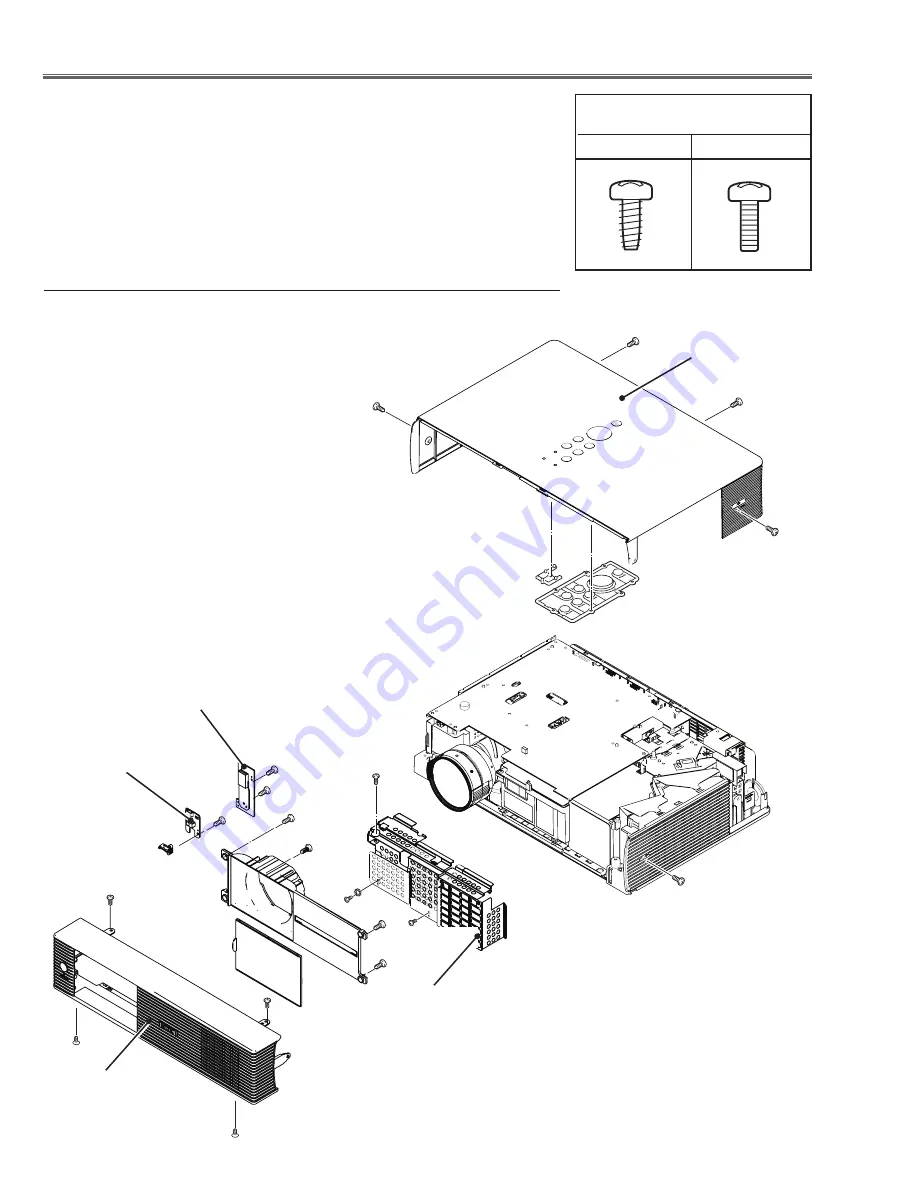
Cabinet Top, Front, R/C Board removal
Mechanical Disassembly
Mechanical disassembly should be made following procedures in numerical or-
der.
Following steps show the basic procedures, therefore unnecessary step may
be ignored.
Caution:
The parts and screws should be placed exactly the same position as the original
otherwise it may cause loss of performance and product safety.
Screws Expression
(Type
Diameter x Length
) mm
T type
M Type
A (Tx10)x5
Cabinet front
R/C Board
Fig.1
B (M2.5x6)x2
Cabinet top
D (M2.5x6)
E (T2x6)X2
1. Remove 5 screws A(Tx10) to remove the cabinet top.
2. Remove 2 screws B(M2.5X6) and 2 screws C(Tx8) to
remove the Cabinet front.
. Remove screw D(M2.5x6) and 2 screws E(T2x6) to
remove the Cabinet front shield.
4. Remove 2 screws F(T2x8) to remove the
Antenna board.
5. Remove screw G(T2x8) to remove the R/C Board.
6. Remove 4 screws H(Tx8) to remove the Lens cap
base and slide shutter.
Control Buttons
C (Tx8)x2
A
A
A
A
F (T2x8)x2
G (T2x8)
B
C
E
Cabinet front shield
F
Antenna Board
Decoration LED
DEC Inlay LED front
H (Tx8)x4
H
H
H
Lens cap base
Slide shutter
Summary of Contents for LC-WB42N
Page 67: ... 67 IC Block Diagrams FA7701 DDC Control IC7841 FA7703 Fan Power Control IC7811 Component2 ...
Page 68: ... 68 IC Block Diagrams MP2106 DC DC Converter IC5721 IC8018 IC8019 FA5502 P F Control IC601 ...
Page 70: ... 70 IC Block Diagrams L3E07111 LCD Driver Gamma Correction IC401 LM4889 Audio Output IC5031 ...
Page 72: ... 72 IC Block Diagrams STR Z2156 Power OSC IC651 TE7783 Parallel I O Expander IC1802 ...
Page 73: ... 73 IC Block Diagrams MP2307 DC DC Conventer IC5860 IC5842 ...
Page 113: ...KY7 WB42N00 113 Mechanical Parts List ...
Page 114: ... KY7BC July 2009 Japan 2009 Eiki Internatinal Inc A key to better communications ...
Page 132: ...A16 PCB_KY7AC NO DATA ...


