background image


4x50 EtherNetIP.190129.1v4: User manual 


WWW.EILERSEN.COM


Version: 2020-11-24, rev.: 1v4 


Page: 20 

5) Installation of System 

5.1 Checklist during installation 

During installation of the system the following should be checked: 

1.


All hardware connections are made as described below. 

2.


Setup IP Address etc. using the EEConnect program as described below. 

3.


If  necessary  the  EtherNetIP  master  should  be  configured  to  communi-
cate with the 4x50 Ethernet unit using the supplied EDS file. 

4.


Set the scaling/resolution of the weight signal by use of SWE.1 as de-
scribed earlier. 

5.


Set the desired measurement time by use of SWE.3-SWE.4 as described 

earlier. 

6.


Select the desired filter by use of SWE.5-SWE.8 as described earlier. 

7.


The  load  cells  are  mounted  mechanically  and  connected  to  BNC  con-
nectors in the front panel of the 4x50 unit. 

8.


The  4x50  Ethernet  unit  is  connected  to  the  EtherNetIP  network  using 

theRS45 Ethernet connector in the front panel. 

9.


Power  (24VDC)  is  applied  at  the  2  pole  power  connectors  in  the  front 

panel  of  the  4x50  unit  as  described  in  the  hardware  section,  and  the 
EtherNetIP communication is started. 

10.Verify that the MS lamp and the NS lamp both end up green. 
11.Verify that the TxLC  lamp (yellow) is lit (turns on after approx. 5 sec-

onds). 

12.Verify that the TxBB lamp (green) are lit (after 10 seconds). 
13.Verify that NONE of the 1, 2, 3, 4 or D1 lamps (red) are lit. 
14.Verify  that  the  4x50  Ethernet  system  unit  has  found  the  correct  load 

cells  (LcRegister),  and  that  no  load  cell  errors  are  indicated  (LcSta-

tus(x)). 

15.Verify that every load cell gives a signal (LcSignal(x)) by placing a load 

directly above each load cell one after the other (possibly with a known 

load). 

 
The  system  is  now  installed  and  a  zero  and  fine  calibration  is  made  as  de-

scribed earlier. Finally verify that the weighing system(s) returns a value cor-
responding to a known actual load. 
Note  that  in  the  above  checklist  no  consideration  has  been  made  on  which 
functions are implemented on the EtherNetIP master. 

Summary of Contents for 4450A

Page 1: ...Kokkedal Denmark info eilersen com Tel 45 49 180 100 Fax 45 49 180 200 Applies for Software EtherNetIP 190129 1v4 Document no 0129mu4x50 1v4 Date 2020 11 24 Rev 1v4 4x50 ETHERNET SYSTEM Status and we...

Page 2: ...cessing 17 4 1 Zeroing calibration and weight calculation 17 4 1 1 Zeroing of weighing system 17 4 1 2 Corner calibration of weighing system 18 4 1 3 Calculation of uncalibrated system weight 18 4 1 4...

Page 3: ...2020 11 24 rev 1v4 Page 3 7 5 1 4050 Ethernet module 29 7 5 2 SW2 settings 29 7 5 3 Light Emitting Diodes LEDs 29 7 5 4 4040 communication module 29 7 5 5 SW2 settings 30 7 5 6 Jumper settings 30 7 5...

Page 4: ...erNetIP master to read status and weight for each of the connected load cells Functions as zeroing calibration and calculation of system weight s must be implemented outside the 4x50 in the EtherNetIP...

Page 5: ...IP unit confirms with the following EtherNetIP specifications Protocol EtherNetIP Media Ethernet Module type Slave Target Communication settings 10MB s Half duplex IP Address Fixed default 192 168 1 1...

Page 6: ...y instance 102 0x66 Connection Connection1 Exclusive Owner Transfer class Class 1 EtherNetIP communication with the 4x50 Ethernet unit also uses a single As sembly consisting of 26 input bytes from th...

Page 7: ...ing back from the 4x50 unit matches the AS in the request sent to the 4x50 unit then the EtherNetIP master knows the data transferred correspond to the requested data The following data transfers can...

Page 8: ...ms OFF LcStatus X is a word two bytes that constitute a register containing the actual status for load cell X LcStatus X is always transferred in 16 bit un signed integer format During normal operatio...

Page 9: ...h means it is the load cell signal with filtering but without any scaling based on the LcExponent X selected using the DIP switch settings SWE 3 1 4 Input data LcSignalUnFiltered AS 2 This chapter des...

Page 10: ...e LcSerialNumber X is transferred as a 7 digit decimal number and has the format YYXXXXX corresponding to the serial number YY XXXXX marked on the load cell itself 3 1 6 Input data LcCapacity AS 4 Thi...

Page 11: ...X is 100 identical to LcStatus X during normal operation AS 0 except the LcStatus X will always have a bit set see 7 6 Appendix F Status Codes stating that LcSignal X is NOT selected i e normal oper a...

Page 12: ...be set to 6 LcStatus X is 100 identical to LcStatus X during normal operation AS 0 except the LcStatus X will always have a bit set see 7 6 Appendix F Status Codes stating that LcSignal X is NOT selec...

Page 13: ...X is NOT selected i e normal oper ation NOT selected LcData X will contain SoftwareVersion X in the double word instead of LcSignal X which is transferred during normal operation AS 0 The SoftwareVers...

Page 14: ...it signed integer format Decimal Hexadecimal Binary MSB first 20000000 0xFECED300 11111110 11001110 11010011 00000000 2000000 0xFFE17B80 11111111 11100001 01111011 10000000 200000 0xFFFCF2C0 11111111...

Page 15: ...FF 1 gram SWE 1 ON SWE 2 OFF 1 10 gram SWE 1 OFF SWE 2 ON 1 100 gram SWE 1 ON SWE 2 ON 10 gram 1 0 1 10 100 0 123 4 123 1234 123400 12 12341 12341 123410 1234100 1234 3 4 Measurement time By use of DI...

Page 16: ...dB OFF ON OFF OFF 2 9 10 0 Hz 2 0 Hz 1 0 Hz 0 5 Hz 60dB ON ON OFF OFF 3 9 12 0 Hz 2 4 Hz 1 2 Hz 0 6 Hz 80dB OFF OFF ON OFF 4 12 8 0 Hz 1 6 Hz 0 8 Hz 0 4 Hz 60dB ON OFF ON OFF 5 12 10 0 Hz 2 0 Hz 1 0 H...

Page 17: ...ll data when calculating the system weight the used data should come from the same telegram 4 1 1 Zeroing of weighing system Zeroing of a weighing system all load cells in the specific system should b...

Page 18: ...ghing sys tem 2 Place a known load CalLoad directly above the load cell that is to be corner calibrated 3 Calculate the corner calibration factor that should be multiplied on the uncalibrated gross we...

Page 19: ...brated system weight in order to achieve correct showing as CalFactor CalLoad Actual Gross After this the determined calibration factor is used to calculate the cal ibrated system weight as follows Gr...

Page 20: ...ing theRS45 Ethernet connector in the front panel 9 Power 24VDC is applied at the 2 pole power connectors in the front panel of the 4x50 unit as described in the hardware section and the EtherNetIP co...

Page 21: ...ings and lamp indica tions that are available on the front panel of the 4x50 system unit 6 2 1 Connection of power The 4x50 system unit is powered by applying 24VDC on BOTH the green two pole connecto...

Page 22: ...nected starting with the connector marked 1 and continuing onwards in rising order Thus if three load cells are to be connected they should be connected to the BNC connectors marked 1 2 and 3 6 2 3 RS...

Page 23: ...ED The 4050 Module Status LED that can be lit flashing in different colors depending on the status of the module The function of the MS LED is giv en in the table below NS Green Red Network Status LED...

Page 24: ...on The unit is On Line but no connec tion to the master has been established Red ON Critical Communication Error The unit has detected an error that makes it impossible to communicate on the net work...

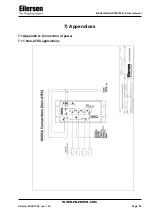
Page 25: ...4x50 EtherNetIP 190129 1v4 User manual WWW EILERSEN COM Version 2020 11 24 rev 1v4 Page 25 7 Appendices 7 1 Appendix A Connection of power 7 1 1 Non ATEX applications...

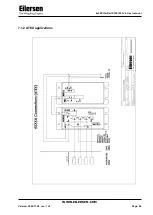
Page 26: ...4x50 EtherNetIP 190129 1v4 User manual WWW EILERSEN COM Version 2020 11 24 rev 1v4 Page 26 7 1 2 ATEX applications...

Page 27: ...software 7 2 1 Change of IP Address SubNet mask etc The MAC address of the 4x50 unit is preset to a unique value within the Eiler sen Electric A S range The default settings for IP address SubNet mas...

Page 28: ...e to 102 Size 2 8 bit 5 Set Configuration Assembly instance to 101 Size 1 8 bit 7 4 Appendix D Omron connection The supplied EDS file can be used in the Omron configurator But please beware that the t...

Page 29: ...has the following function SWITCH FUNCTION Sw2 1 Sw2 8 Reserved for future use 7 5 3 Light Emitting Diodes LEDs The 4050 Ethernet module is internally equipped with 4 LEDs These LEDs have the followi...

Page 30: ...2 3 Number of load cells OFF OFF OFF 1 ON OFF OFF 1 OFF ON OFF 2 ON ON OFF 3 OFF OFF ON 4 ON OFF ON 5 OFF ON ON 6 ON ON ON 6 SWITCH FUNCTION Sw2 4 Sw2 8 Reserved for future use 7 5 6 Jumper settings T...

Page 31: ...ation module is internally equipped with a number of sta tus lamps light emitting diodes The lamps have the following functionality when the 4040 communication module is equipped with standard program...

Page 32: ...een 4015 load cell module and 4040 communication module Bad connection between 4040 communication module and 4050 module Bad setting of DIP switches on 4040 communication module 0100 Reserved for futu...

Reviews: