For safety reasons, the equipment may not be used
as a drive unit for other work tools or toolkits of any
kind, unless they have been expressly permitted by
the manufacturer.
4. Assembly (Fig. 3-7)
1.
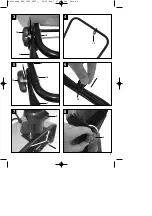
Fit the bottom push bar (Fig. 3 / Item 2) to the
equipment as shown in Figure 3.
Important! Before fitting the bottom push bar,
slide the cable strain-relief clamp (Fig. 4/Item 13)
over the bottom push bar.
2.
Fit the upper push bar (Fig. 5 / Item 1) to the
bottom push bar (Fig. 5 / Item 2) as shown in
Figure 5.
3.
Fasten the cable to the push bar as shown in
Figure 6 with the cable clips (Fig. 6/Item 14).
4.
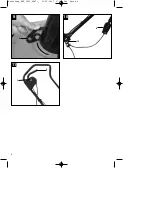
Plug the ejector into the appropriate place as
shown in Figure 7 and fasten with 2 screws (Fig.
7/Item 15).
5. Starting up
Important!
Ensure that there are no people or animals in front of
the snow plow or in the ejection range. Caution: The
ejection range may be up to 5 meters!
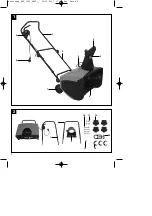
Connect the mains lead (Fig. 1/Item 8) to an
extension cable. It is imperative to secure the
extension cable with the cable grip as shown in
Figure 11.
Important!
To prevent the machine switching on accidentally,
the lawn mower is equipped with a safety switch (Fig.
11/Item 1) which must be pressed before the ON
switch (Fig. 11/Item 2) can be activated. The lawn
mower switches itself off when the switch is
released.
Repeat this process several times so that you are
sure that the machine functions properly. Before you
perform any repair or maintenance work on the
machine, ensure that the blade is not rotating and
that the power supply is disconnected.
The ejection range and direction can be easily
adjusted. To do so, the equipment must always be
switched off. Loosen the star screw of the upper
adjustment (Fig. 8/Item 3) to adjust the upper part of
the ejector and change the ejection range. After you
have adjusted the angle, retighten the star screw
(Fig. 8/Item 3). To change the ejection direction turn
the ejector with the handle of the bottom adjustment
(Fig. 9/Item 4).
Push the snow plow over the areas and paths you
wish to clear from snow.
Important!
If the snow ejection unit becomes
blocked: Switch off the engine and wait until the plow
unit has reached a complete standstill. Clean the
snow ejection unit using a solid object (for example a
wooden pole).
6. Technical data
Mains voltage:
230 V ~ 50 Hz
Power input:
1800 W
Idle speed:
2150 rpm
Working width:
39 cm
Snow layer:
max. 20 cm
Ejection range:
max. 5 m
Ejection capacity:
max. 180 m
3
/h
Sound pressure level L
pA
: 81.6
dB
Sound volume level L
WA
: 104
dB
Vibration a
va
:
< 2.5 m/s
2
Weight: 14
kg
7. Maintenance and cleaning
Important!
Maintenance and cleaning work on the equipment as
well as removal of the safety devices may only be
performed when the motor is switched off and the
power cable has been pulled.
Ensure that all mounting components (i.e. screws,
bolts, nuts etc.) are always tightened so that the
snow plow can be safely operated at all times.
Inspect the equipment and the power cable regularly.
Replace any damaged or worn parts before you
carry on with your work.
Do not clean the tool with running water - and
particularly with high-pressure. For best results,
clean the equipment with a brush or rag. Do not use
any solvents or water to remove dirt. Keeping your
snow plow in good condition not only ensures a long
lifespan, but also enables the equipment to
thoroughly clear your surfaces from snow with
minimal effort.
12
GB
Anleitung_ESF_1839_SPK7:_ 30.05.2007 17:30 Uhr Seite 12


