and then check the extent of the damage.
앬
When you start the motor the lawn mower must
not be tilted unless it has to be raised for this
purpose. In this case only tilt it up as far as is
really necessary and only raise the side that is
furthest away from the user.
앬
The lawn mower should not be tilted when the
motor is started except if it has to be raised for
starting purposes. In this case, tilt it as little as
absolutely necessary and only raise the side
opposite to that of the user. Always make sure
that both hands are in working position before
putting the machine down again.
앬
Ensure that all the nuts, bolts and screws are
tight and that the mower is in a safe condition for
use.
앬
Switch off the motor and disconnect the plug
from the power supply if the mower strikes a
foreign body. Check the mower for signs of
damage and carry out the necessary repair work
before you start work with the mower again.
앬
Do not leave the mower out in the rain. The lawn
must not be wet or very damp.
앬
Ensure that you have safe footing at all times
whilst working with the mower.
앬
Only push the mower at walking pace.
앬
Be particularly careful when changing direction
with the mower whilst working on a slope.
앬
Be particularly careful when you change the
direction of the mower or pull it towards you.
앬
Switch off the mower if it has to be tilted for t
ransport purposes, when you have to take it over
surfaces other than grass, and when moving the
mower to and from the area you wish to mow.
앬
Start or use the starter switch with care as
described in the manufacturer’s instructions.
Ensure that your feet are a safe distance from
the cutting tool.
앬
Never lift or carry the mower whilst the motor is
running.
앬
Switch the mower off before leaving it.
앬
Allow the motor to cool down before you place
the machine in enclosed rooms for storage.
앬
Check the grass bag at regular intervals for signs
of wear and to ensure that it is still in perfect
working order.
앬
Before you adjust or clean the mower or check
whether the mains lead is kinked or damaged,
switch off the mower and disconnect the plug
from the power supply.
앬
The connection sockets on the connectors must
be made of rubber, soft PVC or other
thermoplastic material with the same strength or
they must be coated with this material.
앬
Ensure that you do not push the mower over
routes that might hamper the free movement of
the extension cable.
앬
Do not switch the mower on and off frequently
over a short period of time, and in particular do
not play with the ON/OFF switch.
앬
As a result of the voltage fluctuations this mower
causes as it gets up to speed, other equipment
connected to the same circuit may suffer faults if
the mains supply is not in perfect condition. In
this case suitable action has to be taken (for
example connect the mower to a different circuit
or run the mower on a circuit with lower
impedance).
앬
Disconnect the plug from the power supply:
- whenever you leave the mower.
- if the mower starts to suffer unusual
vibrations (check immediately).
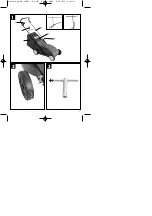
2. Assembly diagram (see Figure 1)
1. Switch-plug block
2. Stress relief clip
3. Wing nuts
4. Grass bag
5. Ejector flap
6. Central height adjuster
3. Proper usage
Power connection
The lawn mower can be connected to any socket
(with 230 V alternating current). However, only use a
socket with an earth connection protected by a cable
protection switch for 16 A and an RCCB with max. 30
mA.
A residual current device (RCD) circuit-breaker with
max. 30 mA must be connected on the line side in
addition.
Mower mains lead
Only use a mower mains lead that is in perfect
condition. The mains lead must not exceed a certain
length (max. 50m), since otherwise the power of the
electric motor will fall. The mains lead must have a
cross-section of 3 x 1.5mm
2
. Mains leads on lawn
mowers are particularly susceptible to insulation
damage.
The causes of this include the following:
- Cutting the cable by passing over it with the mower
- Damage through crushing if the mains lead is
routed under doors or windows
- Cracks caused by ageing of the insulation sheath
16
GB
Anleitung EM 1600-1 Z_SPK1 09.08.2006 9:14 Uhr Seite 16
Summary of Contents for 01045
Page 3: ...3 1 햲 햳 햴 햵 햶 햷 2 3 Anleitung EM 1600 1 Z_SPK1 09 08 2006 9 14 Uhr Seite 3 ...
Page 4: ...4 4 5 7 9 6 8 Anleitung EM 1600 1 Z_SPK1 09 08 2006 9 14 Uhr Seite 4 ...
Page 5: ...5 10 11 12 13 14 햲 햳 A 15 Anleitung EM 1600 1 Z_SPK1 09 08 2006 9 14 Uhr Seite 5 ...
Page 7: ...7 22 23 24 햳 햲 Anleitung EM 1600 1 Z_SPK1 09 08 2006 9 14 Uhr Seite 7 ...
Page 82: ...82 Anleitung EM 1600 1 Z_SPK1 09 08 2006 9 14 Uhr Seite 82 ...
Page 83: ...83 Anleitung EM 1600 1 Z_SPK1 09 08 2006 9 14 Uhr Seite 83 ...


